Inkscape
SVG images can best be edited with a drawing program that supports vector graphics. One such program is Inkscape, a free and open source vector graphics editor that uses SVG as its native file format, and is available for many platforms, including Microsoft Windows, macOS, and Linux. In this documentation, we’ll use Inkscape to create and edit SVG images.
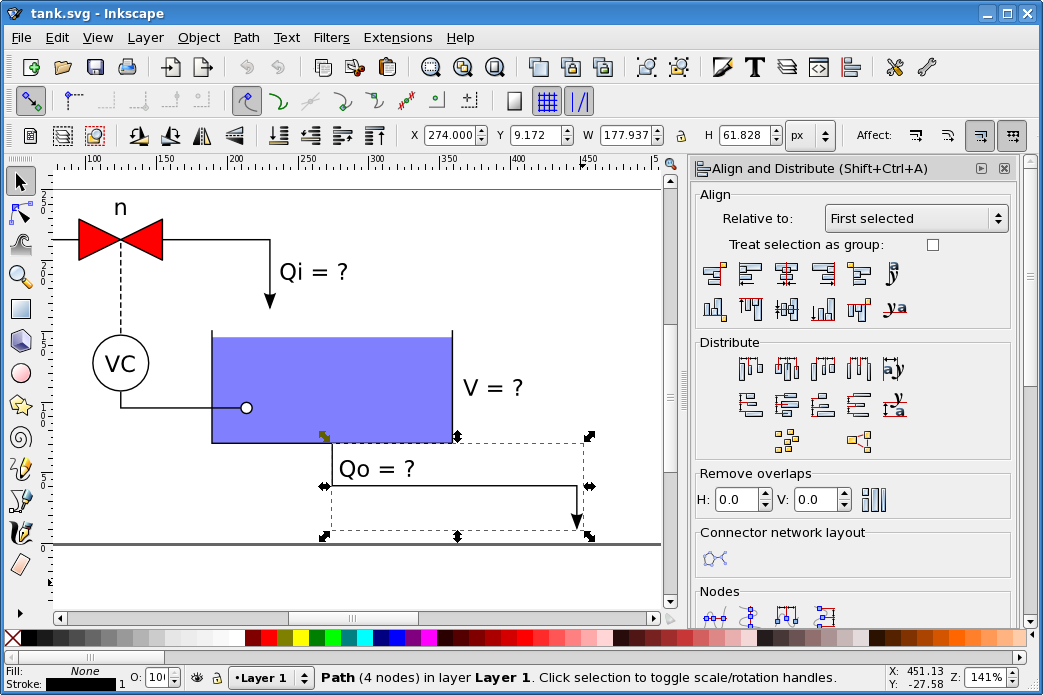
It is beyond the scope of this document to explain how Inkscape works. For that, see the Inkscape website. Here is a screenshot of the Inkscape interface:
Changing ids
As described on the page about SVG, every SVG object has an id. To change the id of an object in Inkscape, right click on the object, and choose Object Properties. The Object Properties window will appear, which looks like this:
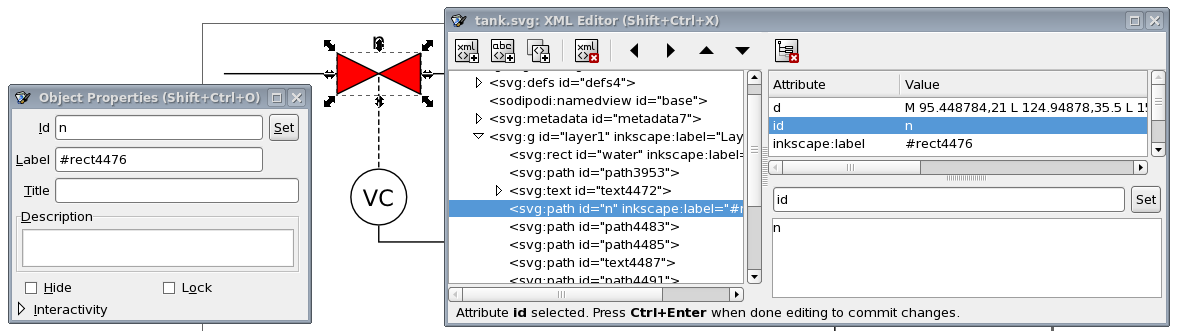
In this window, you can change the object’s id, by entering a new id in the Id field, and clicking the Set button.
XML editor
Inkscape also features an XML editor, that can be used to view and edit the underlying XML representation of the SVG image. The screenshot above also shows Inkscape’s XML Editor window, which can be opened via . The XML editor can be useful to find out the exact structure of the XML tree, and to see the precise definitions that were used to represent the objects that you created on Inkscape’s canvas.
Document size
It is recommended to always set the correct size of the image, before adding any shapes or text labels. To do this, select , to open the Document Properties window. On the Page tab, we recommend to set the Units to px. You can then enter the Width and Height of the image.
By default, Inkscape always adds a layer to new images. When changing the size of the image as described above, this layer gets a transform attribute that can cause all kinds of trouble later on. There are several ways to get rid of this transform attribute of the layer:
-
Select , to show the Layers panel. In that panel, select Layer 1 by clicking on it. Then click the Delete the current layer button to remove the selected layer.
-
Use the XML Editor to select the layer (
<svg:g id="layer1"… node). Then click the Delete node button at the top of the XML Editor window to remove the layer. Alternatively, after selecting the layer, press the Delete key on the keyboard to delete the selected layer. -
Use the XML Editor to select the layer (
<svg:g id="layer1"… node). Then, on the right, select thetransformattribute by clicking on it. Then click the Delete attribute button at the top of the XML Editor window to remove the attribute.
The first two approaches remove the layer, the third approach keeps the layer and only removes the transform attribute.
Alternatively, there is also a way to avoid the transform attribute from being added in the first place. Instead of using the Document Properties window to change the size of the image, do the following:
-
Use the XML Editor to select the entire image (
<svg:svg… node). -
Select the
widthattribute on the right, by clicking on it. -
Change the value in the text area at the lower right corner of the window.
-
Click the Set button to save the new width value. Alternatively, after typing the new value, press Ctrl+Enter to save the new width value.
-
Repeat for the
heightattribute.
Coordinate systems
The coordinate system used by Inkscape uses the lower left corner of the canvas as origin, while the underlying SVG representation uses the upper left corner of the canvas as origin. Also, Inkscape uses x and y coordinates of objects relative to the outside of their border (called stroke in Inkscape), while SVG uses x and y coordinates of objects relative to the middle of their border. These are two most commonly encountered differences between Inkscape and SVG. See the tank example for some tips and tricks regarding the difference in coordinate systems.
Text areas
When using the Inkscape text tool, select the tool, and left click once on the canvas to add a text label. Once you added it, start typing text.
Inkscape also allows you to select the text tool, left click anywhere on the canvas, drag the mouse pointer to another position, and only then release the left mouse button. This creates a text area, where text is automatically wrapped to multiple lines, so that it stays within the bounds of the text area. This feature uses SVG flowRoot elements. These elements are defined in version 1.2 of the SVG standard, which is currently still a working draft. These elements are not supported by the CIF simulator, which only supports version 1.1 of the SVG standard.
Using an SVG image with a flowRoot or other unsupported SVG feature, results in the following error when the SVG file is opened in Eclipse:
ERROR: SVG image file "some_image.svg" is not an SVG file, is an invalid SVG file, or contains unsupported SVG features.
CAUSE: invalid.element