Applications view
The Applications view can be used to manage the applications of the Eclipse ESCET software running within the Eclipse ESCET IDE.
Opening the view
The Applications view can be opened by selecting , assuming the ESCET perspective is enabled.
Application status
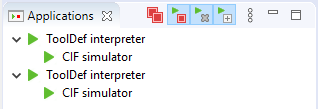
The view shows a list of running applications. If an application starts another application, it is shown as a child, forming a tree structure. Each item of the tree shows a single application. In the example screenshot above, there are four running applications. The first application is a ToolDef interpreter, which is running a second application, a CIF simulator. The third application is also a ToolDef interpreter, which is running a fourth application, also a CIF simulator.
To the left of each item, the status of the application is indicated. The following statuses are available:
 Staring
 Running
 Terminating
 Terminated
 Finished
 Failed
 Crashed
When an application is started, it get a Starting state. Once the options have been processed from the command line and the option dialog (if requested), the actual application code is executed, and the status changes to Running. If the application is not terminated at the request of the user, the application will be done with its execution after some time. If execution finished without problems, it then reaches status Finished. If execution failed for some reason, it reaches status Failed instead. If the execution crashed due to internal problems, the application reaches status Crashed. If however the user terminates the application, the status is first changed to Terminating. Once the application has successfully been terminated, the status changes to Terminated.
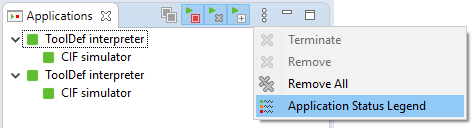
You can also view these statuses and their corresponding icons from within the IDE, by opening the Application Status Legend dialog, which is available via the view’s drop-down button popup menu:
Termination
The Applications view supports terminating running applications. There are several ways to terminate an application using the Applications view.
When terminating an application (with a Starting or Running state), the application will get a Terminating state. Applications occasionally poll for termination requests. Therefore, it may take a while for the application to actually process the termination request. Once it has been processed, the application will have terminated, and the status changes to Terminated as well.
Applications can’t process a termination request while a modal dialog (such as the option dialog) is open, or when input is requested from the console. They will terminate as soon as possible, after the dialog is closed, or the user has provided input via the console.
The following buttons related to termination are available in the Applications view’s toolbar:
Auto Terminate (
 )
)Most users will only want to have a single application running at a time, including application started by that application, etc. To facilitate this, the view provides an Auto Terminate feature. This feature can be enabled and disabled from the view’s toolbar. It is enabled by default. Your choice whether to enable or disable this option will be remembered, even after Eclipse is restarted. The feature only has an effect if the view is shown in at least one of the opened perspectives.
If enabled, and a new application (not started by another already running application) is started, all other already running applications are automatically terminated. The new application starts its execution immediately. The already running applications will start to process the termination request, and will terminate as soon as possible.
Terminate All (
 )
)The view’s toolbar contains a Terminate All button that can be used to terminate all running applications. The button is only enabled when at least one of the listed applications can be terminated. When clicked, all running applications are given a termination request, and will terminate as soon as possible.
Terminate (
 )
)The view’s drop-down button popup menu contains a Terminate item that can be used to terminate all selected applications that are running. The item is only enabled when at least one of the listed applications that is selected, can be terminated. When clicked, all selected applications that can be terminated, are given a termination request, and will terminate as soon as possible.
Even when a child application is selected, all applications in the entire tree, starting from the root, will be given a termination request, if not already terminated or having finished their execution. In other words, only an entire tree of related applications can be terminated.
Removal
The Applications view can get a bit crowded, if already terminated applications are not removed from the list. To keep only relevant applications, the Applications view supports removing items from the list.
Only applications which have finished execution can be removed. That is, the root of the tree of applications needs to have a Terminated, Finished, Failed, or Crashed status, for the tree to be allowed to be removed. This prevents removing applications that are still running, which would make it impossible to terminate them, or observe their status.
The following buttons related to removal are available in the Applications view’s toolbar:
Auto Remove (
 )
)Most users will only want to only have applications listed in the view, that are either still running, or have just finished execution. To facilitate this, the view provides an Auto Remove feature. This feature can be enabled and disabled from the view’s toolbar. It is enabled by default. Your choice whether to enable or disable this option will be remembered, even after Eclipse is restarted. The feature only has an effect if the view is shown in at least one of the opened perspectives.
If enabled, and a new application (not started by another already running application) is started, all already terminated applications, will be removed from the list. If combined with the Auto Terminate feature, all other applications that can not be removed immediately because they are still running, will be removed as soon as possible, after they have been terminated.
Remove All (
 )
)The view’s drop-down button popup menu contains a Remove All item that can be used to remove all listed applications that may be removed. The item is only enabled when at least one of the listed applications can be removed. When clicked, all listed applications that can be removed, are immediately removed from the list.
Remove (
 )
)The view’s drop-down button popup menu contains a Remove item that can be used to remove all selected applications that can be removed. The item is only enabled when at least one of the listed applications that is selected, can be removed. When clicked, all selected applications that can be removed, are immediately removed from the list.
Even when a child application is selected, all applications in the entire tree, starting from the root, will be removed. In other words, only an entire tree of related applications can be removed, and only if all applications in that tree have finished execution.
Expansion
When one application starts another application, they are listed in a tree, with the parent containing the child. When running a single application, it may be of interest to see which child applications are being executed by the parent application. However, when executing multiple applications, this may quickly crowd the view. It may then be better to keep all root items collapsed, only showing the status of the root applications. This provides an overview over those multiple applications.
The following buttons related to expansion are available in the Applications view’s toolbar:
Auto Expand (
 )
)Most users will have the Auto Terminate and Auto Remove features enabled, and will thus only have a single application listed. They will want to automatically expand a parent application, to show its children. To facilitate this, the view provides an Auto Expand feature. This feature can be enabled and disabled from the view’s toolbar. It is enabled by default. Your choice whether to enable or disable this option will be remembered, even after Eclipse is restarted. The feature only has an effect if the view is shown in at least one of the opened perspectives.
If enabled, and a parent application starts a child application, the item for the parent application in the view, is automatically expanded to show its children. If disabled, no items will be automatically expanded.