Digital twins of devices connected via LoRaWAN to TTN
Published by 
A workshop of the 2020 The Things Virtual Conference on April 16th 2020 is/was about how to connect Eclipse Ditto to “The Things Network” via TTN’s MQTT broker in order to automatically update digital twins of devices connected via LoRaWAN to the TTN backend.
You can find the slides here.
This blogpost helps setting up this kind of connection and shall also be used as a step-by-step tutorial during the workshop.
Requirements
You’ll need:
- an operating system capable of running Docker (best use a Linux distribution)
- 4 CPU cores and 4GB of RAM are advised (less can work, but the Ditto cluster startup is more fragile then)
- to have installed:
curlandgit
Also, you’ll need a TTN account and an existing application with at least one device if you want to follow the hands-on part and want to create digital twins of your devices connected to TTN.
Preparation
Please follow these initial preparation steps (if you don’t already have Docker and Docker Compose installed).
When you have access to a Kubernetes cluster and already have worked with Helm (the package manager for Kubernetes), you can alternatively install Ditto via its official Helm chart.
Install Docker
Assumption: You’re running a Debian or Ubuntu based Linux distribution containing the apt package manager.
sudo apt install docker.io
sudo service docker start
sudo usermod -a -G docker <your-username>
Logout and login again so that your user gets the “docker” group.
Install Docker Compose
Follow the installation guide here, in short:
sudo curl -L "https://github.com/docker/compose/releases/download/1.25.4/docker-compose-$(uname -s)-$(uname -m)" -o /usr/local/bin/docker-compose
sudo chmod +x /usr/local/bin/docker-compose
Clone Ditto codebase
That is required to get the docker-compose.yaml file and other resources required to run Ditto with Docker Compose.
git clone --depth 1 https://github.com/eclipse-ditto/ditto.git
Startup Ditto cluster
Change directory into the just cloned git repository - optionally adjust the DITTO_EXTERNAL_PORT variable to where
Ditto is reachable after the start:
cd ditto/deployment/docker/
export DITTO_EXTERNAL_PORT=80
docker-compose up -d
Verify that Ditto is running:
docker-compose ps
The output should look similar like this:
         Name                       Command               State           Ports
----------------------------------------------------------------------------------------
docker_concierge_1       /sbin/tini -- java -jar st ...   Up      8080/tcp
docker_connectivity_1    /sbin/tini -- java -jar st ...   Up      8080/tcp
docker_gateway_1         /sbin/tini -- java -Dditto ...   Up      0.0.0.0:8081->8080/tcp
docker_mongodb_1         docker-entrypoint.sh mongo ...   Up      27017/tcp
docker_nginx_1           nginx -g daemon off;             Up      0.0.0.0:80->80/tcp
docker_policies_1        /sbin/tini -- java -jar st ...   Up      8080/tcp
docker_swagger-ui_1      nginx -g daemon off;             Up      80/tcp, 8080/tcp
docker_things-search_1   /sbin/tini -- java -jar st ...   Up      8080/tcp
docker_things_1          /sbin/tini -- java -jar st ...   Up      8080/tcp
Verify that your Ditto cluster is healthy. Please give it ~1 minute in order to properly start up.
curl -u devops:foobar http://localhost:${DITTO_EXTERNAL_PORT}/status/health
The returned output should start with:
{"label":"roles","status":"UP", ... }
If your Ditto cluster has trouble starting up (e.g. because you only have less CPU cores than advised), try the following startup command instead:
docker-compose start mongodb; sleep 30; docker-compose start policies things; sleep 60; docker-compose start concierge; sleep 60; docker-compose start things-search; sleep 60; docker-compose start connectivity; sleep 60; docker-compose up -d
Configure connection to TTN MQTT broker
The Things Network provides a built in MQTT broker which you can connect to using your TTN application credentials. For a more detailed description on that topic, please refer to the TTN MQTT Quick Start.
Eclipse Ditto can establish connections to MQTT brokers. This is a schematic picture of what we now will do:
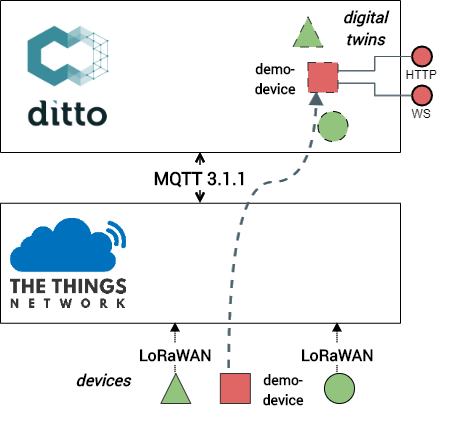
In order to connect to your own TTN application, perform the following steps.
You can find the <AppId> (application ID) and <AppKey> (access key) in your TTN console of your application.
For <Region>, e.g. choose 'eu' when your application is in handled by the Handler ‘ttn-handler-eu’.
Please export your application’s credentials locally to environment variables:
export TTN_REGION='<Region>'
export TTN_APP_ID='<AppID>'
export TTN_APP_KEY='<AppKey>'
After having done that, you can already create the connection of Ditto to the TTN MQTT broker:
curl -X POST -u devops:foobar -H 'Content-Type: application/json' -d '{
    "targetActorSelection": "/system/sharding/connection",
    "headers": {
        "aggregate": false
    },
    "piggybackCommand": {
        "type": "connectivity.commands:createConnection",
        "connection": {
            "id": "ttn-connection-via-mqtt",
            "name": "TTN-MQTT",
            "connectionType": "mqtt",
            "connectionStatus": "open",
            "uri": "tcp://'"${TTN_APP_ID}"':'"${TTN_APP_KEY}"'@'"${TTN_REGION}"'.thethings.network:1883",
            "failoverEnabled": true,
            "clientCount": 1,
            "validateCertificates": false,
            "sources": [{
                "addresses": [
                    "'"${TTN_APP_ID}"'/devices/+/up"
                ],
                "consumerCount": 1,
                "qos": 0,
                "authorizationContext": [
                  "pre-authenticated:ttn-connection"
                ],
                "enforcement": {
                    "input": "{{ source:address }}",
                    "filters": [
                        "'"${TTN_APP_ID}"'/devices/{{ thing:name }}/up"
                    ]
                },
                "replyTarget": {
                    "enabled": false
                },
                "payloadMapping": [
                    "ttn-demo-mapping"
                ]
            }],
            "mappingDefinitions": {
                "ttn-demo-mapping": {
                     "mappingEngine": "JavaScript",
                     "options": {
                         "incomingScript": "function mapToDittoProtocolMsg(\n  headers,\n  textPayload,\n  bytePayload,\n  contentType\n) {\n\n  let ttnJson = JSON.parse(textPayload);\n  let deviceId = ttnJson['"'"'dev_id'"'"'];\n  let payloadFields = ttnJson['"'"'payload_fields'"'"'];\n  \n  let attributesObj = {\n    hardwareSerial: ttnJson['"'"'hardware_serial'"'"'],\n    ttnCounter: ttnJson['"'"'counter'"'"']\n  };\n  \n  let featuresObj = {\n    temperature: {\n      properties: {\n        value: payloadFields['"'"'temperature_7'"'"']\n      }\n    },\n    pressure: {\n      properties: {\n        value: payloadFields['"'"'barometric_pressure_10'"'"']\n      }\n    },\n    humidity: {\n      properties: {\n        value: payloadFields['"'"'relative_humidity_8'"'"']\n      }\n    }\n  };\n  \n  let thing = {\n    attributes: attributesObj,\n    features: featuresObj\n  };\n  \n  let dittoHeaders = {\n    '"'"'response-required'"'"': false,\n    '"'"'If-Match'"'"': '"'"'*'"'"'\n  };\n\n  return Ditto.buildDittoProtocolMsg(\n    '"'"'org.eclipse.ditto.ttn.demo'"'"',\n    deviceId,\n    '"'"'things'"'"',\n    '"'"'twin'"'"',\n    '"'"'commands'"'"',\n    '"'"'modify'"'"',\n    '"'"'/'"'"',\n    dittoHeaders,\n    thing\n  );\n}",
                         "outgoingScript": "function mapFromDittoProtocolMsg() { return null; }",
                         "loadBytebufferJS": "false",
                         "loadLongJS": "false"
                     }
                }
            }
        }
    }
}' http://localhost:${DITTO_EXTERNAL_PORT}/devops/piggyback/connectivity?timeout=8s
Explanation - what is done here:
- using curl with the
devops(admin) user and its initial passwordfoobarwe create a connection of typemqtt(you can find further information on that in Ditto’s MQTT docs) - we use the TTN application credentials in the configured
"uri", connect via plain TCP (SSL is also possible but in this case a little more complicated as the server certificate of the TTN MQTT broker would have to be imported) - we add an entry in
"sources":- defining the MQTT topic (
"addresses") to subscribe to - specifying in which
"authorizationContext"messages from this connection shall be executed - defining in the
"enforcement"that, based on the MQTT topic, a device may only update the Ditto twin having the same name - declaring that a custom payload mapping shall be applied for each incoming message
- defining the MQTT topic (
- in the
"mappingDefinitions"we define the previously used “ttn-demo-mapping” as JavaScript based mapping:- only an “incoming” script is defined as we don’t handle downstream messages to TTN in this example
- when you want to understand the script in more depth, please take a look at the details about it
payload_fields for your TTN devices, please adjust the script
if you want to see the device’s custom payload fields in your Ditto twins.Create a common policy for the twins to be created
Eclipse Ditto secures each API access to the managed twins by applying authorization of the authenticated user.
Those “rules” which authenticated user may access which twins are defined in Policies.
In order to proceed with our scenario, we create a single Policy which shall be used for all twins we create in a later step:
curl -X PUT -u ditto:ditto -H 'Content-Type: application/json' -d '{
   "policyId": "org.eclipse.ditto.ttn.demo:twin-policy",
   "entries": {
       "USER": {
           "subjects": {
              "nginx:ditto": {
                  "type": "basic auth user authenticated via nginx"
              }
           },
           "resources": {
               "thing:/": {
                   "grant": ["READ", "WRITE"],
                   "revoke": []
               },
               "policy:/": {
                   "grant": ["READ", "WRITE"],
                   "revoke": []
               },
               "message:/": {
                   "grant": ["READ", "WRITE"],
                   "revoke": []
               }
           }
       },
       "TTN": {
           "subjects": {
              "pre-authenticated:ttn-connection": {
                  "type": "used in the connections authorizationContext to the TTN MQTT"
              }
           },
           "resources": {
               "thing:/": {
                   "grant": ["WRITE"],
                   "revoke": []
               }
           }
       }
   }
}' http://localhost:${DITTO_EXTERNAL_PORT}/api/2/policies/org.eclipse.ditto.ttn.demo:twin-policy
Explanation - what is done here:
- we create a new Policy with the ID
"org.eclipse.ditto.ttn.demo:twin-policy" - it contains 2 entries:
"USER": this Policy entry contains the authorization information of the user of the twin APIs (authenticated via the contained “nginx” acting as reverse proxy). This user may READ+WRITE the things (twins), this created policy and may also send and receive messages."TTN": this Policy entry contains the authorization information of the connection to the TTN MQTT broker (the subject was configured as"authorizationContext"when we created the connection. This connection may only WRITE (update) the things (twins).
Create digital twins
Now we have everything in place in order to create digital twins for our devices connected to TTN.
Please export all device ids you want to create digital twins for as comma separated environment variable:
export TTN_DEVICE_IDS='<comma-separated-list-of-your-device-ids>'
After having done that, we can already create the twins in Ditto as the ditto user:
for dev_id in ${TTN_DEVICE_IDS//,/ }
do
    # call your procedure/other scripts here below
    echo "Creating digital twin with Thing ID: org.eclipse.ditto.ttn.demo:$dev_id"
    curl -X PUT -u ditto:ditto -H 'Content-Type: application/json' -d '{
       "policyId": "org.eclipse.ditto.ttn.demo:twin-policy"
    }' http://localhost:${DITTO_EXTERNAL_PORT}/api/2/things/org.eclipse.ditto.ttn.demo:$dev_id
done
Explanation - what is done here:
- we split the passed in
TTN_DEVICE_IDSenvironment variable by,and iterate over all contained device ids - for each device ID we create a new Thing (twin) referencing the already previously created Policy
Access your digital twins via API
Congratulations, if you have done it so far your TTN devices do now have digital twin representations in Eclipse Ditto.
jq and pipe the output of the below curl commands to it in order to get
prettified and colored JSONcurl, you may also use the locally deployed swagger-ui at http://localhost:${DITTO_EXTERNAL_PORT}/apidoc/
in order to try out Ditto’s HTTP API - make sure to select /api/2 - local Ditto in the ‘Servers’
section - when asked for credentials, use username ‘ditto’ and password ‘ditto’You can now, for example, use Ditto’s HTTP APIs in order
- to retrieve the latest reported values:
curl -u ditto:ditto http://localhost:${DITTO_EXTERNAL_PORT}/api/2/things/org.eclipse.ditto.ttn.demo:<dev_id> - to get a live stream of updates to the twins using SSE (Server Sent Events):
curl --http2 -u ditto:ditto -H 'Accept:text/event-stream' -N http://localhost:${DITTO_EXTERNAL_PORT}/api/2/things - to list all available twins via the search API:
curl -u ditto:ditto http://localhost:${DITTO_EXTERNAL_PORT}/api/2/search/things- alternatively, use your browser and open http://localhost:${DITTO_EXTERNAL_PORT}/api/2/search/things
- when asked for credentials, use username “ditto” and password “ditto”
- formulate a search query, e.g. only searching for twins with a temperature above 24°, sorted by the last modification, the most recent first
to get the most active twin as first result:
curl -u ditto:ditto "http://localhost:${DITTO_EXTERNAL_PORT}/api/2/search/things?filter=gt(features/temperature/properties/value,24.0)&option=sort(-_modified),size(5)&fields=thingId,policyId,attributes,features,_modified,_revision"
Which other possibilities do we now have?
Now you have all the possibilities Eclipse Ditto as digital twin framework provides, e.g.:
- directly use your device’s data in a web application consuming Ditto’s HTTP API
- directly use your device’s data in a mobile app using Ditto’s bidirectional WebSocket
- make use of the Eclipse Ditto Java or JavaScript clients which also use the WebSocket to integrate your device’s data
- create another connection (optionally also applying JavaScript based payload mapping)
- to e.g. Apache Kafka and forward all the modifications made to your devices to there
- or using HTTP push in order to call another HTTP API (e.g. insert time series data into an InfluxDB via its HTTP API)
For time reasons we do not go deeper into additional topics, they are possible however, please consult the Ditto documentation:
- the WebSocket channel and subscribing for change notifications
- sending downward messages to devices
- live commands (not retrieving persisted data of devices, but live data)
- a more detailed introduction into authentication mechanisms (OpenID Connect with OAuth2.0 is possible)
- possibilities to configure your Policies on every resource level, e.g. allowing individuals to only access certain values of a twin
- and many other things..
Additional resources
Cleanup after the workshop
Simply perform in the ditto/deployment/docker folder:
docker-compose down
And unistall docker + docker-compose (for docker-compose, just remove the downloaded file) again, if you don’t need it.
JavaScript payload mapping script in detail
Similar to the TTN console’s decoding/converting capabilities of “Payload Formats” of an TTN application, Ditto is able
to apply a custom JavaScript function for each consumed message.
That is necessary in order to convert the received data into a Ditto Protocol message
including the JSON hierarchy of a so called Thing being the representation of a digital twin.
As the above injected JavaScript payload mapping script is formatted in a single line, this is the script we used pretty formatted, including the jsdoc of the provided function and some other inline comments.
If you need to adjust the script in order to use your own payload_fields, please replace all newlines with \n and
escape the single quotes ' in the script with the following replacement: '"'"'. Otherwise the single quotes won’t get
correctly escaped in the bash. You can remove the comments before making a single line of the script.
/**
 * Maps the passed parameters to a Ditto Protocol message.
 * @param {Object.<string, string>} headers - The headers Object containing all received header values
 * @param {string} [textPayload] - The String to be mapped
 * @param {ArrayBuffer} [bytePayload] - The bytes to be mapped as ArrayBuffer
 * @param {string} [contentType] - The received Content-Type, e.g. "application/json"
 * @returns {(DittoProtocolMessage|Array<DittoProtocolMessage>)} dittoProtocolMessage(s) -
 *  The mapped Ditto Protocol message,
 *  an array of Ditto Protocol messages or
 *  <code>null</code> if the message could/should not be mapped
 */
function mapToDittoProtocolMsg(
  headers,
  textPayload,
  bytePayload,
  contentType
) {

  let ttnJson = JSON.parse(textPayload);          // we simply parse the incoming TTN message as JSON
  let deviceId = ttnJson['dev_id'];               // and extract some fields we require
  let payloadFields = ttnJson['payload_fields'];  // the 'payload_fields' content is - obviously - different for your application

  let attributesObj = {                           // the attributes of a Thing are meant for unstructured data
    hardwareSerial: ttnJson['hardware_serial'],
    ttnCounter: ttnJson['counter']
  };

  let featuresObj = {                             // the features of a Thing e.g. contain sensor data of devices
    temperature: {
      properties: {
        value: payloadFields['temperature_7']
      }
    },
    pressure: {
      properties: {
        value: payloadFields['barometric_pressure_10']
      }
    },
    humidity: {
      properties: {
        value: payloadFields['relative_humidity_8']
      }
    }
  };

  let thing = {                                   // a Thing can contain both attributes and features
    attributes: attributesObj,
    features: featuresObj
  };

  let dittoHeaders = {
    'response-required': false,     // we don't expect a response sent back to TTN
    'If-Match': '*'                 // we only want to update the thing if it already exists
  };

  return Ditto.buildDittoProtocolMsg(
    'org.eclipse.ditto.ttn.demo',   // this is the namespace used as prefix for Ditto Thing IDs
    deviceId,                       // the TTN device ID is used as "name" part of the Ditto Thing ID
    'things',
    'twin',
    'commands',
    'modify',
    '/',
    dittoHeaders,
    thing
  );
}
An example message received from the TTN MQTT broker:
{
  "app_id": "iot-campus-be12",
  "dev_id": "node0",
  "hardware_serial": "70B3D5499A2D3954",
  "port": 2,
  "counter": 9449,
  "payload_raw": "B2cA6AhoKwpzJ8oEAwH4",
  "payload_fields": {
    "analog_out_4": 5.04,
    "barometric_pressure_10": 1018.6,
    "relative_humidity_8": 21.5,
    "temperature_7": 23.2
  },
  "metadata": {
    ...
  }
}
would be transformed to the following Ditto Protocol message:
{
  "topic": "org.eclipse.ditto/node0/things/twin/commands/modify",
  "path": "/",
  "value": {
    "attributes": {
      "hardwareSerial": "70B3D5499A2D3954",
      "ttnCounter": 9449
    },
    "features": {
      "temperature": {
         "properties": {
          "value": 23.2
        }
      },
      "pressure": {
        "properties": {
          "value": 1018.6
        }
      },
      "humidity": {
        "properties": {
          "value": 21.5
        }
      }
    }
  }
}

–
The Eclipse Ditto team