
| Eclipse Corner Article |
Summary
In the Eclipse Platform a view is typically used to navigate a hierarchy of information, open an editor, or display properties for the active editor. In this article the design and implementation of a view will be examined in detail. You'll learn how to create a simple view based on SWT, and a more advanced view using the JFace viewer hierarchy. We'll also look at ways to achieve good integration with many of the existing features in the workbench, such as the window menu and toolbar, view linking, workbench persistence and action extension.By Dave Springgay, OTI
November 2, 2001
The workbench contains a number of standard components which demonstrate the role of a view. For instance, the Navigator view is used to display and navigate through the workspace. If you select a file in the Navigator, you can open an editor on the contents of the file. Once an editor is open, you can navigate the structure in the editor data using the Outline view, or edit the properties of the file contents using the Properties view.
In this article we'll look at how you, as a plug-in developer, can add new views to the workbench. First we'll examine the process through the creation of a simple Label view. This view just displays the words "Hello World". Then we'll design and implement a more comprehensive view, called Word view, which displays a list of words which can be modified through addition and deletion. And finally, we'll look at ways to achieve good integration with many of the existing features in the workbench.
To run the example or view the source for code for this article you can unzip viewArticleSrc.zip into your plugins/ subdirectory.
To illustrate this process we'll define a view called "Label", which
just displays the words "Hello World".
<?xml version="1.0" encoding="UTF-8"?>
<plugin
   name="Views Plugin"
   id="org.eclipse.ui.articles.views"
   version="1.0.0"
   provider-name="OTI">

<requires>
        <import plugin="org.eclipse.core.boot"/>
        <import plugin="org.eclipse.core.runtime"/>
        <import plugin="org.eclipse.core.resources"/>
        <import plugin="org.eclipse.swt"/>
        <import plugin="org.eclipse.ui"/>
</requires>

<runtime>
        <library name="views.jar"/>
</runtime>

</plugin>
<extension point="org.eclipse.ui.views"> <view id="org.eclipse.ui.articles.views.labelview" name="Label View"A complete description of the view extension point and the syntax are available in the developer documentation for org.eclipse.ui. The attributes are described as follows.class="org.eclipse.ui.articles.views.LabelView"
icon="icons\view.gif"/> </extension>
Perhaps the most important attribute is class (![]() ).
This attribute must contain the fully qualified name of a class that implements
org.eclipse.ui.IViewPart.
The IViewPart interface defines the minimal responsibilities of
the view, the chief one being to create an SWT Control within the workbench.
This provides the presentation for an underlying model. In the XML
above, the class for the Label view is defined as org.eclipse.ui.articles.views.LabelView.
The implementation of LabelView will be examined in a few paragraphs.
).
This attribute must contain the fully qualified name of a class that implements
org.eclipse.ui.IViewPart.
The IViewPart interface defines the minimal responsibilities of
the view, the chief one being to create an SWT Control within the workbench.
This provides the presentation for an underlying model. In the XML
above, the class for the Label view is defined as org.eclipse.ui.articles.views.LabelView.
The implementation of LabelView will be examined in a few paragraphs.
The icon attribute (![]() )
contains the name of an image that will be associated with the view.
This image must exist within the plugin directory or one of the sub directories.
)
contains the name of an image that will be associated with the view.
This image must exist within the plugin directory or one of the sub directories.
package org.eclipse.ui.articles.views;

import org.eclipse.swt.widgets.*;
import org.eclipse.ui.part.ViewPart;

public class LabelView extends ViewPart {
        private Label label;
        public LabelView() {
                super();
        }
     public void setFocus() {
                label.setFocus();
        }
     public void createPartControl(Composite parent) {
                label = new Label(parent, 0);
                label.setText("Hello World");
        }

}
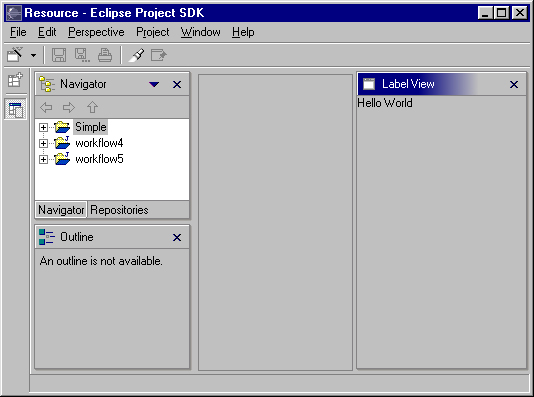
Once the LabelView class has been declared and compiled, we can test the
results. To do this, invoke the Perspective > Show View > Other menu
item. A dialog will appear containing all of the view extensions:
the Label View item will appear in the Other category. If you select
the Label View item and press OK, the view will be instantiated and opened
in the current perspective. Here is a screen snapshot of the Label
view after it has been opened within the Resource perspective.
When the view is closed the lifecycle is completed.
As a plugin developer, you may also define a new perspective which contains your view, or add your view to a perspective which has been contributed by another plug-in. In either case, you have greater control over view position. For more information about the use of perspectives see Using Perspectives in the Eclipse UI.
<extension point="org.eclipse.ui.views">
public class WordView extends ViewPart
{
WordFile input;
ListViewer viewer;
Action addItemAction, deleteItemAction, selectAllAction;
IMemento memento;
/**
* Constructor
*/
public WordView() {
super();
input = new WordFile(new File("list.lst"));
}
/**
* @see IViewPart.init(IViewSite)
*/
public void init(IViewSite site) throws PartInitException {
super.init(site);
// Normally we might do other stuff here.
}
/**
* @see IWorkbenchPart#createPartControl(Composite)
*/
 public void createPartControl(Composite parent) {
// Create viewer.
public void createPartControl(Composite parent) {
// Create viewer.
 viewer = new ListViewer(parent);
viewer.setContentProvider(new WordContentProvider());
viewer.setLabelProvider(new LabelProvider());
viewer.setInput(input);
// Create menu and toolbars.
viewer = new ListViewer(parent);
viewer.setContentProvider(new WordContentProvider());
viewer.setLabelProvider(new LabelProvider());
viewer.setInput(input);
// Create menu and toolbars.
 createActions();
createMenu();
createToolbar();
createContextMenu();
hookGlobalActions();
// Restore state from the previous session.
createActions();
createMenu();
createToolbar();
createContextMenu();
hookGlobalActions();
// Restore state from the previous session.
 restoreState();
}
/**
* @see WorkbenchPart#setFocus()
*/
public void setFocus() {
viewer.getControl().setFocus();
}
restoreState();
}
/**
* @see WorkbenchPart#setFocus()
*/
public void setFocus() {
viewer.getControl().setFocus();
}
In the WordView constructor, the model, a WordFile, is
created (After the view is instantiated, the IViewPart.init method is
called with an IViewSite (![]() ).
The site is the primary interface between the view part and the outside
world. Given the site, you can access the view menu, toolbar, status
line, containing page, containing window, shell, etc. In the code
above we simply call the superclass, ViewPart, where the site is stored
in an instance variable. It can be retrieved at any time by calling
getViewSite().
).
The site is the primary interface between the view part and the outside
world. Given the site, you can access the view menu, toolbar, status
line, containing page, containing window, shell, etc. In the code
above we simply call the superclass, ViewPart, where the site is stored
in an instance variable. It can be retrieved at any time by calling
getViewSite().
The createPartControl method (![]() )
is called to create an SWT Control for the WordFile model.
The creation of this presentation can be done with raw SWT widgets.
However, the platform UI contains a class framework, known as JFace, which
provides a viewer hierarchy for list, tree, table, and text widgets.
A viewer is a wrapper for an SWT control, adding a model based interface
to it. If you need to display a simple list model, tree model,
or table model, use a viewer. Otherwise, it is probably easier to
use raw SWT widgets. In the Word view the model is a simple list
of words, so a ListViewer is used for the presentation.
)
is called to create an SWT Control for the WordFile model.
The creation of this presentation can be done with raw SWT widgets.
However, the platform UI contains a class framework, known as JFace, which
provides a viewer hierarchy for list, tree, table, and text widgets.
A viewer is a wrapper for an SWT control, adding a model based interface
to it. If you need to display a simple list model, tree model,
or table model, use a viewer. Otherwise, it is probably easier to
use raw SWT widgets. In the Word view the model is a simple list
of words, so a ListViewer is used for the presentation.
On the first line of createPartControl the ListViewer
is created (![]() ).
The constructor chosen here automatically creates an SWT List control in
the parent. Then a content provider is defined. A content
provider is an adapter for a domain specific model, wrapping it in an abstract
interface which the viewer invokes to get the model root and its children.
If the model (the WordFile) changes, the content provider will
also refresh the state of the ListViewer to make the changes visible.
A label provider is also defined. This serves up a label and
image for each object which is supplied by the content provider.
And finally, we set the input for the ListViewer. The input
is just the
WordFile created in the WordView constructor.
).
The constructor chosen here automatically creates an SWT List control in
the parent. Then a content provider is defined. A content
provider is an adapter for a domain specific model, wrapping it in an abstract
interface which the viewer invokes to get the model root and its children.
If the model (the WordFile) changes, the content provider will
also refresh the state of the ListViewer to make the changes visible.
A label provider is also defined. This serves up a label and
image for each object which is supplied by the content provider.
And finally, we set the input for the ListViewer. The input
is just the
WordFile created in the WordView constructor.
The createPartControl method also contains several method calls for
the creation of a menu, toolbar, context menu, and global actions (![]() ).
These methods will be examined in later sections. For now, it is sufficient
to say that each view has a local menu and toolbar which appear in the view
title area. The view itself may contribute menu and toolbar items to these
areas. The view may define a context menu (pop-up menu) for each control
it creates, or hook a global action in the parent window. A global
action refers to those actions in the window menu and toolbar which are
always visible, but delegate their implementation to the active part.
For instance, the Cut, Copy and Paste actions are always visible in the Edit
menu. If invoked, their implementation is delegated to the active part.
The last line (
).
These methods will be examined in later sections. For now, it is sufficient
to say that each view has a local menu and toolbar which appear in the view
title area. The view itself may contribute menu and toolbar items to these
areas. The view may define a context menu (pop-up menu) for each control
it creates, or hook a global action in the parent window. A global
action refers to those actions in the window menu and toolbar which are
always visible, but delegate their implementation to the active part.
For instance, the Cut, Copy and Paste actions are always visible in the Edit
menu. If invoked, their implementation is delegated to the active part.
The last line (![]() ) relates
to state persistence between sessions. We will examine the code for each
of these features in later sections.
) relates
to state persistence between sessions. We will examine the code for each
of these features in later sections.
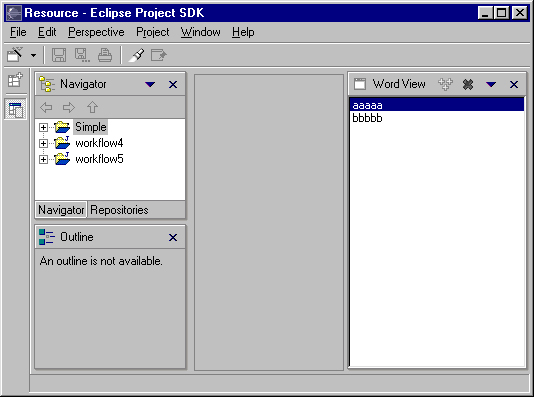
Once the Word view has been declared and compiled we can test the results. To do this, invoke Perspective > Show View > Other, and then select the Word View in the Show View dialog. The Word view will appear in the Resource perspective, as shown below.
But first, some background information. Each view has a local menu and toolbar. The toolbar is located to the right of the view caption. The menu is initially invisible, but becomes visible if you click on the menu button, which is just to the left of the close button. For instance, here is a snapshot of the Word view with the menu and toolbar we are about to define.
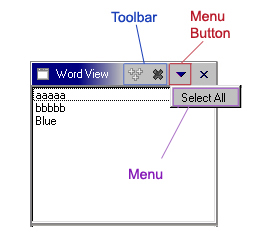
The menu and toolbar controls for a view are initially empty and invisible. As the view adds items to each, the menu or toolbar will become visible. A view can also contribute items to the status line which appears at the bottom of the parent window. Together, the local menu, toolbar and status line are known as the action bars.
In code, access to the action bars is provided by the view site. The site is the primary interface between the view part and the outside world. If your view is a subclass of ViewPart, the site can be accessed by calling ViewPart.getViewSite. If not, then you must manage your own storage and retrieval of the site, which is passed to the view in the IViewPart.init method. Given the site, you can call getActionBars().getMenuManager to get an IMenuManager, or getActionBars().getToolBarManager() to get an IToolBarManager.
The IMenuManager and IToolBarManager interfaces are a JFace abstraction. They wrap an SWT Menu or Toolbar object so that you, the developer, can think in terms of action and action contribution. An action represents a command which can be triggered by the user from a menu or toolbar. It has a run method, plus other methods which return the menu or tool item presentation (text, image, etc.). In JFace, you create a menu or toolbar by adding instances of org.eclipse.jface.action.IAction to an IMenuManager or IToolBarManager.
In the WordView class, the actions are created in the createActions
method (shown below), which is called from createPartControl. For
simplicity, each action is defined as anonymous subclass (![]() )
of org.eclipse.jface.actions.Action. We override the run
method (
)
of org.eclipse.jface.actions.Action. We override the run
method (![]() ) to implement
the actual behavior of the action.
) to implement
the actual behavior of the action.
        public void createActions() {
             addItemAction = new Action("Add...") {
                     public void run() {
                                addItem();
                        }
                };
             addItemAction.setImageDescriptor(getImageDescriptor("add.gif"));
                deleteItemAction = new Action("Delete") {
                        public void run() {
                                deleteItem();
                        }
                };
                deleteItemAction.setImageDescriptor(getImageDescriptor("delete.gif"));
                selectAllAction = new Action("Select All") {
                        public void run() {
                                selectAll();
                        }
                };

                // Add selection listener.
             viewer.addSelectionChangedListener(new ISelectionChangedListener() {
                        public void selectionChanged(SelectionChangedEvent event) {
                                updateActionEnablement();
                        }
                });
        }
The label of each action is defined in the action constructor ( /**
* Returns the image descriptor with the given relative path.
*/
private ImageDescriptor getImageDescriptor(String relativePath) {
String iconPath = "icons/";
try {
ViewsPlugin plugin = ViewsPlugin.getDefault();
URL installURL = plugin.getDescriptor().getInstallURL();
URL url = new URL(installURL, iconPath + relativePath);
return ImageDescriptor.createFromURL(url);
}
catch (MalformedURLException e) {
// should not happen
return ImageDescriptor.getMissingImageDescriptor();
}
}
On the last line of createActions (![]() ),
a selection listener is created and added to the list viewer. In
general, the enablement state of a menu or tool item should reflect the
view selection. If a selection occurs in the Word view, the enablement
state of each action will be updated in the updateActionEnablement method
(shown below).
),
a selection listener is created and added to the list viewer. In
general, the enablement state of a menu or tool item should reflect the
view selection. If a selection occurs in the Word view, the enablement
state of each action will be updated in the updateActionEnablement method
(shown below).
        private void updateActionEnablement() {
                IStructuredSelection sel =
                        (IStructuredSelection)viewer.getSelection();
                deleteItemAction.setEnabled(sel.size() > 0);
        }
The approach taken for action enablement in the Word view is just
one way to go. It is also possible to imagine an implementation where
each action is a selection listener, and will enable itself to reflect
the selection. This approach would make the actions reusable beyond
the context of the original view.
        /**
         * Create menu.
         */
        private void createMenu() {
                IMenuManager mgr = getViewSite().getActionBars().getMenuManager();
                mgr.add(selectAllAction);
        }

        /**
         * Create toolbar.
         */
        private void createToolbar() {
                IToolBarManager mgr = getViewSite().getActionBars().getToolBarManager();
                mgr.add(addItemAction);
                mgr.add(deleteItemAction);
        }
At this point the definition of the menu and toolbar are complete.
If the Word view is opened in the workbench, the toolbar will be populated
with the Add and Delete items. If you click the down arrow for the
menu, you will see the Select All item there.
But first, some background info. One of the primary goals for the platform UI is extensibility. In fact, it is this extensibility which gives you the freedom to add new views, editors, perspectives, actions, etc., to the platform. Of course, extensibility is a two way street. While you may wish to extend the platform, others may wish to extend your view. It is common for one plug-in to add actions to the menu, toolbar, or context menu of a view from another plugin.
Support for context menu extension is accomplished by collaboration between the view and the platform. In contrast to the local menu and toolbar for each view, which are created by the platform and populated by the view, each context menu within a view must be created by the view itself. This is because the context menus within a view are beyond the scope of platform visibility, and there may be zero, one, or many context menus within the view. Once a context menu has been created, the view must explicitly register each context menu with the platform. This makes it available for extension.
A context menu can be created using the SWT Menu and MenuItem classes directly, or it can be created using the JFace MenuManager class. If you define a context menu using the MenuManager class, the platform can extend this menu with actions. However, if you define a context menu using the SWT Menu and MenuItem classes directly, this is not possible.
        private void createContextMenu() {
                // Create menu manager.
             MenuManager menuMgr = new MenuManager();
                menuMgr.setRemoveAllWhenShown(true);
                menuMgr.addMenuListener(new IMenuListener() {
                        public void menuAboutToShow(IMenuManager mgr) {
                                fillContextMenu(mgr);
                        }
                });

                // Create menu.
             Menu menu = menuMgr.createContextMenu(viewer.getControl());
                viewer.getControl().setMenu(menu);

                // Register menu for extension.
             getSite().registerContextMenu(menuMgr, viewer);
        }
In the first few lines of createContextMenu a new MenuManager
is created (After creating the MenuManager, we can create the menu, and then register
the menu manager with the site (![]() ).
Take a good look at the last line of createContextMenu. In this statement
we pass the menu manager and the viewer to the site. In general,
the platform will only add action extensions to a menu if it opens.
At that time, the action extensions for the menu are determined by examining
the menu id and view selection. So where is the menu id? To
answer, we need to look at the definition of IWorkbenchPartSite.registerContextMenu.
There are two registerContextMenu methods (shown below). If there
is only one context menu in the view, we should call the first. The
menu id will be derived from the part id to ensure consistency. So
in this case, our menu id is "org.eclipse.ui.articles.views.wordview".
If there is more than one context menu in the view, we should use the second,
where the menu id is explicit.
).
Take a good look at the last line of createContextMenu. In this statement
we pass the menu manager and the viewer to the site. In general,
the platform will only add action extensions to a menu if it opens.
At that time, the action extensions for the menu are determined by examining
the menu id and view selection. So where is the menu id? To
answer, we need to look at the definition of IWorkbenchPartSite.registerContextMenu.
There are two registerContextMenu methods (shown below). If there
is only one context menu in the view, we should call the first. The
menu id will be derived from the part id to ensure consistency. So
in this case, our menu id is "org.eclipse.ui.articles.views.wordview".
If there is more than one context menu in the view, we should use the second,
where the menu id is explicit.
    // Defined on IWorkbenchPartSite.
    public void registerContextMenu(MenuManager menuManager,
        ISelectionProvider selectionProvider);
    public void registerContextMenu(String menuId, MenuManager menuManager,
        ISelectionProvider selectionProvider);
If the user opens our context menu, the fillContextMenu method will be called. This method adds the Add, Delete and SelectAll actions to the menu. It is important to notice that a GroupMarker is also added to the menu for "additions" (
        private void fillContextMenu(IMenuManager mgr) {
                mgr.add(addItemAction);
             mgr.add(new GroupMarker(IWorkbenchActionConstants.MB_ADDITIONS));
                mgr.add(deleteItemAction);
                mgr.add(new Separator());
                mgr.add(selectAllAction);
        }
The first couple of items have already been discussed. At
this point we will focus on the last point: define an IActionFilter for
each object in your model.
<extension point="org.eclipse.ui.popupMenus">The target for an objectContribution can be defined using the objectClass attribute and an optional nameFilter attribute. The nameFilter is used to specify objects with a specific label. Together, these attributes provide reasonable accuracy when targeting objects.
Within an objectContribution, a plug-in developer may define
filter
sub elements. Each filter describes one attribute of the target
object using a name value pair. For instance, the following XML can
be used to target an action at any Word object with name = "Blue".
Notice how the filter sub element (![]() )
is used to define an attribute value pair.
)
is used to define an attribute value pair.
<extension point="org.eclipse.ui.popupMenus"> <objectContribution id="org.eclipse.ui.articles.pm2" objectClass="org.eclipse.ui.articles.views.Word">Now let's look at the implementation of the filter sub element. The attributes for an object are type specific, and beyond the domain of the workbench itself, so the workbench will delegate filtering at this level to the selection itself. To do this, the platform will test to see if the selected object implements an org.eclipse.ui.IActionFilter. This is a type specific filtering strategy. If the selection does not implement IActionFilter, the platform will ask the selection for a filter using the IAdaptable mechanism defined in org.eclipse.core.runtime. If a filter is found, the platform will pass each name value pair to the filter to determine if it matches the state of the selected object. If so, or there is no IActionFilter, the action will be added to the context menu for the object.
In order to support the XML above, we need to define an IActionFilter
for the Word class. To do this, we define a class called WordActionFilter
(shown below), which simply implements the IActionFilter interface (![]() ).
This class is defined as a singleton for memory efficiency (
).
This class is defined as a singleton for memory efficiency (![]() ).
It also publishes the filter attributes for the Word class (
).
It also publishes the filter attributes for the Word class (![]() ),
so that they can be referenced outside the plugin.
),
so that they can be referenced outside the plugin.
The action filter for the Word class will be exposed using the IAdaptable mechanism. To do this, we need to implement the IAdaptable interface on our Word object, and return the WordActionFilter singleton if the platform asks for an IActionFilter. The implementation of getAdapter is shown below.
        public Object getAdapter(Class adapter) {
                if (adapter == IActionFilter.class) {
                        return WordActionFilter.getSingleton();
                }
                return null;
        }
At this point the WordActionFilter is complete. If we open the Word
view and select a Word with name = Blue, the "Blue Action" will
appear in the context menu. Stepping back from this example, the
WordActionFilter is actually fairly useless. However, it does illustrate
how precise action extension targeting should be supported by a model within
a view (or editor).
In the platform, action filters already exist for markers, resources, and projects. The attribute names for each are defined in IMarkerActionFilter, IResourceActionFilter, and IProjectActionFilter within org.eclipse.ui, so other plug-in developers can reference them easily. If we look at an existing, production quality filter like IResourceActionFilter we can see that it contains matching attributes for NAME, EXTENSION, PATH, READ_ONLY and PROJECT_NATURE. You should define attributes which reflect your own model and permit precise action targeting.
In the Word view there are three actions (Add, Delete and Select All).
The complete set of global actions is declared in IWorkbenchActionConstants.GLOBAL_ACTIONS
(shown below). A quick comparison will demonstrate that there is
no semantic equivalent to Add, but the Delete (![]() )
and Select all actions (
)
and Select all actions (![]() )
are represented within the global actions. So the Word view will
hook both of these actions.
)
are represented within the global actions. So the Word view will
hook both of these actions.
        /**
         * From IWorkbenchActionConstants.
         * Standard global actions in a workbench window.
         */
        public static final String [] GLOBAL_ACTIONS = {
                UNDO,
                REDO,
                CUT,
                COPY,
                PASTE,
                PRINT,
             DELETE,
                FIND,
             SELECT_ALL,
                BOOKMARK
        };
}
In the WordView class, the global actions are hooked within hookGlobalActions
(shown below), which is called from createPartControl. Within this
method, the Word view retrieves the action bars from the workbench part
site ( private void hookGlobalActions() {
IActionBars bars = getViewSite().getActionBars();
bars.setGlobalActionHandler(IWorkbenchActionConstants.SELECT_ALL, selectAllAction);
bars.setGlobalActionHandler(IWorkbenchActionConstants.DELETE, deleteItemAction);
viewer.getControl().addKeyListener(new KeyAdapter() {
public void keyPressed(KeyEvent event) {
if (event.character == SWT.DEL &&
event.stateMask == 0 &&
deleteItemAction.isEnabled())
{
deleteItemAction.run();
}
}
});
}
On the last line of hookGlobalActions (Registration of the global action handlers is complete. If the Select All or Delete action in the window is invoked, and the Word view is active, the corresponding handler within the Word view will be invoked. The approach taken here can be used for other actions, and you are encouraged to do so. For instance, most editors provide a handler for all of the global actions. The Navigator implements the Delete and Bookmark actions. The Tasks view implements the Delete and Select All actions.
To start out, we need to create a new Listener view. We've already
done this twice, so let's skip the declaration within the plugin.xml and
concentrate on the ListenerView class (shown below). This class is
very similar to LabelView. In createPartControl we create a simple
SWT Label (![]() ), where
we will display the word attributes.
), where
we will display the word attributes.
public class ListenerView extends ViewPart
        implements ISelectionListener
{
        private Label label;
        public ListenerView() {
                super();
        }
        public void setFocus() {
                label.setFocus();
        }
     public void createPartControl(Composite parent) {
                label = new Label(parent, 0);
                label.setText("Hello World");
             getViewSite().getPage().addSelectionListener(this);
        }

        /**
         * @see ISelectionListener#selectionChanged(IWorkbenchPart, ISelection)
         */
     public void selectionChanged(IWorkbenchPart part, ISelection selection) {
                if (selection instanceof IStructuredSelection) {
                        Object first = ((IStructuredSelection)selection).getFirstElement();
                        if (first instanceof Word) {
                                label.setText(((Word)first).toString());
                        }
                }
        }
}
Things get interesting on the last line of createPartControl (So far so good. The Listener view is ready to receive selection events. However, we have a problem: the Word view doesn't publish any selection events.
To reconcile our problem we add one line of code to the Word view (![]() )
Within the createPartControl method, a selection provider is passed to
the site. Fortunately, the viewer itself is an ISelectionProvider,
so it is very easy to define the selection provider for the view.
When the Word view is active (as indicated by shading in the title bar)
the platform will redirect any selection events fired from viewer to selection
listeners within the page.
)
Within the createPartControl method, a selection provider is passed to
the site. Fortunately, the viewer itself is an ISelectionProvider,
so it is very easy to define the selection provider for the view.
When the Word view is active (as indicated by shading in the title bar)
the platform will redirect any selection events fired from viewer to selection
listeners within the page.
        public void createPartControl(Composite parent) {
                // Create viewer.
                viewer = new ListViewer(parent);
                viewer.setContentProvider(new ListContentProvider());
                viewer.setLabelProvider(new LabelProvider());
                viewer.setInput(input);
             getSite().setSelectionProvider(viewer);

                // Create menu and toolbars.
                createActions();
                createMenu();
                createToolbar();
                createContextMenu();
                hookGlobalActions();

                // Restore state from the previous session.
                restoreState();
        }
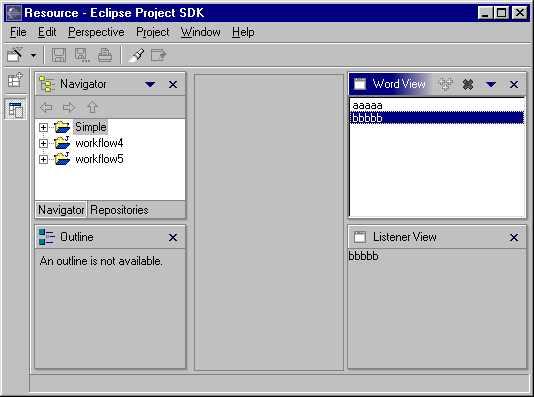
Now we can try out the Listener view. Open up the Word view and the
Listener view. Add a word to the Word view and then select it.
The name of the Word will be displayed in the Listener view. A snapshot
of the result is shown below.
The linking approach demonstrated here can be described as activation linking. In activation linking, the listener receives selection from the active part. The benefit of this approach is that there is a loose coupling between the Listener view and other views within the same page. If we were to introduce another view, similar to the Word view, which published selection events for objects of type Word, these objects would also appear in the Listener view. This makes it very easy to add, remove, or replace the views in the workbench while maintaining good integration between views.
In contrast to activation linking, a view may also implement explicit linking. In explicit linking, the listener tracks selection within a specific source view, which is usually discovered by calling IWorkbenchPage.findView(String id). There are two drawbacks to this approach. First, the listener will be disabled if the specific source view is nonexistent or closed by the user, and second, the listener will never work with additional views added by the user, or another plug-in. For this reason, the use of explicit linking is discouraged.
In practice, the visibility of resources within a page is implemented through collaboration between the page and the views within that page. The page itself is just a visual container for views and editors. It doesn't provide any presentation for resources. That is delegated to the parts within the page. The hand off usually occurs during part creation. In the early stages of part lifecycle a part can obtain a handle to the containing IWorkbenchPage, and from this it can call IWorkbenchPage.getInput. The result can be used as the initial input for the view. For instance, if a new perspective containing the Navigator is opened, the Navigator will use the page input as its own input. The Packages view does the same.
The strategy should be adopted by any view which displays resources within the workspace. This will ensure a consistent navigational paradigm for users within the platform.
Within any view there are at least two elements of state: the model itself and model presentation (widget state). In our Word view, the model is stored as a file in the file system, so it is a non issue. However, the widget state should be saved. To do this we need to implement the IViewPart.init and IViewPart.saveState methods (shown below) in WordView.
    public void init(IViewSite site,IMemento memento) throws PartInitException;
    public void saveState(IMemento memento);
But first, some background info. When the workbench is closed, the IViewPart.saveState method is called on every view. An IMemento is passed to the saveState method. This is a structured, hierarchical object where you can store integers, floats, Strings, and other IMementos. The platform will store the IMemento data in a file called workbench.xml within the org.eclipse.ui metadata directory. When a new session is started, the platform will read this file, recreate each window, page, and view, and then pass an IMemento to each view in the init method. The view can use this to recreate the state of the previous session.
Now we can do some coding. We will implement the saveState method
first (shown below). Within this method a memento is created for
the selection (![]() )
and then one item is added to it for every word which is selected (
)
and then one item is added to it for every word which is selected (![]() ).
In our code, the word string is used to identify the word. This may
be an inaccurate way to identify words (two words may have the same string),
but this is only an article. You should develop a more accurate strategy
which reflects your own model.
).
In our code, the word string is used to identify the word. This may
be an inaccurate way to identify words (two words may have the same string),
but this is only an article. You should develop a more accurate strategy
which reflects your own model.
        public void saveState(IMemento memento){
                IStructuredSelection sel = (IStructuredSelection)viewer.getSelection();
                if (sel.isEmpty())
                        return;
             memento = memento.createChild("selection");
                Iterator iter = sel.iterator();
                while (iter.hasNext()) {
                        Word word = (Word)iter.next();
                     memento.createChild("descriptor", word.toString());
                }
        }
Next we implement the init method. When a new session is started,
the init method will be called just after the part is instantiated, but
before the createPartControl method is called. In our code all of
the information within the memento must be restored to the control, so
we have no choice but to hold on to the memento until createPartControl
is called.
        public void init(IViewSite site,IMemento memento) throws PartInitException {
                init(site);
                this.memento = memento;
        }
Within createPartControl, the restoreState method is called. Within
restoreState the selection memento is retrieved ( private void restoreState() {
if (memento == null)
return;
memento = memento.getChild("selection");
if (memento != null) {
IMemento descriptors [] = memento.getChildren("descriptor");
if (descriptors.length > 0) {
ArrayList objList = new ArrayList(descriptors.length);
for (int nX = 0; nX < descriptors.length; nX ++) {
String id = descriptors[nX].getID();
Word word = input.find(id);
if (word != null)
objList.add(word);
}
viewer.setSelection(new StructuredSelection(objList));
}
}
memento = null;
updateActionEnablement();
}
You may notice certain limitations in the IMemento interface. For
instance, it can only be used to store integers, floats, and Strings.
This limitation is a reflection of the persistence requirements in the
platform UI.
Java serialization could be used for persistence. However,
serialization is only appropriate for RMI and light-weight persistence
(the archival of an object for use in a later invocation of the same program).
It is not considered robust for long term storage, where class names and
structure may change. If any of these occur serialization will throw
an exception.
Let's start out with the assumption that the Word view has two sorting algorithms. The user may select one as the preferred algorithm. How do we share this preference with other views of the same type?
Approach #1: We don't.
The initial value of the preference will be hard coded in some way, probably as a constant in the class declaration. If the user changes this preference in one view, it will not be reflected in other views. For instance, the Navigator preference for "Sort" is a local preference, and is not shared with other Navigator views.
Approach #2: We Use a Preference Page
The initial value of the preference will be exposed in a preference page in the Workbench Preferences. If the user changes this preference, the new preference will apply to all instances of the view. For instance, the Navigator preference for "Link Navigator selection to active editor" is controlled by a check box in the Workbench Preferences. This option applies to all Navigator views.
Approach #3: Inheritance.
The initial value of the preference will be defined in the plugin metadata. If a view is opened, it will read the plugin metadata to determine the preference. If the user changes the preference in one view, it will not affect other views, but it will be saved to the plugin metadata, so that any view created in the future will inherit the preference. For instance, if the user changes the sort preference in one Word view, it will have no affect on other Word views. However, if the user opens a new Word view it will inherit the most recent preference.
While each of these is a valid approach, the correct choice should reflect your own view and the underlying model.
Java and all Java-based trademarks and logos are trademarks or registered trademarks of Sun Microsystems, Inc. in the United States, other countries, or both.