
Five simple steps to your JVM language
In this tutorial we will basically implement the domain model language again, but this time we will make use of the special JVM support shipped with Xtext. This kind of language is really a sweet spot for DSLs, so feel free to use this as a blueprint and add your project specific features later on.
The revised domain model language supports expressions and cross-links to Java types. It is directly translated to Java source code. The syntax should look very familiar. Here is an example:
import java.util.List

package my.model {

    entity Person {
        name: String
        firstName: String
        friends: List<Person>
        address : Address
        op getFullName() : String {
            return firstName + " " + name;
        }

        op getFriendsSortedByFullName() : List<Person> {
            return friends.sortBy[ f | f.fullName ]
        }
    }

    entity Address {
        street: String
        zip: String
        city: String
    }
}
As you can see, it supports all kinds of advanced features such as Java generics and full expressions, even including lambda expressions. Don’t panic, you will not have to implement these concepts on your own but will reuse a lot of helpful infrastructure to build the language.
We will now walk through the five little steps needed to get this language fully working including its compiler. The first three steps are very similar to those in the 15 Minutes Tutorial.
After you have installed Xtext on your machine, start Eclipse and set up a fresh workspace.
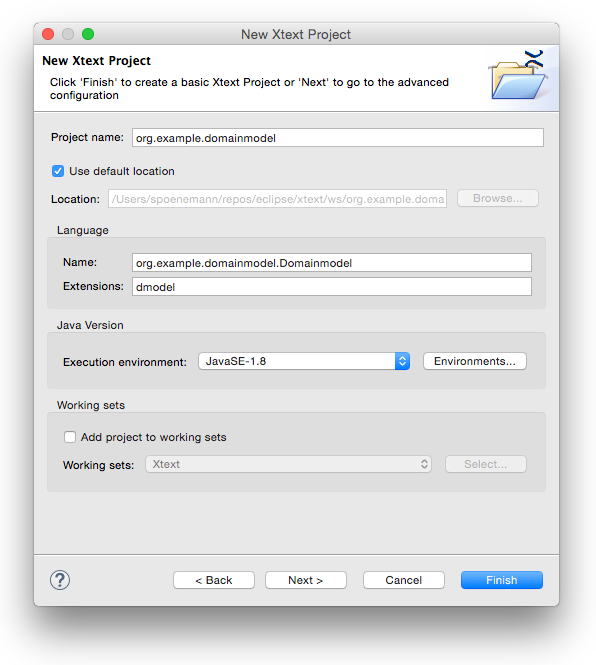
Step One: Create A New Xtext Project
In order to get started we first need to create some Eclipse projects. Use the Eclipse wizard to do so:
File → New → Project… → Xtext → Xtext Project
Choose a meaningful project name, language name and file extension, e.g.
| Project name: | org.example.domainmodel |
| Language name: | org.example.domainmodel.Domainmodel |
| File extension: | dmodel |
Click on Finish to create the projects
After you have successfully finished the wizard, you will find five new projects in your workspace.
| org.example.domainmodel | The grammar definition and all language-specific components (parser, lexer, linker, validation, etc.) |
| org.example.domainmodel.tests | Unit tests for the language |
| org.example.domainmodel.ide | Platform-independent IDE functionality (e.g. services for content assist) |
| org.example.domainmodel.ui | The Eclipse editor and other workbench related functionality |
| org.example.domainmodel.ui.tests | Unit tests for the Eclipse editor |
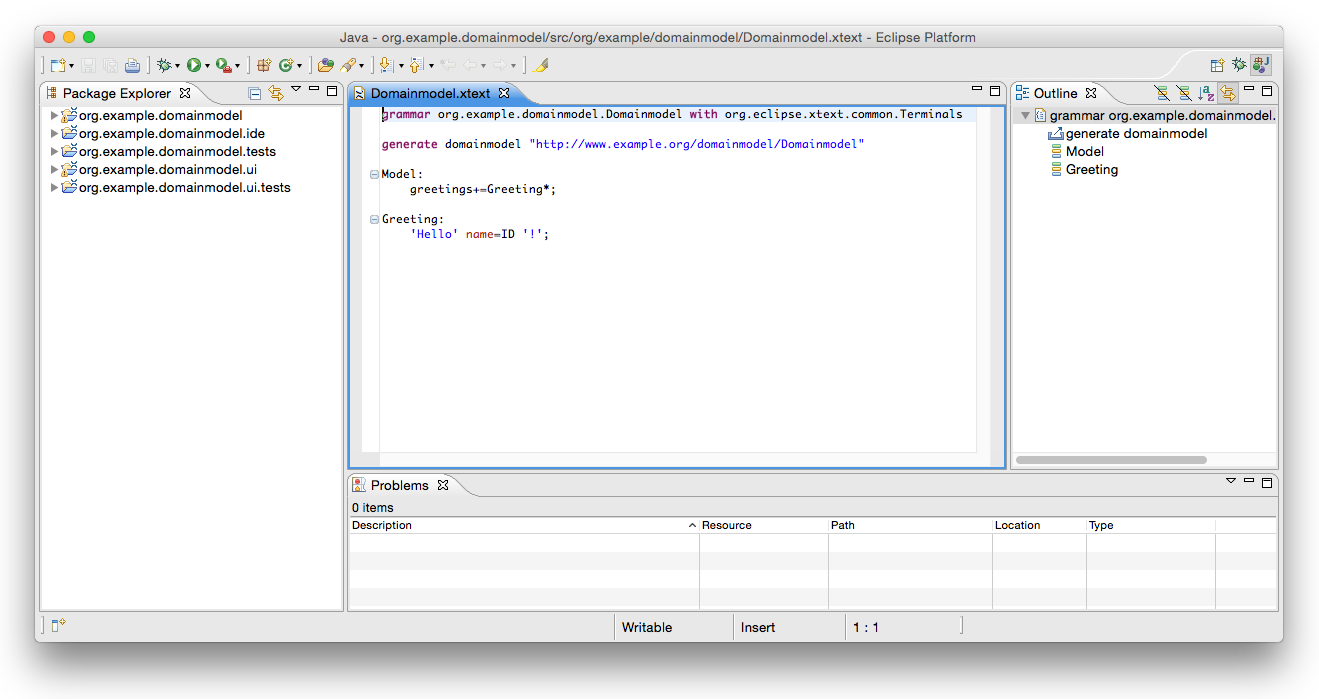
Step Two: Write the Grammar
The wizard will automatically open the grammar file Domainmodel.xtext in the editor. As you can see it already contains a simple Hello World grammar. Replace that grammar definition with the one for our language:
grammar org.example.domainmodel.Domainmodel with
                                      org.eclipse.xtext.xbase.Xbase

generate domainmodel "http://www.example.org/domainmodel/Domainmodel"

Domainmodel:
    importSection=XImportSection?
    elements+=AbstractElement*;

AbstractElement:
    PackageDeclaration | Entity;

PackageDeclaration:
    'package' name=QualifiedName '{'
        elements+=AbstractElement*
    '}';

Entity:
    'entity' name=ValidID ('extends' superType=JvmTypeReference)? '{'
        features+=Feature*
    '}';

Feature:
    Property | Operation;

Property:
    name=ValidID ':' type=JvmTypeReference;

Operation:
    'op' name=ValidID
        '('(params+=FullJvmFormalParameter
        (',' params+=FullJvmFormalParameter)*)?')'
        ':' type=JvmTypeReference
    body=XBlockExpression;
Some parts of this grammar are equal to the one in the 15 Minutes Tutorial, but other parts are different.
-
grammar org.example.domainmodel.Domainmodel with
              org.eclipse.xtext.xbase.Xbase
The first thing to note is that instead of inheriting from the usual org.eclipse.xtext.common.Terminals grammar, we make use of org.eclipse.xtext.xbase.Xbase. Xbase allows us to easily reuse and embed modern, statically typed expressions as well as Java type signatures in our language.
-
Domainmodel:
    importSection=XImportSection?
    elements+=AbstractElement*;
A Domainmodel contains an optional import section and an arbitrary number of AbstractElements. The concept of XImportSection is part of org.eclipse.xtext.xbase.Xbase and comes with tool support and syntax like you know it from Java.
-
AbstractElement:
    PackageDeclaration | Entity;
The rule AbstractElement delegates to either the rule PackageDeclaration or the rule Entity.
-
PackageDeclaration:
    'package' name=QualifiedName '{'
        elements+=AbstractElement*
    '}';
A PackageDeclaration is used to declare a name space which can again contain any number of AbstractElements. Xtext has built-in support for qualified names and scoping based on the hierarchy of the produced model. The default implementation will add the package names as the prefix to contained entities and nested packages. The qualified name of an Entity ‘Baz’ which is contained in a PackageDeclaration ‘foo.bar’ will be ‘foo.bar.Baz’. In case you do not like the default behavior you will need to use a different implementation of IQualifiedNameProvider.
-
Entity:
    'entity' name=ValidID ('extends' superType=JvmTypeReference)? '{'
        features+=Feature*
    '}';
The rule Entity starts with the definition of a keyword followed by a name. The extends clause makes use of the rule JvmTypeReference which is defined in the super grammar. JvmTypeReference defines the syntax for full Java-like type names. That is everything from simple names, over fully qualified names to fully-fledged generics, including wildcards, lower bounds and upper bounds. Finally between curly braces there can be any number of Features, which leads us to the next rule.
-
Feature:
    Property | Operation;
The rule Feature delegates to either a Property or an Operation.
-
Property:
    name=ValidID ':' type=JvmTypeReference;
A Property has a name and makes again use of the inherited rule JvmTypeReference.
-
Operation: 'op' name=ValidID '('(params+=FullJvmFormalParameter (',' params+=FullJvmFormalParameter)*)?')' ':' type=JvmTypeReference body=XBlockExpression;Operations also have a signature as expected. Note that also for formal parameters we can reuse a rule from the super grammar.
The body of the Operation is the actual implementation and is defined by the rule XBlockExpression, which is one of the most often used entry rules from Xbase. A block consist of any number of expressions between curly braces such as:
{
    return "Hello World" + "!"
}
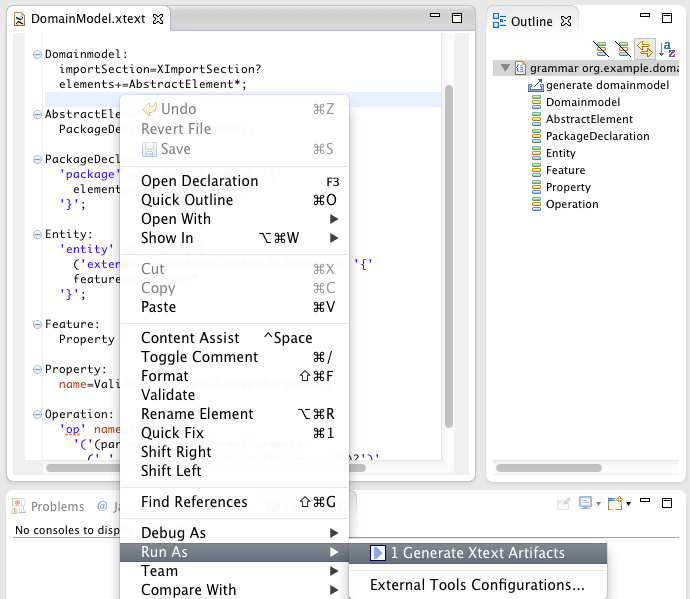
Step Three: Generate Language Artifacts
Now that we have the grammar in place we need to execute the code generator that will derive the various language components. To do so, right-click into the grammar editor and select
Run As → Generate Xtext Artifacts.
This action generates the parser and text editor and some additional infrastructure code. You will see its logging messages in the Console View.
Step Four: Define the Mapping to JVM Concepts
The syntax alone is not enough to make the language work. We need to map the domain-specific concepts to some other language in order to instruct Xtext how it is executed. Usually you define a code generator or an interpreter for that matter, but languages using Xbase can omit this step and make use of the IJvmModelInferrer.
The idea is that you translate your language concepts to any number of Java types (JvmDeclaredType). Such a type can be a Java class, Java interface, Java annotation type or a Java enum and may contain any valid members. In the end you as a language developer are responsible to create a correct model according to the Java language.
By mapping your language concepts to Java elements, you implicitly tell Xtext in what kind of scopes the various expressions live and what return types are expected from them. Xtext also comes with a code generator which can translate that Java model into readable Java code, including the expressions.
If you have already triggered the ‘Generate Xtext Artifacts’ action, you should find a stub called org/example/domainmodel/jvmmodel/DomainmodelJvmModelInferrer.xtend in the src folder. Please replace its contents with the following :
package org.example.domainmodel.jvmmodel

import com.google.inject.Inject
import org.example.domainmodel.domainmodel.Entity
import org.example.domainmodel.domainmodel.Operation
import org.example.domainmodel.domainmodel.Property
import org.eclipse.xtext.naming.IQualifiedNameProvider
import org.eclipse.xtext.xbase.jvmmodel.AbstractModelInferrer
import org.eclipse.xtext.xbase.jvmmodel.IJvmDeclaredTypeAcceptor
import org.eclipse.xtext.xbase.jvmmodel.JvmTypesBuilder

class DomainmodelJvmModelInferrer extends AbstractModelInferrer {

  /**
   * a builder API to programmatically create Jvm elements
   * in readable way.
   */
  @Inject extension JvmTypesBuilder

  @Inject extension IQualifiedNameProvider

  def dispatch void infer(Entity element,
                IJvmDeclaredTypeAcceptor acceptor,
                boolean isPrelinkingPhase) {
    acceptor.accept(element.toClass( element.fullyQualifiedName )) [
      documentation = element.documentation
      if (element.superType !== null)
        superTypes += element.superType.cloneWithProxies
      for (feature : element.features) {
        switch feature {

          Property : {
            members += feature.toField(feature.name, feature.type)
            members += feature.toGetter(feature.name, feature.type)
            members += feature.toSetter(feature.name, feature.type)
          }

          Operation : {
            members += feature.toMethod(feature.name, feature.type) [
              documentation = feature.documentation
              for (p : feature.params) {
                parameters += p.toParameter(p.name, p.parameterType)
              }
              body = feature.body
            ]
          }
        }
      }
    ]
  }
}
Let’s go through the code to get an idea of what is going on. (Please also refer to the JavaDoc of the used API for details, especially the JvmTypesBuilder).
-
def dispatch void infer(Entity element,
        IJvmDeclaredTypeAcceptor acceptor,
        boolean isPrelinkingPhase) {
Using the dispatch keyword makes sure that the method is called for instances of type Entity only. Have a look at the Xtend documentation on polymorphic dispatch to understand Xtend’s dispatch functions. Extending AbstractModelInferrer makes sure we don’t have to walk the syntax model on our own.
-
acceptor.accept(element.toClass(element.fullyQualifiedName)) [
    ...
]
Every JvmDeclaredType you create in the model inference needs to be passed to the acceptor in order to get recognized. The extension method toClass comes from the JvmTypesBuilder class. This class provides a lot of convenient extension methods, which help making the code extremely readable and concise. It is important to understand that the creation and assignment of a qualified name is done in an early phase where the compiler collects all global symbols. You cannot resolve type references at this point.
- The second argument to accept is a lambda block that contains further initialization of the created Java type. Only in this block you are allowed to do type reference resolution. This is also the place where you add members and put the XExpressions into context. Let’s see what we do in the initialization block in detail:
-
documentation = element.documentationHere we assign some JavaDoc to the newly created element. The assignment is translated to an invocation of the method JvmTypesBuilder.setDocumentation(JvmIdentifiableElement, String), and
element.documentationis in fact calling the extension method JvmTypesBuilder.getDocumentation(EObject). Such extension methods are explained in detail in the Xtend documentation. -
if (element.superType !== null)
    superTypes += entity.superType.cloneWithProxies
Set the superType on the inferred element. Note that we have to clone the type reference from the element.superType. If we did not do that, the type reference would be automatically removed from the element, as superType is an EMF containment reference.
-
for (feature : element.features) {
    switch feature {
        Property : {
            // ...
        }
        Operation : {
            // ...
        }
    }
}
When iterating over a list of heterogeneous types, the switch expression with its type guards comes in handy. If feature is of type Property the first block is executed. If it is an Operation the second block is executed. Note that the variable feature will be implicitly casted to the respective type within the blocks.
-
Property : {
    members += feature.toField(feature.name, feature.type)
    members += feature.toSetter(feature.name, feature.type)
    members += feature.toGetter(feature.name, feature.type)
}
For each Property we create a field as well as a corresponding getter and setter.
-
Operation : {
    members += feature.toMethod(feature.name, feature.type) [
        documentation = feature.documentation
        for (p : feature.params) {
            parameters += p.toParameter(p.name, p.parameterType)
        }
        body = feature.body
    ]
}
Operations are mapped to a corresponding Java method. The documentation is translated and the parameters are added within the initializer. The line
body = feature.bodyregisters the Operation’s expression as the body of the newly created Java method. This defines the scope of the expression. The framework deduces the visible fields and parameters as well as the expected return type from that information.
Step Five : Try the Editor!
We are now able to test the IDE integration by spawning a new Eclipse using our plug-ins: right-click the project org.example.domainmodel in the Package Explorer and select Run As → Eclipse Application.
In the new workbench, create a Java project (File → New → Project… → Java Project). Xbase relies on a small runtime library on the class path. To add this, right-click on the project and go to Java Build Path → Libraries → Add Library and choose Xtend Library. Then create a new file with the file extension you chose in the beginning (*.dmodel) in the source folder of the Java project. This will open the generated entity editor. Try it and discover the rich editor functionality it provides. You should also have a look at the preferences of your language to find out what can be individually configured to your users needs.
Have fun!
