| Eclipse Article |

This document is the first in a series of tutorials where we will demonstrate how you can use the rich set of tools and APIs that comes with the Web Tools Platform Project. This first tutorial will give you a step by step tour of using some the tools for web development. For this purpose we will build and run a J2EE web application using WTP tools and Apache Tomcat.
By Naci Dai, Eteration A.S.
December 7, 2004
| Introduction |
This document is the first in a series of tutorials where we will demonstrate how you can use the rich set of tools and APIs that comes with the Web Tools Platform Project. This first tutorial will give you a step by step tour of using some the tools for web development. For this purpose we will build and run a J2EE web application using WTP tools and Apache Tomcat.
| Getting Started |
You will need a Java Development Kit (JDK) version 1.4.2 and
above as Eclipse 3.1 requires it. Java Runtime Environment (JRE) is
sufficient for Eclipse but it will not be suitable for web application
development. You can get latest JDK from Sun.
![]() Most server runtimes require tools, such as the java compiler (found in
tools.jar), that are only found in the JDK but not the JRE.
Most server runtimes require tools, such as the java compiler (found in
tools.jar), that are only found in the JDK but not the JRE.
Obviously, you will need an eclipse installation. The Eclipse driver used in this tutorial is eclipse-SDK-3.1M3-linux-gtk.zip. You can find a suitable driver for your platform at here. WTP uses components from other eclipse projects: The eclipse modeling framework, emf, java emf model, jem, are used to define models for artifacts defined in many java, w3c, xml and j2ee standards; The graphical editing framework, gef, is used to provide graphical editing capabilities for xml, xsd and wsdl editors, etc. You can obtain these components from their projects.
You will need to download the full WTP package that is used in this tutorial from wtp downloads. You will need a WTP runtime.
Once you have everything downloaded, install JDK and your favorite server runtime, and unzip eclipse, emf, gef, jem and wtp zip files to a folder. You are ready to go!
| Setup |
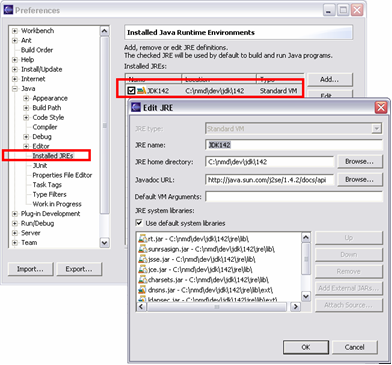
After you launch eclipse for the first time, but before we can build our first web application, we need to do a little eclipse house keeping: If it is not already defined, you will need to set the Java preferences to point to your JDK installation (see figure). You should have obtained the latest JDK from Sun.
This step involves changing or creating the settings for Installed Server Runtimes. During web application development, we will need a server runtime environment to test, debug and run our project. We begin by telling wtp what our server runtime is, and where it is located. A “server runtime environment” is not a server. It provides the environment, libraries and infrastructure that a “server” needs. A server is an instance of the server runtime that can host our web applications and other server-side components. To define a server runtime, we need to visit the appropriate Preferences page:
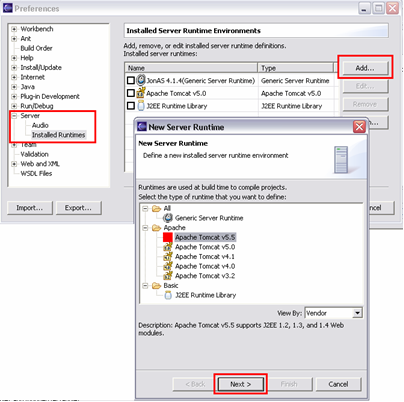
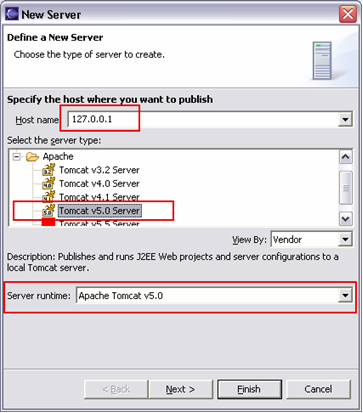
Here you will find a list of server runtimes that have been defined previously. You can choose a server runtime and change its properties. To add a new one click “Add…”. A wizard will popup and display a list of server runtimes that are supported by WTP. Choose your server runtime from the list. Jonas and JBoss are currently supported under the “Generic Server Runtime”. Basic “J2EE Runtime Library” is not a true server runtime, but can be used for coding support only. It does not provide a server instance that can be used to run web artifacts.
After you click “Next”, you will have to choose the
JDK and the folder where you have installed your server runtime. Of
course, based on your choice of the server runtime, you will be asked to
provide different properties. Click finish. Now we can do the fun part.
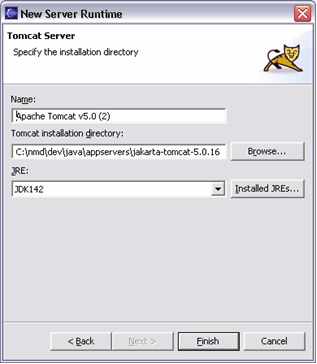
![]() We chose Apache Tomcat. You can also choose another server such as
ObjectWeb Jonas. If you would like to use them as your runtime, select
the “Generic Server”, and follow the wizard to define the
properties for Jonas, JBoss or Weblogic. There are differences between
for server runtimes; Apache Tomcat provides dynamic development support;
i.e: the ability to run the web application from the eclipse project
without the need to publish the artifacts to a server. Generic server
does not support dynamic development, but it will automatically publish
the artifacts (your web application) to the server when you run.
We chose Apache Tomcat. You can also choose another server such as
ObjectWeb Jonas. If you would like to use them as your runtime, select
the “Generic Server”, and follow the wizard to define the
properties for Jonas, JBoss or Weblogic. There are differences between
for server runtimes; Apache Tomcat provides dynamic development support;
i.e: the ability to run the web application from the eclipse project
without the need to publish the artifacts to a server. Generic server
does not support dynamic development, but it will automatically publish
the artifacts (your web application) to the server when you run.
| Developing the Application |
In this section we will create a J2EE web application that
contains typical components such as servlets and JSPs. We will:
• Create a project with a web module
• Create a servlet
• Edit deployment descriptor
• Create and edit a JSP
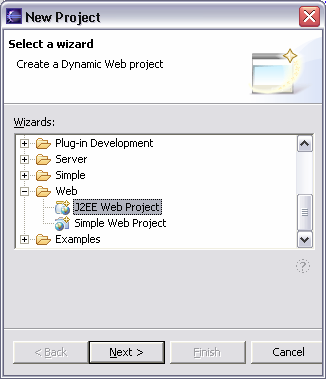
Go to New->Project. Choose Web category from the list of
available wizards to create a new eclipse resource. You will find two
project types available under this category. Simple Web Project is a
basic Eclipse resource project that can be associated with a server. We
are interested in creating a J2EE Web Application, so we will choose the
J2EE Web Project here:
A J2EE Web Project is a type of Java project that has been
initialized to host a server-side application. It needs to be associated
with a Target Server.
A target server provides the container which will be used to execute our
web application. Specifically, it will provide a set of libraries
(jars), that are added to the project classpath, which are needed to
compile our custom classes. E.g.: to create a new Servlet, we need
javax.servlet.* packages. These are not a part of the JDK libraries.
Server runtime provides them to the project. If yiu have skipped the
previos step where we defined a server runtime, you will get a chance to
define one here by clicking on the New….
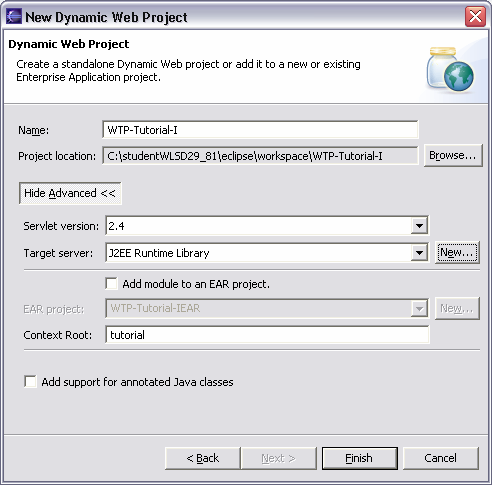
Make sure that “Add module to an EAR project” is not
selected. We will create a standalone web application that can be
deployed as a standard web module.
Finally, we will change the context root to “tutorial”. This
is used when you access the web application with a URL, i.e.
http://localhost:8080/tutorial
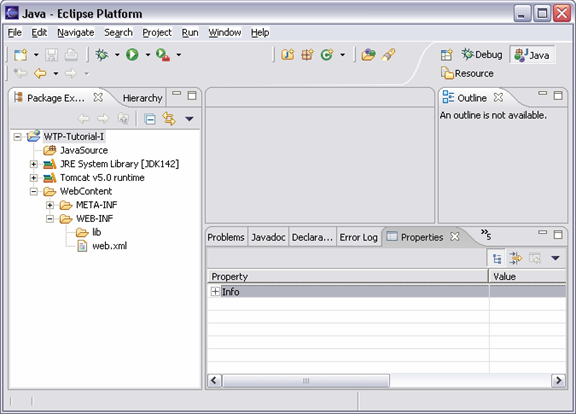
When the wizard completes its tasks, you will find that it has create a new Java Project and has initialized it so that you can start with your development right away: It has created a java source folder. You will add your custom java packages and classes here. It has defined the classpath (JRE and Tomcat) so that you will have J2EE libraries in your project classpath. It has created a resource folder named “Web Content”, which mimics the standard WAR structure from the J2EE specification. It will contain the web resources that will be packaged with your J2EE web module. All artifacts inside this folder are accessible from the Web Application context.
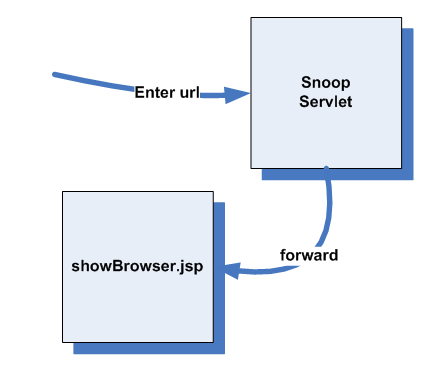
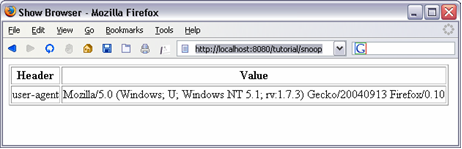
This is a simple Hello WTP application. We will call a simple
“snoop servlet” that will display information about the
client browser in a JSP file.
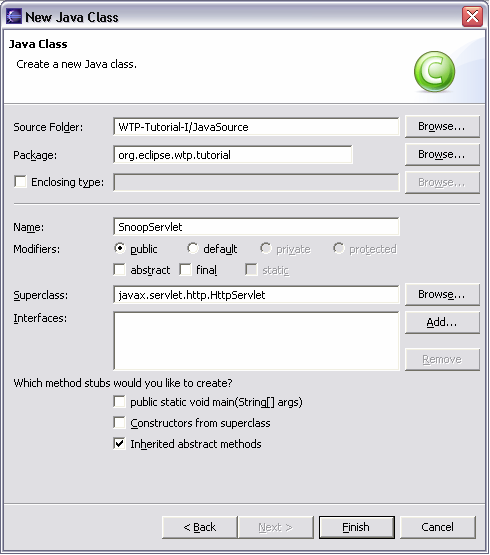
Go to New->Class. Create a new Java class that is a subclass of the standard javax.servlet.http.HttpServlet:
Add the code provided in Listing 1 to the servlet:
Listing 1. SnoopServlet.java
package org.eclipse.wtp.tutorial;

import java.io.IOException;

import javax.servlet.ServletException;
import javax.servlet.http.HttpServlet;
import javax.servlet.http.HttpServletRequest;
import javax.servlet.http.HttpServletResponse;

public class SnoopServlet extends HttpServlet {
	public void doGet(HttpServletRequest req, HttpServletResponse resp)
			throws ServletException, IOException {
		String userAgent =  req.getHeader("user-agent");
		String clientBrowser =  "Not known!";
		if( userAgent != null)
			clientBrowser = userAgent;
		req.setAttribute("client.browser",clientBrowser );
		req.getRequestDispatcher("/showBrowser.jsp").forward(req,resp);
	}
}
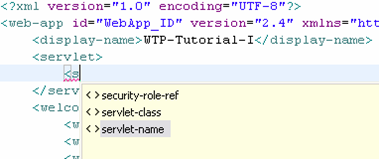
Web modules in J2EE has a deployment descriptor where you configure the web application and its components. This deployment descriptors is called the web.xml. According to the J2EE specification, it must be located in the WEB-INF folder. web.xml must have definitions for the Servlet and the Servlet URI mapping. Enter the following lines into web.xml:
Listing 2. Deployment Descriptor web.xml
  <servlet>
   <servlet-name>Snoop Servlet</servlet-name>
   <servlet-class>org.eclipse.wtp.tutorial.SnoopServlet</servlet-class>
  </servlet>
  <servlet-mapping>
    <servlet-name>Snoop Servlet</servlet-name>
    <url-pattern>/snoop/*</url-pattern>
 </servlet-mapping>
You can obtain code assist from the WTP XML editor during this process by hitting [Ctrl]+[Space] as usual.
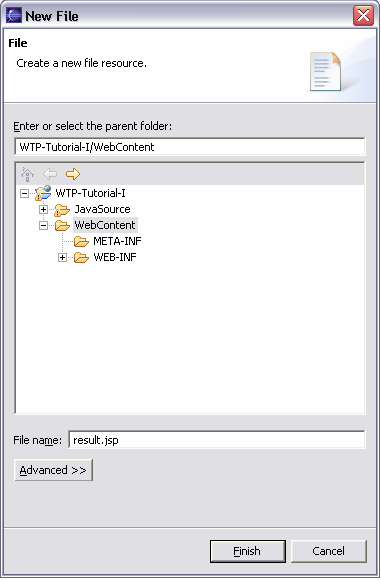
Go to New->File. Select the WebContent folder and enter showBrowser.jsp as the file name.
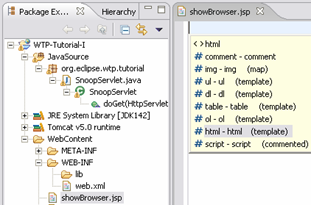
Our JSP file will be opened with a “JSP Source Page Editor”. Hit [Ctrl]+[Space] and choose html template. You can get HTML, JavaScript, JSP and Java code assist in a JSP Editor.
JSP Source Page Editor also provides java code assist. Try the following inside a JSP expression:
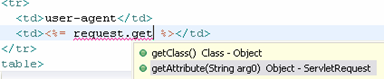
At the end your JSP should have the following code
![]() Use
the table template
Use
the table template
Listing 3. showBrowser.jsp
<html>
<head><title>Show Browser</title></head>
<body>
<table border="1">
	<tr> <th>Header</th><th>Value</th>
	</tr>
	<tr>
		<td>user-agent</td>
		<td><%= request.getAttribute("client.browser")%></td>
	</tr>
</table>
</body>
</html>
Go to the menu Window >Show View and select the Project Explorer view from the J2EE category.
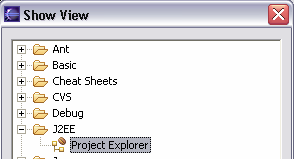
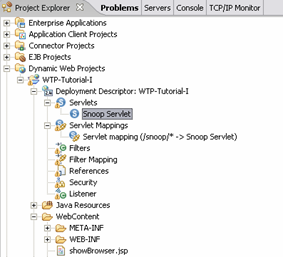
Project explorer is a smart navigator that knows about the web and J2EE artifacts. You will be able to browse your web module, deployment descriptors and the contents of these. For example, we can navigate to the deployment descriptor and observer our servlet and its mapping.
| Running the Application |
In this section we will run our recently developed web
application on a server. In order to do this, we will:
• Create a server
• Add our web module to a server
• Run the server
• Run the web application.
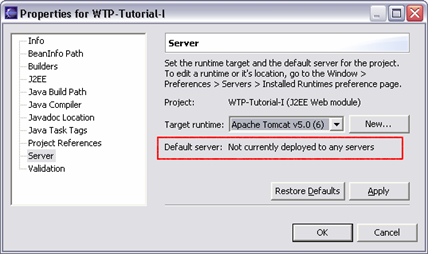
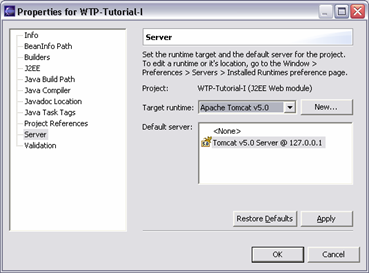
In the Java Package explorer or the J2EE Project Explorer, highlight your project name WTP-Tutorial-I and using the right-click menu (mouse menu) choose properties. Alternatively, you can hit [Alt]+[Enter]. This will display project properties window. Here we can set the target runtime and the default server for the project. Remember that we have chosen the target runtime when we created the project. This runtime has provided the classpath for the project. You can choose a different runtime here. This will change the libraries that are used to compile your application. Here we can also choose a default server. The default server is the server on which our application will be deployed and run. If you have not previously defined a server as set it as default, you will see a message in the properties view. To create a server you will have to cancel this window and come back to it after you have created the server.
Servers can be created using the Server View. To open a server view go to Window->Show View->Other…, and choose the Servers under the Server category.
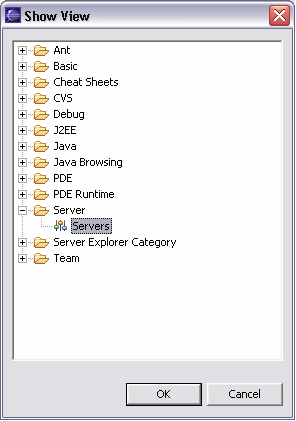
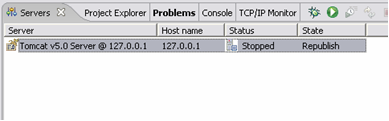
The server view allows you to create servers for the currently installed server runtime environments. Use the right click menu to create a new server. In the following wizard, choose the server address where you will deploy (publish) your web module. You will also have to choose the server type and, if you have defined more than one installed environment for this server (see preferences), choose the server runtime. When you click finish, you have a Server!
 |
 |
Now you can go back to the project properties and set your default server.
 |
 |
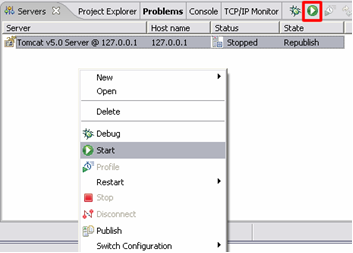
In the server view, do a menu-click on your server and choose start, or you can simply click the start button. You will see the “Status” of the server from Stopped to “Starting”, and when the server is ready it will change its status to "Started".
Open your favorite browser and type http://localhost:8080/tutorial/snoop.
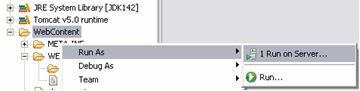
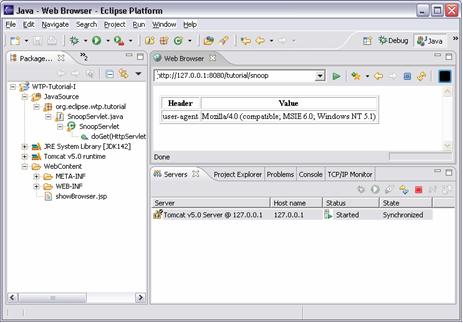
Well, now that you have been through all this trouble to run your
application, did you know that you could have done all this with almost
just one click? Try to select you WebContents on try “Run on
server…”. The web application will popup inside the WTP web
browser in almost an instant. You can then try to call your servlet as
usual.
 |
 |
In this tutorial, we looked at what is necessary to create a simple web application. The next part will show how we can debug our web application and monitor http traffic.
Java and all Java-based trademarks and logos are trademarks or registered trademarks of Sun Microsystems, Inc. in the United States, other countries, or both.
Other company, product, and service names may be trademarks or service marks of others.