Tutorial: Developing a Simple Web Service With Jakarta EE 8
In this article, I’ll walk you through the steps required to create a simple web service with Jakarta EE 8. The example web service creates a Web Application Resource (WAR) file that can be deployed to any Jakarta EE 8-compliant application server container, including micro-containers such as Payara Micro and WildFly.
The headings below outline the main steps to create the web service and most steps include example code.
Create a Maven-Based WAR File Project
You can create the file in your favorite IDE. The most prevalent IDEs for developing Jakarta EE 8 applications include the Eclipse IDE, IntelliJ, and Apache NetBeans. Another option is to download the Jakarta EE starter project.
I start with the Jakarta EE starter project, then I open it and develop within the Apache NetBeans 12 IDE. I deploy the web service to the Payara Micro platform.
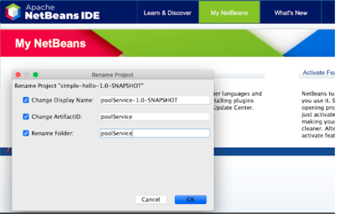
To get started, download and unzip the Jakarta EE starter project simple-hello.zip and copy it into a working directory on your computer. Open the project in your IDE and rename it to PoolService-1.0-SNAPSHOT, as shown in Figure 1.
Figure 1: Renaming the Project
Add a Root Path for Jakarta RESTful Web Services Resources
Adding a path to the class named org.demo.simple.ApplicationConfig creates a root path for your Jakarta RESTful web services at the path "resources.” To access Jakarta RESTful Web Services (JAX-RS) resources, preface the service name with this path.
When you’re finished, the code should look like the example below.
package com.demo.simple;

import javax.ws.rs.ApplicationPath;
import javax.ws.rs.core.Application;

/**
 * Configures the Jakarta REST application.
 *
 * @author Ivar Grimstad (ivar.grimstad@eclipse-foundation.org)
 */
@ApplicationPath("resources")
public class ApplicationConfig extends Application {

}
Create the Temperature Controller Class
The TemperatureController class is used to read the temperature file when it’s invoked.
To create the class, create a new Java class named org.demo.simple.TemperatureController, which is responsible for reading the file and setting values within variables. The temperature will be in the format (23.5, 74.3) with the first reading being in Celsius, and the second reading being in Fahrenheit.
Here’s an example TemperatureController class for reference.
package com.demo.simple;

import java.io.BufferedReader;
import java.io.IOException;
import java.nio.charset.Charset;
import java.nio.file.Files;
import java.nio.file.Paths;
import javax.enterprise.context.RequestScoped;
import javax.inject.Named;

/**
 *
 * @author juneau
 */
@Named
@RequestScoped
public class TemperatureController {

  private String currentTemperatureF;

  private String currentTemperatureC;

  public TemperatureController(){

  }

  protected String readTemperatureFile() {

  	String temperatureFile = "<<path-to-file>>/temperature.txt";
  	java.nio.file.Path path = Paths.get(temperatureFile);
  	String currentTemperature = null;
  	try (BufferedReader reader = Files.newBufferedReader(path, Charset.forName("UTF-8"))) {

      	String currentLine = null;
      	while ((currentLine = reader.readLine()) != null) {//while there is content on the current line
          currentTemperature = currentLine;
      	}
  	} catch (IOException ex) {
      ex.printStackTrace(); //handle an exception here
  	}
  	return currentTemperature;
  }

  /**
  * @return the currentTemperatureF
  */
  public String getCurrentTemperatureF() {
  	String temp = readTemperatureFile();
  	currentTemperatureF = temp.substring(temp.indexOf(",") + 1, temp.lastIndexOf(")"));
  	return currentTemperatureF;
  }

  /**
  * @param currentTemperatureF the currentTemperatureF to set
  */
  public void setCurrentTemperatureF(String currentTemperatureF) {
  	this.currentTemperatureF = currentTemperatureF;
  }

  /**
  * @return the currentTemperatureC
  */
  public String getCurrentTemperatureC() {
  	String temp = readTemperatureFile();
  	currentTemperatureC = temp.substring(temp.indexOf("(") + 1, temp.lastIndexOf(","));
  	return currentTemperatureC;
  }

  /**
  * @param currentTemperatureC the currentTemperatureC to set
  */
  public void setCurrentTemperatureC(String currentTemperatureC) {
  	this.currentTemperatureC = currentTemperatureC;
  }

}
An interested service can now use Jakarta Contexts and Dependency Injection (CDI) to inject TemperatureController and call on getCurrentTemperatureF() or getCurrentTemperatureC() to obtain the requested temperature format.
Create the Temperature Resource File
The TemperatureResource file is a JAX-RS file that includes the code shown below.
package com.demo.simple;

import javax.ws.rs.core.Context;
import javax.ws.rs.core.UriInfo;
import javax.ws.rs.Consumes;
import javax.ws.rs.Produces;
import javax.ws.rs.GET;
import javax.ws.rs.Path;
import javax.ws.rs.PUT;
import javax.enterprise.context.RequestScoped;
import javax.inject.Inject;
import javax.ws.rs.core.MediaType;

/**
 * JAX-RS Web Service
 *
 * @author juneau
 */
@Path("temperature")
@RequestScoped
public class TemperatureResource {

  @Inject
  private TemperatureController temperatureController;

  /**
  * Creates a new instance of TemperatureResource
  */
  public TemperatureResource() {
  }

  /**
  * Calls upon the TemperatureController and obtains the current temperature
  * in Fahrenheit.
  *
  * @return an instance of java.lang.String
  */
  @GET
  @Produces({MediaType.TEXT_PLAIN})
  public String getXml() {
  	String currentTemperature = temperatureController.getCurrentTemperatureF();
  	return currentTemperature;
  }

  /**
  * PUT method for updating or creating an instance of TemperatureResource
  *
  * @param content representation for the resource
  */
  @PUT
  @Consumes(MediaType.APPLICATION_XML)
  public void putXml(String content) {
  }

  /**
  * Calls upon the TemperatureController and retrieves the current temperature
  * in Fahrenheit.  Same as getXml();
  * @return
  */
  @GET
  @Produces({MediaType.TEXT_PLAIN, MediaType.APPLICATION_JSON})
  @Path("f")
  public String getF() {
  	String currentTemperature = temperatureController.getCurrentTemperatureF();
  	return currentTemperature;
  }

  /**
  * Calls upon the TemperatureController and retrieves the current temperature
  * in Celsius.
  * @return
  */
  @GET
  @Produces({MediaType.TEXT_PLAIN, MediaType.APPLICATION_JSON})
  @Path("c")
  public String getC() {
  	String currentTemperature = temperatureController.getCurrentTemperatureC();
  	return currentTemperature;
  }

}
This is a web service that will be made available at the URI /resources/temperature, so when the URL http://localhost:8080/poolService/resources/temperature is entered, the temperature in Fahrenheit is displayed. This happens because the method named getXml() is called by default as it is annotated with @GET and does not contain a path. It returns plain text because it is annotated with @Produces({MediaType.TEXT_PLAIN}).
To change the default format to another format, such as XML, you can modify the @Produces annotation to: @Produces({MediaType.APPLICATION_JSON}).
The getXml() method invokes the TemperatureController getCurrentTemperatureF() method to read the temperature and return the result.
Compile and Build the Project
Use your favorite IDE, or the command line, to compile and build the project to create a WAR file named simple-hello.war.
Deploy the Web Service
I’m going to use a micro container to deploy the web service. However, it could also be deployed into any other Jakarta EE-compatible container such as Eclipse GlassFish, Payara Server, or Open Liberty. For a complete list of compatible implementations, click here.
In this case:
- Download Payara Micro 5.2020.4 and place the downloaded Java archive (JAR) file into a directory.
- Open a terminal and type the code shown below to start Payara Micro and deploy the WAR file:
java -jar payara-micro-5.2020.4.jar --deploy <path-to-war-file>/simple-hello.war
The terminal output will look similar to the example shown below.
Payara Micro URLs:
http://<your-machine>:8080/simple-hello

'simple-hello' REST Endpoints:
GET  /simple-hello/resources/application.wadl
GET  /simple-hello/resources/hello
GET  /simple-hello/resources/temperature
PUT  /simple-hello/resources/temperature
GET  /simple-hello/resources/temperature/c
GET  /simple-hello/resources/temperature/f

]]
Run the Web Service
Type the following URL into a browser: http://<your-machine>:8080/simple-hello/resources/temperature
Get More Information
To learn more about getting started with Jakarta EE, visit the Jakarta EE starter page. You’ll find tutorials, examples, and more.
To get involved with the Jakarta EE community, check out our Stay Connected page to choose your preferred method of communications.
About the Author