| Eclipse Corner Article |

Summary
This tutorial shows how to extend the Visual Editor to support a custom widget. It covers topics such as adding to the Visual Editor's palette, building a BeanInfo class, and working with EMF .override files to introduce custom editor behavior.Dave Orme, db4objects
Gili Mendel, IBM
Joe Winchester, IBM
June 20, 2005
The Visual Editor project provides reference implementations of a graphical user interface builder for the JFC and SWT widget toolkits built around an extensible framework. The motivation for this came from experience with previous GUI builders that, while they provided high function end points for particular toolkits, were unable to be adapted to support custom behavior. This typically would be for areas of functionality such as user defined widgets, new layout managers, or flexible code generation patterns. A design goal of the Visual Editor is that is none of its own custom behavior for any JFC or SWT classes is done with hard coding and all logic that the VE employs to enable specific bespoke function such dropping a control on a composite or showing feedback for a particular layout manager is soft coded through extension points. The intention is that the same techniques can be leveraged by anyone wishing to employ similar techniques for their own scenario.
In this tutorial a 3.1 based Eclipse plugin org.eclipse.ve.example.customwidget is created that illustrates some of the extension points of the visual editor. To do this an SWT custom widget is built that combines a Label, Text and Button in a single widget called org.eclipse.ve.examples.customwidget.MyCustomPrompter.

MyCustomPrompter has two properties: type and text. These each have get and set methods and can be used to configure the behavior of the Button and the Text's text value. There is also a ButtonSelectionEvent event that is raised when the prompter's button is pressed and listeners can register for this callback using addButtonSelectionListener(ButtonSelectionListener aListener);
In the absence of the plugin that this tutorial creates, the MyCustomPrompter widget can still be used by a user who drops it onto an SWT composite by adding a jar (or folder) containing the class to their Java project's build path. Within the Visual Editor the class can be selected by using ChooseBean from the palette to drop MyCustomPrompter onto a composite. Through inheritance (MyCustomPrompter extends org.eclipse.swt.widgets.Composite) the custom control will be rendered correctly and its properties will be determined using JavaBeansTM reflection allowing it to be modified using the Properties Viewer. The new event will also be determined automatically through introspection by the Visual Editor and available to the user to add callback logic to through the Add Event dialog.
This tutorial shows how to extend the edit experience by creating a plugin that enables specific Visual Editor behavior over and above the default that is determined through inheritance. This results in a higher level edit experience for end users of the MyCustomPrompter class. The examples given are purely for illustrative purposes only and to highlight some of the available ways to extend the behavior of the Visual Editor, and it is expected that the reader of this tutorial will use it to learn the extension mechanism and then apply this to their own custom widget or Java class.
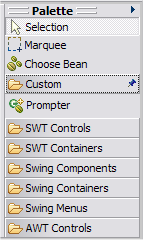
The visual editor provides a palette of classes from which the user can choose commonly used classes. The tutorial shows how to create a new palette category containing the CustomWidget to allow it to be brought to the user's selection and easily selected and dropped without having to use ChooseBean and enter the class name
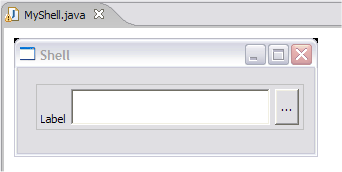
| Before | With plugin showing Custom category with the MyCustomPrompter class |
 |
 |
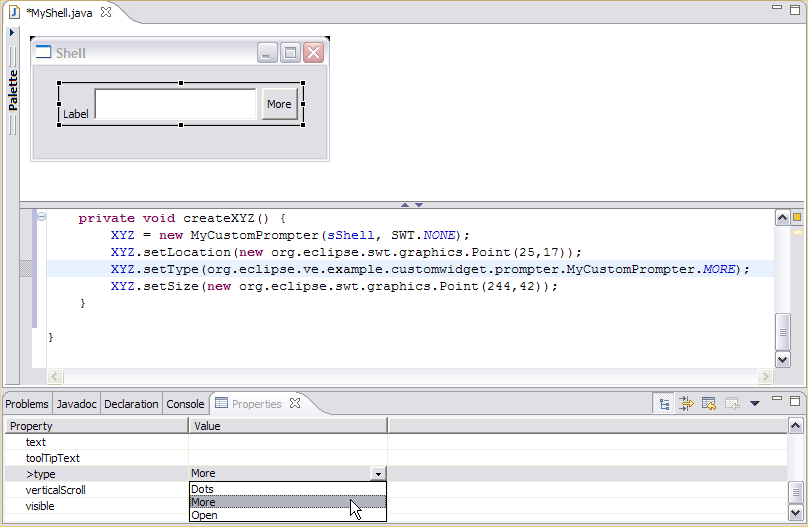
MyCustomPrompter has an int property called type that affects the text shown on the CustomPrompter's button. This has a set of restricted values corresponding to static constraints. For example, 0 is the constant CustomPrompter.DOTS, 1 is CustomPrompter.MORE and 2 is CustomPrompter.OPEN. Rather than have the user have to remember this the property sheet will be extended so that there is a drop down list of available values and the existing value is shown as its meaningful name rather than its internal int value.
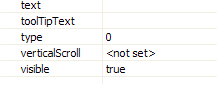
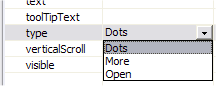
| Before | With plugin | With plugin |
| type property displayed with default int editor | type property displayed as static constant name | type property edited with drop down list of enumerated allowable values |
 |
 |
 |
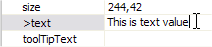
MyCustomPrompter has a String property called text that reflects the value shown on the CustomPrompter's text widget. The default property sheet editor for a String property is a Text field that allows the value to be changed, however the tutorial shows how to have a custom property editor that launches a separate dialog through which the value can be changed
| Before with default String editor behavior for text property | With plugin showing custom editor for text property |
 |
 |
The visual editor uses the graphical editor framework or GEF to
render the visual classes to the user. GEF is a powerful
framework which uses EditPart classes as mediators between the
underlying model and the draw2d view layer. This is similar to
the controller in an MVC pattern and described in overview at
Create an Eclipse based application using GEF. The default behavior
for a visual class is a WYSIWYG rendering where a preview of the live
runtime widget is drawn. There are times when you may wish to
override this for a specific component such as to visually annotate the
feedback for the figure such as drawing grid lines, additional handles
or other features provided by GEF. As an example of how to alter
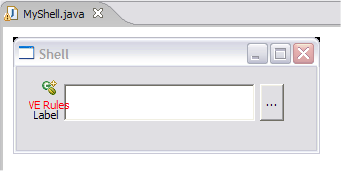
the edit part used by the visual editor the tutorial shows how to have MyCustomPrompter rendered
with an icon  and the text VE Rules super imposed over the
image of the live visual control. In addition the default
behavior of a Composite graphical edit part is to draw a border around
it in the editor so that it can be located by the user irrespective of
whether it has child controls or not. MyCustomPrompter is an aggregate of
three child controls into a custom widget so the graphical edit part
will remove the artificial border.
and the text VE Rules super imposed over the
image of the live visual control. In addition the default
behavior of a Composite graphical edit part is to draw a border around
it in the editor so that it can be located by the user irrespective of
whether it has child controls or not. MyCustomPrompter is an aggregate of
three child controls into a custom widget so the graphical edit part
will remove the artificial border.
| Before with default behavior showing the image of the live visual control with a border | With plugin showing custom edit part with an icon and label and no border |
 |
 |
Code generation uses decoder classes to mediate between the visual editor's model and the Java source model. This tutorial shows how to create a custom code generation rule for the text property of MyCustomPrompter so that it has an additional comment placed on the line with the set method. This is the string // Prompter Text Property
| Before with default code generation behavior | With plugin showing the extra comment line code generated for the setText(String) method |
| private void
createMyCustomPrompter() { myCustomPrompter = new MyCustomPrompter(sShell, SWT.NONE); myCustomPrompter.setText("Text Value"); } |
private
void createMyCustomPrompter() { myCustomPrompter = new MyCustomPrompter(sShell, SWT.NONE); myCustomPrompter.setText("Text value"); // Prompter Text Property } |
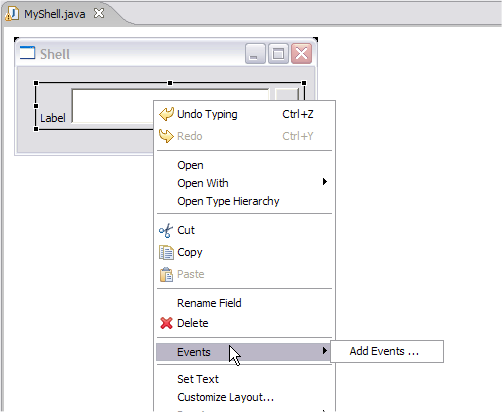
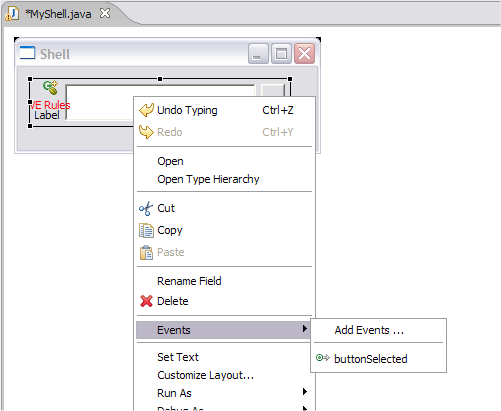
MyCustomPrompter signals an event when its button is pressed. Listeners can register interest in this with the method addButtonSelectionListener(ButtonSelectionListener aListener) and remove interest with the method removeButtonSelectionListener(ButtonSelectionListener aListener). The Visual Editor will automatically detect this event because the naming convention of the methods and the listener class follows the JavaBeans specification. The event will be available from the list of all available events for the custom control, however it is included in the list that has everything from mouse through keyboard and paint events. This tutorial shows how to promote the event to the list of preferred events whereupon it will be shown on the Add Events menu for the class.
| Before where the Events menu has no preferred events | With plugin the Events menu has buttonSelected as a preferred event |
 |
 |
This tutorial goes go through the steps required to build a plugin calledorg.eclipse.ve.example.customwidget. The pre-requisites are an Eclipse 3.1 target environment which has a 3.1 code-base for the Visual Editor, GEF and EMF installed. These can be obtained from the Visual Editor's download page. There is an SDK version of the Visual Editor available as well as a runtime, and to develop this tutorial ensure you have the SDK download for the VE. If you obtain the SDK drivers for GEF and EMF it means you will be able to view their source and debug code more easily.
 Although the
plugin is designed to target 3.1 it can be developed in an earlier
environment such as 3.0.1. The target environment is the one that
is run when the Run ... Eclipse
Environment is used to launch a runtime workbench. You can
use Windows->Preference->PDE->Target
Platform to view and change the target environment and Help About to see the version of
Eclipse.
Although the
plugin is designed to target 3.1 it can be developed in an earlier
environment such as 3.0.1. The target environment is the one that
is run when the Run ... Eclipse
Environment is used to launch a runtime workbench. You can
use Windows->Preference->PDE->Target
Platform to view and change the target environment and Help About to see the version of
Eclipse.
The completed plugin can be obtained separately as described in the section A complete example
This section describes how to build the plugin org.eclipse.ve.example.customwidget. This will be used to package the CustomWidget itself as well as to include the extensions required to override its default behavior. The end result for users is that they will install this plugin onto their Eclipse environment and then configure their Java projects to use the custom widget jar that is included in this plugin using a class path container.
To create the plugin select open the New Project wizard using the
menu options File > New >
Project and choose Plug-in
Project
On the first page of the creation wizard name the plugin org.eclipse.ve.example.customwidget,
select 3.1 as the target version and select the check box Create an OSGi bundle manifest.
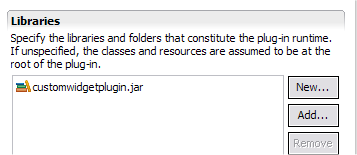
Press Next to bring up the Plug-in-Content page and enter a
plugin name such as Customwidget VE
Example Plugin in the Plugin-In
Name text field and set the name of runtime library to customwidgetplugin.jar.
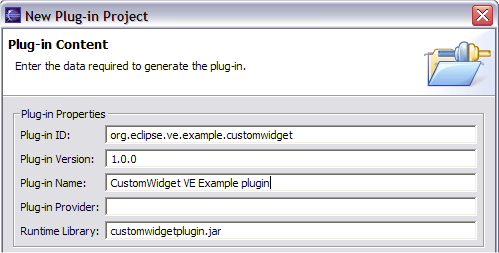
The reason the default suggested
runtime library name of customwidget.jar
is renamed to customwidgetplugin.jar
is to distinguish the jar file used by the workbench code for the
plugin from the name that will be given to the runtime jar containing
the custom widget. This is covered in the section Different jars and packages for
workbench and widget code
Press Finish to have the PDE generate the stub plugin. The workbench might then ask you to switch to the PDE perspective which you can answer Yes to. The plugin manifest editor should be opened by default. This is an editor that allows you to view and edit the contents of the files called plugin.xml and manifest.mf that reside within the plugin. These are both important files as they describe the extension points used and also the list of pre-requisite plugins.
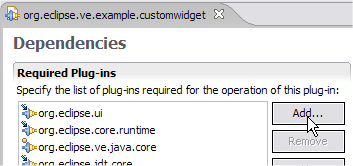
A plugin represents a component that can be installed onto an Eclipse environment and contributes code. Every plugin has a set of dependent plugins which is those it requires to function. This list would typically include pre-requisite plugins with classes or interfaces extended or any extension points that have been used. The list of pre-requisite plugins for a plugin extending the visual editor is:
 org.eclipse.ve.swt
The pre-requisite plugin org.eclipse.ve.swt is not necessarily
required by everyone extending the visual editor. It contains the
code that enables the visual editor to work with the SWT and because MyCustomPrompter is an SWT custom
widget the plugin will be extending SWT base behavior. If your
plugin was for a JFC toolkit such as AWT or Swing you would not
necessarily include org.eclipse.ve.swt
in your list of dependencies but instead would use org.eclipse.ve.jfc. If your
plugin was for an entirely new widget toolkit you might include neither.
To set up the list of required plugins select the Dependencies tab on the plugin editor, select the Add ... button beside the list of Required Plug-ins and enter the list of plugins listed above.
Having created the plugin there are two major steps remaining. The first is to create the actual custom widget class itself and test it, and the second is to extend the visual editor to have the customized behavior described in the introduction.
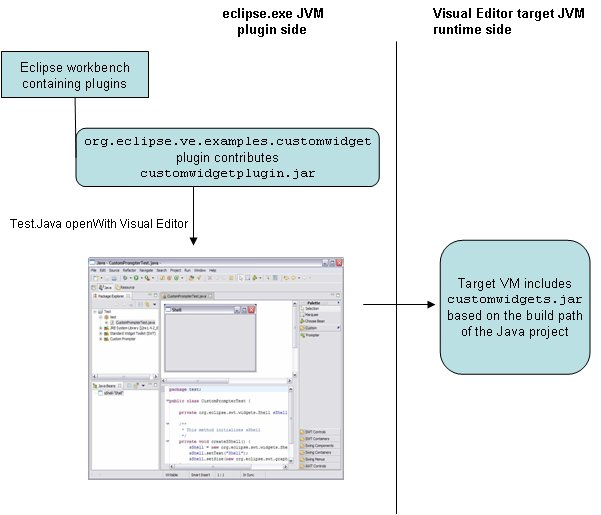
There are two jar files being created as part of this
tutorial. The reason for this is based on the architecture of the
Visual Editor and how it uses a separate JVM for the classes
instantiated by the editor rather with re-use or share the JVM used by
Eclipse itself.
The Visual Editor can be considered as an extension to the Java
Development Tooling (JDT) that lets you preview any visual controls
that are part of the Java class being edited. The raw Java editor
on its own lets you view and modify the source code for a .java file, and edit it using
features like Code assist and the Outline viewer. When you use
code assist the list of available classes is scoped to be only those
that are valid for the current compilation unit, namely those present
in the Java build path of the project. The Java build path is
specified through the project's properties and can be thought of as the
list of -classpath entries
that make up the javac
command. If you try to use a class that isn't on the build path
you will get a compile error. If you try to call a method that
doesn't exist on a valid class you will get a compile error, although
if you were to change the build path so that it now contained a version
of the class that had the method it would compile. The build
path's entries determine the environment in which the class you're
editing is being created for and the editor responds accordingly.
When the Visual Editor is open it uses the JDT's Java editor (as the
bottom half of the screen or a separate tab depending on the workbench
preferences) and parses the code to recognize visual classes and how
they are constructed and associated with each other together with their
initial property values. To create a preview of the visuals these
classes must be actually instantiated in a live environment following
the constructor pattern detected from the source and set methods
actually invoked against the live objects for the desired properties
and relationships. To do this a JVM environment must exist that
contains the list of -classpath
entries that match those in the Java build path so that the JVM can
load and use the actual instances the user is editing their project
with. This can't be the Eclipse's JVM as this is started with the
.jar files required for it to behave as an editor, so a separate JVM is
created each time the Visual Editor is opened on a class. This is
sometimes referred to as the target
VM and its purpose is to host prototype Java instances that the
Visual Editor instantiates and uses based on the source statements in
the .java file being
edited. A good analogy to this process is the one used by
the Run As>Java Application
option in the JDT. If you write a Java class with a public void
main(String[] args) method the JDT lets you edit it inside the Eclipse
JVM, however to test it a separate JVM is launched by the Java Application launcher.
The JDT launcher's separate JVM can be viewed from the Debug viewer allowing you to set
breakpoints and step through code, while the Visual Editor's target VM is deliberately hidden
from the Debug viewer to stop
users from accidentally terminating it.
When writing the plugin for this tutorial there are two jar files that
will finally be created. The first of these is the plugin side jar and contains the Eclipse
workbench code that is used within the IDE's VM and contains code such
as a JFace property sheet editor, a GEF graphical edit part and a
custom source decoder. The second is the runtime
side jar that contains the actual MyCustomPrompter
class itself and doesn't run inside the IDE but instead is placed in
the Java build path of the user's project and runs in the target
VM. The runtime side jar also contains the BeanInfo class for
MyCustomPrompter that contains the extensions that conform to the
JavaBeans component model which is covered more in the sections on the type
property editor and creating the preferred
event.
The plugin code for this tutorial is placed in customwidgetplugin.jar that is
defined as the runtime jar for the plugin itself. On the New
Project wizard we explicitly changed the default prompted jar name to
be customwidgetplugin.jar so that is will not be confused with
the run time jar. The customwidgetplugin.jar contains
the Eclipse code that will run inside the workbench and its definition
can be seen in the in the Runtime
tab of the manifest editor for the plugin's plugin.xml file.
The name of the plugin code's jar
is either held in a <runtime><library
name="customwidgetplugin.jar"></runtime> tag in the plugin.xml file for a pre 3.1
plugin, or else for an OSGI 3.1compatible only plugin the jar file name
is held in the MANIFEST.MF
file in the line Bundle-ClassPath:
customwidgetplugin.jar.
The package org.eclipse.ve.example.customwidget
contains the Java code that is used to create the contents of the customwidgetplugin.jar.
The code for the MyCustomPrompter and its BeanInfo class are placed in the packageorg.eclipse.ve.example.customwidget.prompter. When the plugin is deployed these classes are compiled not into the plugin's customwidgetplugin.jar but instead to a file customwidgets.jar. The steps to create the customwidgets.jar are described in the section The Custom Widget.
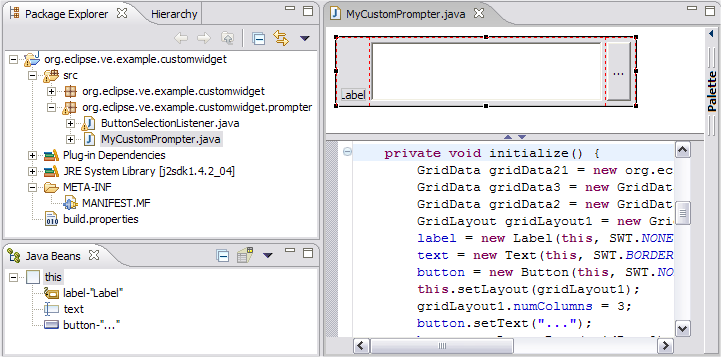
The custom widget used in this tutorial extends SWT composite and has three child controls on it; a label, a text field, and a button. For this tutorial we used the Visual Editor to build the custom widget which, although a good exercise in using the Visual Editor, is outside the scope of what this tutorial is designed to cover - you can download it directly from CVS to begin working. You should download the two classes MyCustomPrompter.java, and ButtonSelectionListener.java and place them into the plugin project in a package org.eclipse.ve.customwidget.prompter. This is illustrated below together with the Visual Editor opened against the MyCustomPrompter class to show the three child controls. The package org.eclipse.ve.example.customwidget is where the visual editor classes (such as the specialized graphical edit part or code generation decoder) will reside, and the package org.eclipse.ve.customwidget.prompter is where the classes reside that the user will use to build their runtime GUIs with.
For deployment the classes MyCustomPrompter
and ButtonSelectionListener
will be packaged in a runtime jar. To do this select the runtime
package and use the pop up menu option Export
to bring up the Export wizard. Select the JAR file option and
name the JAR file customwidgets.jar.
This JAR file will be placed inside the plugin itself and there are two
ways to do this. The first is to either export the JAR to a
temporary location on your computer and then import it into the
project. If you do this you should import the customwidgets.jar not as a JAR file
as it contains no code of any interest to the plugin itself, but
instead as a raw File.
The reason for this is that the inclusion of the runtime code in the
plugin is not for the benefit of Eclipse and it will never be loaded by
the Visual Editor into the Eclipse JVM. The user of the plugin
will configure their Java project to use the custom prompter which is
described in the later section Using
a classpath container, and the visual editor will insert the JAR
into the -classpath of the VM that it uses to host the Java classes
that make up the user's classes.
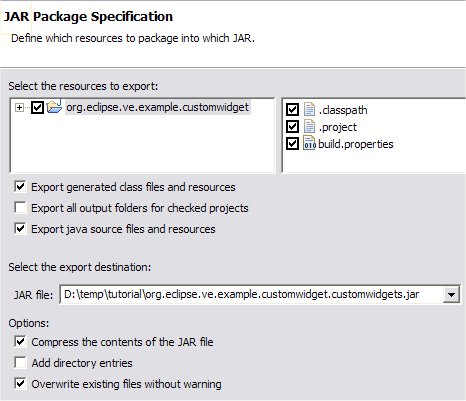
The second way to ensure that the customwidgets.jar
is included in the plugin that avoids having to export to the file
system and then re-import as a file, is to export straight to the
directory used by the plugin itself. To see the location of the
plugin you can open its properties and select Info. The figure
below shows an example of this where the workbench location is
D:\temp\tutorial and the JAR wizard creates customwidgets.jar into the
directory used by the org.eclipse.ve.example.customwidget
plugin. If you do export directly to the workbench as shown below
afterwards you will need to do a manual refresh of the project's
contents using F5 (or the pop-up menu option) to ensure that the
Eclipse workbench is in sync with the file system contents that have
just been altered.
Having created the plugin you can now test it. To do this create an Eclipse launch configuration using the Run menu to bring up the list of available launch configurations, selecting Eclipse Application and New and then running this using the default application.
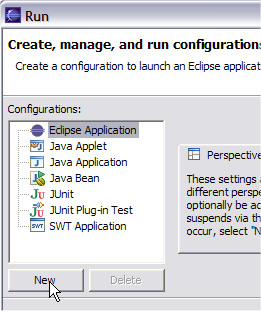
On Eclipse 3.0.x an Eclipse
Application launch configuration is called Run-time Workbench.
This will launch a second Eclipse workbench - the first being your
one that you are using to develop the plugin and the second being the
one you are going to use to deploy the plugin into. In the
deployed workbench create a Java project and add customwidgets.jar
to the Java build path. This is done using the pop-up menu option
to open the Properties of the
project and selecting Java Build path
.... On the build path select the Libraries tab and Add External Jar .... Point
to the location of the jar in the plugin itself - for the example
figure above this would be D:\temp\tutorial\org.eclipse.ve.example.customwidget.customwidgets.jar.
Having added the JAR containing the MyCustomPrompter
class you can now use it within a visual editor class. Create a
test sample using File > New >
Visual class and selecting SWT
> Shell. This will open the Visual Editor over a class
with an SWT shell. Select the Choose
Bean palette entry and because customwidgets.jar
is in the project's build path (the effective -classpath used by the
Eclipse Java compiler and by the Visual Editor) you can choose MyCustomPrompter and drop it onto
the Shell.
The behavior of MyCustomPrompter
is everything picked up by default as the Visual Editor will realize
that MyCustomPrompter extends
org.eclipse.swt.widgets.Composite
so it will be rendered visually and have default property sheet, code
generation, graphical edit part and event menu behavior. The
remainder of this tutorial shows how to customize this behavior as
described in the introduction.
For the test described at the end of the preceding section the MyCustomPrompter class was made available to the user's Java project by them adding it as an external JAR. This isn't ideal as it requires the user knowing the location of the plugin directory on their computer and physically pointing to it. A better way is to use a classpath container. This allows one-touch configuration of a Java project to use a named container which handles all the internals of how to locate the correct runtime code.
A Java container is a class that implements the JDT interface org.eclipse.jdt.core.IClasspathContainer. It is added to a Java project's build path using the Add Library button on the Libraries tab and an example of one used by the Visual Editor is org.eclipse.ve.internal.swt.SWTContainer. As well as the JDT using the container to locate the runtime classes the Visual Editor uses this as a marker for extension behavior. When the Visual Editor opens over a project all of the containers are scanned and matched against extension points to see if there are any plugins that wish to contribute to the palette or any other custom visual editor behavior based on the classes included within the container.
This tutorial doesn't create a new container class because the complexities involved doing this require knowledge of JDT concepts such as IPath and IClassPathEntry[]. It is expected that commercial quality plugins extending the Visual Editor will create their own containers in which case the SWTContainer class is a good example to look at to learn how to do this, however for simplicity the visual editor provides a reference implementation container class org.eclipse.ve.internal.java.core.RegisteredClassPathContainer. The Registered container uses extension points to determine the JAR files it will add to the user's build path.
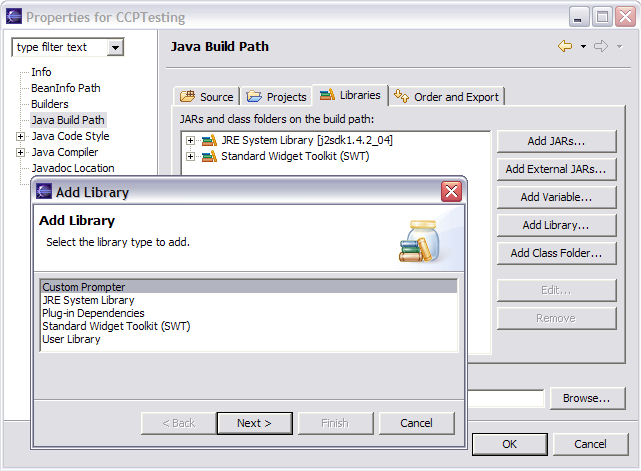
The user experience is that a container called "Custom Prompter" will be available for them to add to a Java project's build path. This is described in the section Using a classpath container. The JDT extension point org.eclipse.jdt.ui.classpathContainerPage allows contributions to be made for an entry to appear in the list of containers and be available for the user to select, as well as the wizard page that will then appear once Next is pressed. The wizard page is responsible for configuring the project's build path to actually add the container classpath entry.
To add the Custom Prompter entry to the list of available containers add the following to the plugin.xml of the org.eclipse.ve.examples.customwidget plugin.
<extension
point="org.eclipse.jdt.ui.classpathContainerPage">
<classpathContainerPageclass="org.eclipse.ve.internal.java.wizard.RegisteredClasspathContainerWizardPage"
id="org.eclipse.ve.example.PrompterContainer">
</classpathContainerPage>
</extension>
The name "Custom
Prompter" is the user visible String shown in the list of
available libraries from the Add
Library wizard on the Libraries
tab on the Java build path.
In a commercial quality plugin it is expected this would come from a
resource bundle and be externalized for different locales however this
tutorial will hard code it to the literal "Custom Prompter". Once the
user selects a container library to be added and presses Next a wizard page is brought up
showing configuration details of the particular container. This
wizard page implements
org.eclipse.jdt.ui.wizards.IClasspathContainerPage and for a
commercial quality plugin it is expected that a custom page would be
written. The visual editor SWT container page
org.eclipse.ve.internal.swt.SWTcontainerWizardPage is a good example to
look at if your intention is to create a full wizard page, however the
visual editor provides an example org.eclipse.ve.internal.java.wizard.RegisteredClasspathContainerWizardPage
that can be used .
The container needs an id that uniquely identifies it within an Eclipse
environment and this tutorial uses org.eclipse.ve.example.PrompterContainer.
The RegisteredClasspathContainerWizardPage will add the container
RegisteredClasspathContainer to the build path of the user's project
once they select it. This is a generic container and to identify
it as being an entry that should point to the runtime files required
for the MyCustomPrompter and
its supporting classes requires two further extension points. If
a specific custom container is being used then these are not required.
The extension point org.eclipse.jdt.core.classpathContainerInitializer
specificies a container initializer that will be used by the JDT to
configure containers. The following lines should be added to the
plugin.xml for the org.eclipse.ve.examples.customwidget
plugin.
<extension
point="org.eclipse.jdt.core.classpathContainerInitializer">
<classpathContainerInitializer
</classpathContainerInitializer>
</extension>
The class used is a reference implementation provided by the Visual
Editor and is org.eclipse.ve.internal.java.core.RegisteredClasspathcontainerInitializer.
The id used must match the one described earlier as the id of the
container wizard page. This tutorial is using org.eclipse.ve.example.PrompterContainer.
Having configured the wizard page and the container initializer
this will now add an instance of the RegisteredClasspathContainer to
the user's build path of their Java project. This needs to be
told where to locate the jars that contain the runtime code.
There is an extension point used by the RegisteredClasspathContainer
class named org.eclipse.ve.java.core.registrations.
To use it add the following lines to the plugin.xml. Note that if
a true container implementation is being done instead then this
extension point is not required - it is only used by the
RegisteredClasspathContainer. For example, the project
org.eclipse.ve.swt that defines the SWT extensions for the visual
editor has its own custom behavior and does not require use of this
extension point.
<extension
point="org.eclipse.ve.java.core.registrations">
<registration
</registration>
</extension>
The name of the container must match the id used when the
classpath wizard page and container initializer were defined.
This tutorial is using org.eclipse.ve.example.PrompterContainer.
The container needs a description that will appear in the Java build
path list of classpath entries and the tutorial uses the hard coded
literal "Custom
Prompter". The plugin element
<library runtime="customwidgets.jar".> describes the actual
location of the runtime jars that contain the MyCustomPrompter class. If
there are multiple jars then the entry can be repeated. The
location of the jar is relative to the plugin itself, so if customwidgets.jar were in a
directory called jars within
the plugin then the entry would be runtime="jars/.customwidgets.jar".
Having updated the plugin.xml file to define the classpath container
the next step is to test this.
Launch the Eclipse Application workbench using the Run menu to open the runtime environment in which the MyCustomPrompter class can be tested. If you have previously done this and created a Java project with a build path entry pointing to the customwidgets.jar as described earlier remove the jar from the build path. Otherwise create a new Java project.
The next steps are the experience that a user of the plugin will take to configure a Java project to work with the MyCustomPrompter custom control. Open the properties for the Java project using the Properties choice on the pop-up menu and select Java Build Path. Select the Libraries tab and choose the Add Library button. This will bring up a list of all known Java containers which will include the Custom Prompter as defined using the extension point org.eclipse.jdt.ui.classpathcontainerPage earlier. The figure below shows the Java build path for a project called Test and the Custom Prompter displayed in the list of available libraries opened from the Add Library button
Select the Custom Prompter and press Next to view the wizard page org.eclipse.ve.internal.java.wizard.RegisteredClasspathContainerWizardPage defined earlier. This is a generic example of a page and shows details of the jar that will be added by the page. For commercial quality plugins it is expected that this page however will be a specific to the particular plugin.
Pressing Finish on the wizard page will configure the project (using
the RegisteredClasspathcontainerInitializer defined earlier) to include
the container RegisteredClasspathContainer
together with the id oforg.eclipse.ve.examples.PrompterContainer.
Expanding the container in the project's build path will show that it
points to the correct location for the customwidgets.jar as described
in the <library
runtinme="customwidgets.jar"> plugin.xml tag described earlier.
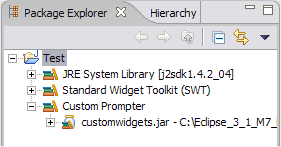
The figures above for configuring
the project Test's build path to include the Custom Prompter container entry
show two other containers, namely the JRE
System library and the Standard
Widget Toolkit. The JRE container will be present on
the Java project by default when it is first created, however the SWT
container will not be. This is a container defined by the plugin
project org.eclipse.ve.swt
that enables the Visual Editor to work with the SWT. If you
created the Test project in the step Testing the custom prompter
described earlier when you created the test class using the New Visual Class Wizardand selected
SWT application the wizard automatically added the SWT container to the
project's build path as required. SWT support for the Visual
Editor can be manually added by using the steps described above but
selecting Standard Widget Toolkiit
instead of Custom Prompter on
the Add Library wizard
page. Adding dependent containers (CustomPrompter requires SWT)
is not something that is supported by the reference implementation of
RegisteredClassPathContainer and it is expected that commercial quality
plugins will provide their own container class with the required logic
to ensure consistency of dependent containers in the user's build path.
Having configured the Test project to use the Custom Prompter container you can
now test it by creating an SWT Shell from the New Visual Class Wizard and
dropping MyCustomPrompter
using the Choose Bean ...
palette entry. the next step is to configure the palette so that
a new category called Custom
is added that has an entry for the MyCustomPrompter
class.
The visual editor's palette is described by an EMF model. EMF
serializes to XMI
which is an XML representation of a graph of EMF objects. Plugins
can define their own XMI files that describe the categories to be added
to the palette, the groups these belong to, and the actual entries
themselves. For the org.eclipse.ve.examples.customwidgets plugin
there will be a palette XMI file that describes the single category and
class to add.
Create a file called customprompter.xmi in the plugin and open it with
a text editor. The data for the file is shown below and can be
downloaded directly from
CVS to avoid re-entry.
<xmi:XMI xmi:version="2.0"
xmlns:xmi="http://www.omg.org/XMI"
xmlns:ecore="http://www.eclipse.org/emf/2002/Ecore"
xmlns:palette="http:///org/eclipse/ve/internal/cde/palette.ecore"
xmlns:utility="http:///org/eclipse/ve/internal/cde/utility.ecore">
<cmpGroups xsi:type="palette:GroupCmp">
<objectCreationEntry xsi:type="palette:EMFCreationToolEntry"creationClassURI="java:/org.eclipse.ve.example.customwidget.prompter#MyCustomPrompter"/>
<entryLabel xsi:type="utility:ConstantString" string="Prompter"/>
<values xmi:type="ecore:EStringToStringMapEntry" key="org.eclipse.ve.internal.cde.core.nameincomposition" value="customPrompter"/>
</cmpEntries>
</cmpGroups>
</palette:CategoryCmp>
</xmi:XMI>
The <palette:categoryCmp> tag describes a
palette category that has a label and groups, each group containing a
number of entries. In the example for the tutorial the label is
hard coded to the literal "Custom".
For
a plugin that needed to support different language locales there is an
EMF class utility:TranslatableString and examples of its usage can be
found in the palette files for the plugin org.eclipse.ve.jfc.
A single group is defined for the Custom category. If multiple
groups are defined the palette demarks these visually with a
separator. The group has a single entry that defines the
graphic, the qualified name of the class and the literal
string that is displayed on the palette entry. To ensure that a
good default name is used each time the user drops an instance of the
CustomPrompter a default nameincomposition
is specified to be "customPrompter". The
graphic points to the URL of where the image is located, in this case
the entry points to a file custom.gif
in the icons directory of the
plugin called org.eclipse.ve.example.customwidget.
The graphic used is available in CVS
and you will
need to create a folder called icons
in the plugin and copy it there.
 Because XMI files do not have anything to validate them at design time
errors made in their syntax can easily be made that cause runtime
problems that can be hard to trace and debug. The most
straightforward way to write a Visual Editor XMI file is to copy an
existing one that is similar to what you desire and then alter just the
parts that need changing.
Because XMI files do not have anything to validate them at design time
errors made in their syntax can easily be made that cause runtime
problems that can be hard to trace and debug. The most
straightforward way to write a Visual Editor XMI file is to copy an
existing one that is similar to what you desire and then alter just the
parts that need changing.
Having created the customprompter.xmi file we need to enable the Visual Editor to use it. This is done by associating the palette file with a classpath container, in our case the Custom Prompter.
Now that we have our palette xmi file available, we need to contribute it to the Visual Editor. We do so by adding to the following extension in the plugin's plugin.xml manifest file.
<extension
<palette
</extension>
The extension point used is org.eclipse.ve.java.core.contributors.
This has a <palette> child XML tag that points to the id of
the container whose inclusion in a project's
build path causes the palette categories defined in the
categories tag to be included. The palette categories tag is relative
to the root of the plugin project, for example If the palette XMI file
is in a folder called palette
then the entry would be categories="palette/customprompter.xmi".
When the Visual Editor starts it scans all of the project's build path entries and for any that are containers it looks to see whether there are any palette files. These are combined together to create the overall palette.
As well as describing palette entries directly it is
possible to configure the Visual Editor to have an IConfigurationContribution that has the
ability to manipulate both the -classpath of the Visual Editor's VM and
the palette with more fine control. An example of where this is
done is by SWT that has to add runtime packages such as DLLs or
packages to the VM's arguments, or a plugin that might wish to remove
some of the existing palette entries (such as the JFC ones) for
projects configured with their container present.
As
well as defining containers to be the trigger point for Visual Editor
custom behavior you can also use plugins by direct name using the plugin= tag. An example of where
you might do this is if you were extending the Visual Editor to work
with a set of classes that were contained in a specific plugin, so the
user experience to enable a Java project would be to add a dependent
plugin rather than a classpath container. An example of this
might be something like a PDE type development environment for the
actual end user.
Having modified the manifest of the example plugin to include the
plugin the next step is so test it. Do this by launching the
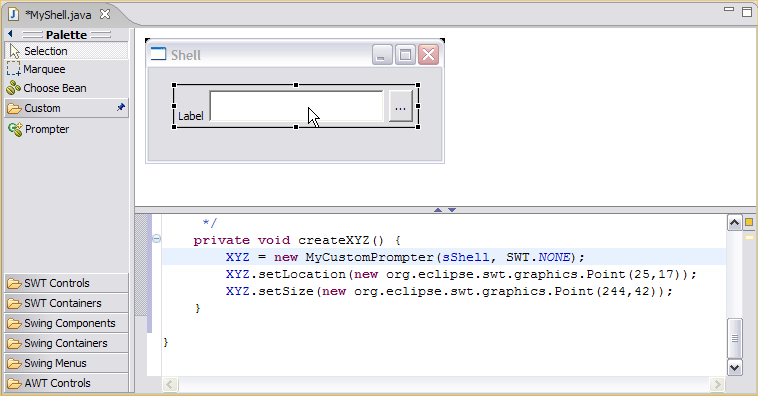
Eclipse Application workbench and creating, or re-opening, a class MyShell that was created from the New Visual Class Wizard as an SWT
application. The Visual Editor should detect that the container
with an id of org.eclipse.ve.example.PrompterContainer
is in the project's build path and include the palette categories
contained in the custompalette.xmi
file. This is shown in the figure below where the Prompter
palette entry has been selected and dragged out onto the Shell.
When
you launch the Eclipse Application workspace use the -clean option, as each time the plugin.xml manifest file has
changed we need to be sure the runtime Eclipse environment clears its
cached manifest details
At this point in the tutorial you should have defined a classpath
container that the user can configure a Java project with to include
the jar containing the runtime code for the MyCustomPrompter
class. The extension point org.eclipse.ve.java.core.contributors
has been used to point to the location of a palette XMI file that
contains a category with an entry for the class.
The next steps are to configure the Visual Editor so that MyCustomPrompter has custom
behavior over and above that it inherits by virtue of extending org.eclipse.swt.widgets.Composite.
MyCustomPrompter class has an int property named typewith getType() and setType(int aType) methods. While the signature of setType allows it to accept any int, the class itself only works with one of the three values 0, 1, or 2 The definition of the values is held in three static constants on the MyPrompterClass.
public final static int DOTS = 0;
public final static int MORE = 1;
public final static int OPEN = 2;
The significance of the three values is that they alter the button text for MyCustomPrompter to be either "...", "More", or "Open" respectively. The following code shows this for MyCustomPrompter's setType(int type) method.
public void setType (int type) {
  switch (type) {
    case DOTS: button.setText("...");
      break;
    case MORE: button.setText("More");
      break;
   case OPEN: button.setText("Open");
      break;
    default:
     throw new IllegalArgumentException("Value " + type + " must be one of 0, 1 or 2");
  }
}
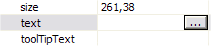
Whenever a class is selected in the Visual Editor graphical canvas or Java Beans tree viewer the Properties view will show its properties and their current values. The view can also be used to edit the property values, and the Visual Editor has a number of pre-defined editors associated with specific types. int properties for example have an editor that allows only valid int values to be entered and by default the Visual Editor will use this whenever the type property is selected based on its signature.
This step of the tutorial describes how to override the default behavior so that the type property is edited using a drop down list of the three allowable values. Also, instead of the values 0, 1 and 2 being displayed as the current values the literals "Dots", "More" and "Open" will be used instead. This is described as an objective of the tutorial in the Introduction.
To override the behavior of the type property so that it has the desired behavior involves using a BeanInfo class. BeanInfo classes provide a way to describe a classes' design time behavior and art part of the JavaBeans specification. The Visual Editor uses the JavaBeans specification wherever possible to define edit time behavior for a JavaBean.
The BeanInfo specification allows for a class with the same name as its Java peer to exist that describes the edit time behavior of the class. For example, the tutorial class is named MyCustomPrompter so there would be a class MyCustomPrompterBeanInfo that implements the interface java.beans.BeanInfo associated with it. The simplest way to create this class is to put it in the same package as the class it describes (e.g. org.eclipse.ve.example.customwidget) . Strictly speaking this isn't good physical separation of behaviors as the BeanInfo classes should be kept apart from the runtime in a separate package and separate jar so they don't become part of the end user's actual deployment configuration. The Visual Editor does support scenarios where the BeanInfo is in separate packages and separate jars, however for the purpose of this tutorial the class org.eclipse.ve.examples.customwidget.MyCustomPrompterBeanInfo will be created that extends the abstract superclass java.beans.SimpleBeanInfo.
The full source code for the BeanInfo can be downloaded from CVS. A BeanInfo class is responsible for describing the list of properties used by a tool such as the Visual Editor, and also their edit time behavior. This is done by specializing the method PropertyDescriptor[] getPropertyDescriptors(). The method returns an array of java.beans.PropertyDescriptor objects, each one representing an item that will appear as a row in the Properties view and containing information about its display name, the Java get and set method associated with the property, as well as the rules for how the property shoud be edited. The specification allows support for editing behavior is provided by having a java.beans.PropertyEditor defined against the PropertyDescriptor, and while the Visual Editor will work correctly if a PropertyEditor class has been defined it also supports a shorthand notation for describing a list of enumerated values because this pattern occurs frequently in widget libraries (for example orientation properties on scroll bars, alignment values on layout constraints, etc...) and is the pattern used by the MyCustomPrompter's type property. This shorthand notation involves defining a key value pair on the PropertyDescriptor, the key of which is the string literal enumerationValues and the value of which is an array of tri values. The structure of the array is a repeating set of displayName, value, initializationString. The displayName is the user visible string shown to the user in the Properties view, the value is the actual object that identifies the trivalue against a live property setting, and the initializationString is the fully qualified code fragment that is generated as argument to the property's set method. This is illustrated below in the method getPropertyDescriptors() for the class MyCustomPrompterBeanInfo.
public PropertyDescriptor[] getPropertyDescriptors() {
try {
PropertyDescriptor[] result = new PropertyDescriptor[2];
result[0] = new PropertyDescriptor("text",MyCustomPrompter.class);
result[1] = new PropertyDescriptor("type",MyCustomPrompter.class);
result[1].setValue(
});
return result;
} catch (IntrospectionException e) {
e.printStackTrace();
return null;
}
}
The getPropertyDescriptors() method returns an array of two
properties; text and type. The type property has a key value pair
assigned to it with a key of enumerationValues
and a value that is an array of nine elements. These nine
elements represent the three enumerated values defined as a
tri-values. The first of these is for the value 0 and is defined
as displayName,value,initString
of "Dots", 0, "0". Instead of hard
coding the 0 however they are coded to be the dynamic lookups of the
actual value from the static constant, allowing the constant to
internally change without requiring BeanInfo modification. The
other two values "More" and
"Open" are defined as tri-values for the 4th, 5th and 6th elements of
the array and the 7th, 8th and 9th respectively.
The getPropertyDescriptors() method returns a fully inclusive set of property descriptors for the JavaBean. For MyCustomPrompter the user experience the tutorial wants is that the inherited properties such as background, foreground, size, etc.. are present on the class. To achieve this rather than having the getPropertyDescriptors() method collect the full list of all desired properties, the JavaBeans specification allows for the method BeanInfo[] getAdditionalBeanInfo() to be specialized. This returns an array of BeanInfo classes whose properties are merged together with the result of getPropertyDescriptors() to create the complete list.
public BeanInfo[] getAdditionalBeanInfo(){
try{
} catch (IntrospectionException e){
return new BeanInfo[0];
}
To create the array of BeanInfo classes representing the set of
descriptors to merge one technique might be to write the code return
new BeanInfo[] {CompositeBeanInfo.class, ControlBeanInfo.class, WidgetBeanInfo.class}. However
doing so would be an attempt to hard code the names of the BeanInfo
classes that may currently be associated with the superclass chain of MyCustomPrompter but would fail
if new BeanInfo classes were introduced or removed. The preferred
technique for picking up inherited properties is with the statement return
new BeanInfo[]{Introspector.getBeanInfo(Composite.class)} where the
argument to the getBeanInfo(Class aClass) method is the
current bean's superclass. Rather than using Composite as the starting point
for merging inherited properties which is the immediate superclass of MyCustomPrompter,
Control is used
instead. The reason for this is that while MyCustomPrompter extends Composite it does this more for
physical reasons so it can have its three child controls (the Label, Text and Button), however as a black box
custom class it itself doesn't want to inherit the behavior of Composite such as the ability
to have its layout changed. For this reason it is logically a
subclass of Control.
Having updated MyCustomPrompterBeanInfo.java this must be re-exported to the customwidgets.jar file. The customwidgets.jar in the plugin is the one that the Custom Prompter classpath container uses in its build path, and if the step of re-creating the customwidgets.jar file is not done when you launch the Eclipse Application you will be using the old version of the code. Currently Eclipse 3.1 does not support classpath container entries pointing to folder structures otherwise the RegisteredClassPathContainer could be coded to automatically look back into the directory structure of the development environment that launched it so for now don't forget to keep re-creating the customwidgets.jar file each time any of its contents have changed.
The Visual Editor caches information about a class and under some
builds prior to VE 1.1 there are some issues with the cache going stale
and not being automatically refreshed. If this occurs you can
manually recycle the cache by selecting Project > Clean and also manually
removing the directory org.eclipse.ve.beaninfo/cache
from the workbench directory.
The changes to the MyCustomPrompterBeanInfo
should mean that the type
property is now rendered with its display name rather than just the raw
int value. The
Properties view also will create a drop down list of the three
allowable values. The figure below shows the list of the three
values and when one is selected the argument to the setType(int) method will be
generated with the initializationString as defined in the BeanInfo array.
The BeanInfo mechanism provides one technique to override default edit
behavior for a Java class. The Visual Editor uses BeanInfo
classes internally for many of its customizations and it recognizes
externally created BeanInfo classes according to the JavaBeans
specification.
Some kinds of customization are not possible through the BeanInfo
mechanism because while it provides a powerful way to describe edit
time behavior and shape for a class the Visual Editor needs to be able
to export some of its innermost extension points to the creator of the
Java class, and the BeanInfo mechanism is designed to provide a
portable way of customizing a Java class that can be transported easily
between different IDEs and tools. For example, the next exercise
in the tutorial is to override the behavior that occurs when the text property is edited to launch a
dialog editor. This dialog editor will be written using the SWT
and implement Eclipse specific interfaces, so describing it on the
BeanInfo would violate the idea that BeanInfo classes are portable (as
Eclipse interfaces and the SWT are not necessarily available to other
visual design tools).
For this reason the Visual Editor has a separate mechanism to extend a
class's edit time behavior that is done through override files. This works in conjunction with
the BeanInfo mechanism and provides the ability to leverage any Eclipse
IDE or Visual Editor specific behavior for a class.
At the heart of the Visual Editor is an EMF model that describes a
class being edited. This model describes the instances, their
relationships, scope, and property settings. Instances of objects in
this model implement org.eclipse.jem.internal.instantiation.base.IJavaInstance.
For example, a visual editor class that has a Shell whose size is 200,200
will contain two IJavaInstance
objects. The first of these is for the Shell itself and the second is
for a Point representing
the size. An EMF relationship between the Shell and the Point instance will exist whose
structural feature represents the size property.
EMF is a self describing structure, so behind the instance model there
is a meta-model that describes the classes themselves - their methods,
properties, events and hierarchy. The meta-model is created by the
Visual Editor using a combination of reflection and JavaBeans
Introspection. Instances in this metamodel consist of org.eclipse.jem.java.JavaClass
for each Java class. The structural features in the model are
instances of EReference and represent the properties of the Java class.
There are times when it is necessary to provide additional information that should be merged in with the EMF model of a JavaClass. An example of this is a new feature has to be added over and above those that can be determined by reflection.
The Visual Editor uses the EMF model of a JavaClass not only to define its shape but also to define a number of helper classes used by the Visual Editor. These are typically mediator classes that are used by the different Visual Editor subsystems. The names of the mediator classes to use for a given JavaClass are held in the EMF model, thereby allowing specific classes to have custom behavior for each subsystem. Rather than hold these directly against the JavaClass (which is a generic model of Java classes that can be used by Eclipse plugins other than the Visual Editor) they are held against decorator classes that annotate the descriptive information of a class. These can be thought of similar to key value pairs that hold information rather than provide functionality.
In summary, override files are used as means to modify, add to or delete from an EMF JavaClass whose shape is determined through using standard Java reflection combined with BeanInfo introspection.
For a plugin to contribute override files its plugin manifest must implement the extension point org.eclipse.jem.beaninfo.registrations. This specifies the trigger in the build path that will cause the overrides to be applied (either a classpath container or pre-requisite project) as well as the name of a Java package and where override files for its contents are held within the plugin folder structure. The code below shows the extension used for the plugin.xml for the org.eclipse.ve.examples.customwidget example in this tutorial.
<extension
point="org.eclipse.jem.beaninfo.registrations">
<override
</override>
</registration>
</extension>
The classpath container with an id of is
the one used by the Custom Prompter
library. The class being overriden is org.eclipse.ve.example.customwidget.prompter.MyCustomPrompter
so its package is declared together with a
folder location for where the override files will be stored. The
location of the override folder is up to the creator of the plugin and
is any arbitrary folder, however there is a convention that the Visual
Editor uses where override files are held in a top level folder called overrides and then sub folders
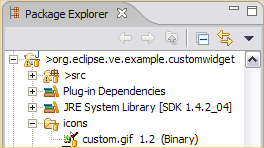
created for the package path. The Figure below shows the
directory structure of the org.eclipse.ve.example.customwidget
plugin with the folder structure of /overrides/org/ecliose/ve/example/customwidget/prompter
(which matches that defined in the registration path=
extension point).
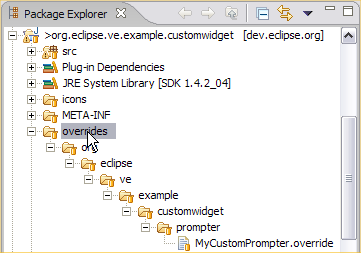
The Figure also shows a file MyCustomPrompter.override present in the override directory for the package. When the Visual Editor builds up the EMF JavaClass instance representing the shape of the MyCustomPrompter class this file will be read and merged into the definition. The syntax of this file can become complex due to the number of different ways in which different JavaClasses needed to be leveraged to implement custom functionality. The remainder of the three examples in this tutorial are each achieved through settings in the .override file. These are:
Each of these three is done through adding decorator classes. Decorator classes are added to ECore elements in the EMF model representing a class, either the JavaClass itself or an EReference representing one of its structural features Decorators are added through the <annotations> property of an ECore object.
The type org.eclipse.ve.internal.cde.decorators.BasePropertyDecorator is responsible for specifying property sheet information such as the name of the classes for the JFace label provider or cell editor, or whether the entry in the property sheet should override the default behavior for whether it is expandable, whether null values are allowed, etc...
The type org.eclipse.ve.internal.cde.decorators.ClassDescriptorDecorator is responsible for specifying custom GEF behavior such as custom edit parts for the graphical editor or the Java Beans tree view.
Because MyCustomPrompterBeanInfo returns a text PropertyDescriptor in list of properties from the method getPropertyDescriptors()[] it will be included as an entry in the Properties view. Even without the explicit BeanInfo the class's signature includes the two methods public String getText() and public void setText(String aText) which, because they follow the JavaBeans specification naming convention for a property's get and set methods, would be automatically detected by the Visual Editor through Introspection.
The rules for the Properties view is that for a given property a BasePropertyDecorator is first looked for on the EReference representing the property in the EMF model. If one is found and it has an explicit labelProviderClassName or cellEditorClassName then this is used as appropiate. This is the mechanism that will be used for the text property. If no decorator exists in the property defining an editor then if the EReference came originally through introspection the java.beans.PropertyDescriptor is queried to look for a propertyEditorClass or key of enumerationValues. Failing both of these a default editor is used for the type of the property.
To determine the default editor for a property based on its type a BasePropertyDecorator on the JavaClass EMF definition is
used. If no direct decorator can be found annotating the JavaClass then the superclass
chain is searched to look for a decorator that provides a custom cell
editor or label provider. For example, the text property is typed to java.lang.String and the plugin
org.eclipse.ve.java.core
provides a String.override
file that annotates the JavaClass
with a a BasePropertyDecorator
defining the label provider as org.eclipse.ve.internal.java.core.StringJavaLabelProvider
and the cell editor as org.eclipse.ve.internal.java.core.StringJavaCellEditor.
This is an example of where the Visual Editor's implementations of the
JFC and SWT are done thoroughly using its own API.
The cell editor that will be written for the text property will be placed in the package org.eclipse.ve.example.customwidget. This package will form part of the contents of the plugin jar that makes up the code that runs in the workbench and extends the Visual Editor with new Eclipse workbench behavior. The class created is org.eclipse.ve.example.customwidget.CustomLabelEditor and extends the abstract superclass org.eclipse.jface.viewers.DialogCellEditor.
IDE specific extensions are defined by annotating the EMF JavaClass meta object that the Visual Editor uses. This is done with a .override file, and the contents of MyCustomPrompter.override should be written as follows:
<?xml version="1.0" encoding="UTF-8"?>
xmlns:xmi="http://www.omg.org/XMI"
xmlns:xsi="http://www.w3.org/2001/XMLSchema-instance"
xmlns:org.eclipse.ve.internal.cde.decorators="http:///org/eclipse/ve/internal/cde/decorators.ecore"
xmlns:ecore="http://www.eclipse.org/emf/2002/Ecore"
xmlns:event="event.xmi">
<addedEObjects xsi:type="ecore:EReference"
</addedEObjects>
</event:Add>
</xmi:XMI>
The header of a .override file declares the namespaces of the EMF
packages used. Two packages are required to define the objects
required for the CustomLabelEditor, the
decorators.ecore package and the event model's package.
The purpose of the file is to create a BasePropertyDecorator that
defines the cell editor and annotate the structural feature for the text property. This is done
by adding a structural feature whose name is text. Even through the object
used is an Add from the event
model, the Visual Editor will pick up the fact that there is a text property defined from
introspection (the one explicitly specified in the
MyCustomPrompterBeanInfo or in its absence the one determined through
get and set method pair matching) and merge in with this
property. This way information that has come from introspection
such as the get and set method names are combined with the EReference
defined in the .override file.
The eAnnocations property defines the
annotations for the EReference and the class we're creating is an
instance of org.eclipse.ve.internal.cde.decorators.BasePropertyDecorator.
The xsi:type
structure does not point to the
Java package directly. The first portion of
org.eclipse.ve.internal.cde.decorators points to the name of a
namespace defined in the xmi:XMI opening tag. This
namespace relates to the URL of decorators.ecore EMF package that
itself is declared in the plugin org.eclipse.ve.cde with its own use of
the extension point org.eclipse.emf.ecore.generated_package
to be the EMF package class
org.eclipse.ve.internal.cde.decorators.DecoratorsPackage.
The class
org.eclipse.ve.internal.cde.decorators.BasePropertyDecorator has an EMF
feature cellEditorClassname. This will be
used by the Visual Editor in the Properties view when the property is
edited and points to our custom editor.
Having defined the .override file that extends the MyCustomPrompter's text feature to have a custom IDE cell editor the next step is to write the code for the custom editor itself. CustomLabelEditor extends DialogCellEditor that provides the framework support for displaying a button to open the actual dialog.
The next step is to write the dialog that allows the user to edit the text property and ensure that this is launched from CustomLabelEditor.
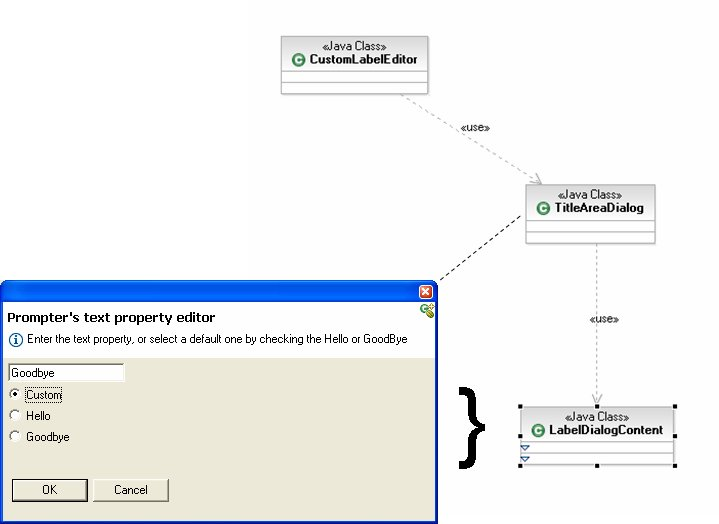
The dialog is created by extending the JFace helper class org.eclipse.jface.dialogs.TitleAreaDialog that provides support for the title area and buttons. The content or client area of this will be built using the Visual Editor itself as a visual component class org.eclipse.ve.example.customwidget.LabelDialogContentArea.
To logic for what occurs when the dialog is requested to be open is done by specializing the method openDialogBox(Control cellEditorWindow) in CustomLabelEditor. The contents for this method are shown below and perform two important steps. The first of these is to open an actual dialog that lets the user specify their text property, and the second is to get the result of this and create a new IJavaInstance that represents the next String for the Visual Editor's EMF instance model. The code below shows how to do this for CustomLabelEditor.
protected Object openDialogBox(Control cellEditorWindow) {
Display display = cellEditorWindow.getDisplay();
LabelDialogContent content;
protected Control createContents(Composite parent) {
setTitleImage(CustomwidgetPlugin.getCustomImage());
setTitle("Prompter's text property editor");
setMessage("Enter the text property, or select a default one by checking the Hello or GoodBye",IMessageProvider.INFORMATION);
return result;
}
protected Control createDialogArea(Composite parent) {
return content;
}
public String toString() {
}
};
if (dialog.open() != Window.CANCEL) {
} else { return getValue();
}
}
The dialog editor used is an
inner class that extends the jface abstract class
org.eclipse.jface.dialogs.TitleAreaDialog. Three methods are
specialized:
The createContents(Composite parent) method is used to build the
actual SWT content area of the dialog. The TitleAreaDialog
supeclass provides a default structure that is invoked through
calling super.createContents(parent),
although details such as the image and title are overridden. The
content area of the dialog is the area we're interested in putting out
custom editing experience into, and this is done by creating an
instance of LabelDialogContent
(that is built below).
The content area for the TitleAreaDialog created by the
LabelCellEditor is the class
org.eclipse.ve.examples.customwidget.LabelDialogContent. This is
available in CVS LabelDialogContent.java
and extends org.eclipse.swt.Composite
and was built using the Visual Editor. This has the methods public setString(String aString)
to set the current value of the String, and public String getString() to
return it. These are both called by the CustomLabelEditor when it
initializes the content area and
returns the value.
The toString()
method is specialized to return the value of the LableDialogContent,
which represents the String entered by the user as the new text property. This is so
that the value can be referenced by the CustomLabelEditor itself when
it has created the actual object that will be
set into the Visual Editor model.
If the TitleAreaDialog isn't cancelled then the JFace cell editor
needs to return the value of the newly created object representing the
value of the text
property. The LabelDialogContent returns a java.lang.String and
this requires conversion into an IJavaInstance representing the EMF
JavaClass instance for the Visual Editor's model. This is done
with the helper method IJavaInstance
createStringJavaObject(String aString);
To create an IJavaInstance requires two steps. First the EMF JavaClass needs to be located and then an instance of IJavaInstance needs to be created using this with rules as to how the actual instantion of the live Java object should occur (both in code and by the target VM).
To locate a JavaClass involves looking up for the object on the current resource set. A resource set is a physical grouping of EMF documents and to locate the one being used by the Visual Editor it is held on the editorPart's GEF editDomain. The Visual Editor uses a subclass of default GEF edit domain called org.eclipse.ve.internal.cde.core.EditDomain. The editDomain provides a way of passing common objects (such as the target VM helper classes, the set of viewers, and the EMF resource set) around between different Visual Editor subsystems. For a cell editor to be given a reference to the edit domain it should implement the interface org.eclipse.ve.internal.propertysheet.INeedData that has a single method public void setData(Object data); The argument to this will be set by the Visual Editor to the editDomin object and the cell editor should store this in an instance variable.
public class CustomLabelEditor extends DialogCellEditor implements INeedData {and
private EditDomain fEditDomain;
// Remainder of class definition ...
 public void setData(Object data) {
    fEditDomain = (EditDomain) data;
  }
To lookup the resource set from an EditDomain can be done using the static helper methodJavaEditDomainHelper.getResourceSet(EditDomain anEditDomain);
Now that the CustomLabelEditor has a handle to the Visual Editor's model's resource set it can look up JavaClass objects using the API org.eclipse.jem.internal.beaninfo.core.Utilities.getJavaClass(String className, ResourceSet resourceSet); In EMF to instantiate actual objects the package's factory should be used, so having obtained the JavaClass to get the IJavaInstance requires the method call javaClass.getEPackage().getEFactoryInstance().create(javaClass);
Rather than having to do both steps however there is a helper API method org.eclipse.ve.internal.java.core.BeanUtilities.createJavaObject(String qualifiedClassName, ResourceSet aResourceSet, String initString); Examples of its usage are shown below:
BeanUtilities.createJavaObject("java.lang.Boolean", aResourceSet, "Boolean.TRUE");  // Create a Boolean.TRUE instance
BeanUtilities.createJavaObject("java.awt.Color", aResourceSet , "java.awt.Color.red");  // Create an instance of the AWT color red
BeanUtilities.createJavaObject("boolean", aResourceSet, "true");  // Create an instance of the primitive boolean true
BeanUtilities.createJavaObject("java.lang.String", aResourceSet, "\\"Hello World\\""); // Create an instance of the String "Hello World"
The third argument to the method represents the code fragment that will
be used to instantiate the actual live Java instance. This is the
actual argument that is used by the Visual Editor when it generates the
setProperty(Object propertyValue)
method. For the last example that was itself a String for the
quotation marks to be present in the String when the code is generated
they must be present in the literal itself which requires escaping them
with a \\.
The protected helper method on CustomLabelEditor
and called by openDialogBox(Control
cellEditorWindow) can now be written as follows.
private IJavaInstance createStringJavaObject(String aString) {
return BeanUtilities.createJavaObject(
"java.lang.String",
JavaEditDomainHelper.getResourceSet(fEditDomain),
);
}
Rather than just writing "\\"
+ aString + "\\" a
helper method on BeanUtilities
is used to quote the user's string. The helper handles cases such
as the string containing bona-fide escape characters the user put there
that themselves need quoting.
When the text property is displayed in the Properties view we wish the user to be able to see the current value. This occurs with nothing extra to be done, because the text property is typed to java.lang.String and there is a default label provider class for this provided by the org.eclipse.ve.java.core plugin as part of its String.override. For this reason file the Visual Editor already knows how to render String properties as shown below.

With the CustomLabelEditor however specific code is required to ensure that it displays the current value of the text property
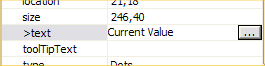
This is done by specializing the method doSetValue(Object value); This method is given an argument of an IJavaInstance which represents the current value of the String object in the Visual Editor's EMF model. To convert from this to this to a java.lang.String object can be done by accessing the target VM to query the value of the live String object.
To write the code for the doSetValue(Object value) method requires an understanding of the API to work with the Visual Editor target VM objects
Live objects used by the Visual Editor exist only on the target VM
and are never loaded by the Visual Editor inside the actual Eclipse
workbench's JVM. For every object created on the target VM there
is a proxy to it held by the Visual Editor inside the Eclipse
JVM. This proxy is an instance of org.eclipse.jem.internal.proxy.core.IBeanProxy
and is able to perform tasks such as remote method invocation on
the actual target VM instance.
The API for this is modelled on thejava.lang.reflect
API however, unlike the reflection API which performs dynamic
invocation within a single JVM, the bean proxy mechanism works between
the Eclipse workbench's JVM where the proxies are, and Visual Editor's
target JVM where the live instances exist.
| java.lang and java.lang.reflect API | org.eclipse.jem.internal.proxy.core API |
| Object | IBeanProxy |
| Class | IBeanTypeProxy |
| object.getClass() | IBeanProxy.getTypeProxy() |
| Method | IMethodProxy |
| Class.getMethod(String methodName) | IBeanTypeProxy.getMethodProxy(String methodName) |
| Constructor | IConstructorProxy |
| Class.getConstructor(Class[] types) | IBeanTypeProxy.getConstructorProxy(IBeanTypeProxy[] types) |
| Constructor.newInstance(Object[] initArgs) | IConstructorProxy.newInstance(IBeanProxy[] initArgs) |
To locate instances of IBeanProxy (from which method and constructor proxies can be retrieved) a factory is used that is held on a proxy factory registry. The registry is used to create and cache instances of IBeanTypeProxy, and can be located through a helper method which retrieves it from the GEF edit domain. The IProxyFactoryRegistry can return factories for retrieving instances of IBeanTypeProxy through the method getBeanTypeProxy(String typeName) as well as factories for creating new instances of IBeanProxy through the overloaded method getBeanProxy(Object anObject) with arguments representing the nine Java primitives, their java.lang peers as well as java.lang.String.
The following code samples show how to create an instance of a java.io.File for the file name "C:\temp\foo.txt" (i.e. the result of evaluating new java.io.File("C:\temp\foo.txt") on the target VM.
IProxyFactoryRegistry aProxyFactoryRegistry = JavaEditDomainHelper.getBeanProxyDomain(anEditDomain).getProxyFactoryRegistry();
IBeanTypeProxy javaIOFileBeanTypeProxy = aProxyFactoryRegistry.getBeanTypeProxy("java.io.File");
Having obtained the IBeanTypeProxy the instance of an IBeanProxy for the java.io.File can be created by locating the correct IConstructorProxy and calling newInstance(IBeanProxy[]) with the correct arguments.
IBeanProxy fooStringBeanProxy = aProxyFactoryRegistry.getBeanProxyFactory().createBeanProxyWith("C:\temp\foo.txt");
IConstructorProxy fileConstructorProxy = javaIOFileBeanTypeProxy.getConstructorProxy("java.lang.String");
IBeanProxy fileProxy = fileConstructorProxy.newInstance(fooStringBeanProxy);
In addition to locating the IConstructorProxy and invoking as shown above there is a shorthand way of creating a bean proxy with a specific Java initialization string. This is with the method newInstance(String javaInitializationString) on IBeanTypeProxy. Using this the above code can be shortened to
IBeanProxy fileProxy = javaIOFileBeanTypeProxy.newInstance("C:\temp\foo.txt");
The Visual Editor's model for the Java class being visually is an EMF graph of IJavaInstance objects. The API method org.eclipse.jem.internal.proxy.core.BeanProxyUtilities.getBeanProxy(IJavaInstance aJavaInstance) exists to obtain the bean proxy fom a Visual Editor EMF object. These are some more examples of the API for working with bean proxies.
// Retrieve a proxy to the result of calling the method getType() on a target VM for an IJavaInstance of MyCustomPrompter
IBeanProxy prompterProxy = BeanProxyUtilities.getBeanProxy(prompterJavaInstance);  // Obtain an IBeanProxy from an IJavaInstance
IMethodProxy getTypeMethodProxy = prompterProxy.getTypeProxy().getMethodProxy("getType");
IBeanProxy proxyToGetTypeResult = getTypeMethodProxy.invoke(prompterProxy);

// Set the value of setType(String) method to the value "Frog"
IBeanProxy frogProxy = prompterProxy.getProxyFactoryRegistry().getBeanProxyFactory().createBeanProxyWith("Frog");
IMethodProxy setTypeMethodProxy = prompterProxy.getTypeProxy().getMethodProxy("setType","java.lang.String");
setTypeMethodProxy.invoke(prompterProxy,frogProxy);
Working with remote proxies from the Eclipse workbench's JVM that point to instances of real live objects in the Visual Editor's target JVM provides a way of ensuring that the two are totally insultated and no class within the user's build path of a Java project needs to be loaded by the class loader or instantantiated within Eclipse. This provides a true editing sandbox which allows multiple instances of classes to exist across different editors working with different build paths and is the design principle that allows the Visual Editor to be extended to support new target environment and topologies other than just pure Java. However at some point the Visual Editor does need to transport objects back from the target JVM to Eclipse. An example of this is that having got an IBeanProxy for a rectangle result to the getBounds() method this must be converted in its four constituient int values so that a draw2D rectangle can be created for the GEF figure. Likewise the Properties view shows the user the values of the target VM objects. The point at which an object on the target VM can be retrieved within the Eclipse workbench is when it is a primitive object or a java.lang peer of a primitive or a String instance. This is done by having four subinterfaces of IBeanProxy in the package org.eclipse.jem.internal.proxy.core.
| |
java.lang Object lookup | primitive lookup |
| IStringBeanProxy | java.lang.String stringValue() | |
| IBooleanBeanProxy | java.lang.Boolean getBooleanValue() | boolean booleanValue() |
| ICharacterBeanProxy | java.lang.Character characterValue() | char charValue() |
| INumberBeanProxy | |
int intValue() |
| |
|
long longValue() |
| |
|
byte byteValue() |
| |
|
short shortValue() |
| |
|
float floatValue() |
| |
|
double doubleValue() |
| |
|
number numberValue() |
It is possible to register custom sub instances of IBeanProxy for plugin specific
objects and this occurs with org.eclipse.ve.jfc
plugin that has introduces the types IPointBeanProxy, IRectangleBeanProxy and IDimensionBeanProxy. This
can occur safely if you know that the Eclipse workbench's JVM contains
the classes in its -classpath and that these are a compatible shape
with the target VM's instances. This and other advanced topics
such handling arrays, installing helper class on the target VM's
-classpath for a classpath container, exceptions and debugging the
target VM are covered in a later tutorial specific to the target VM
architecture.
Having covered some of the background to the target VM API the method doSetValue(Object value) can now be overriden on CustomLabelEditor. This is so that the Properties view can render correctly the value of the text property.
// ...
protected void doSetValue(Object value) {
if (value != null){
IStringBeanProxy stringBeanProxy =
}
super.doSetValue(value);
}
// ...
}
A String instance varialble is
created to store the value of the text
property result that the CustomLabelEditor is working with.
The doSetValue(Object) method will be called when the editor is
first created by the Properties view and after each time the dialog
editor is closed. The argument to this is an
IJavaInstance for the String inside the Visual Editor's EMF model, so
the target VM can be used to locate the IBeanProxy which, because the type property is typed to java.lang.String, will be an
instance of IStringBeanProxy.
The java.lang.String
value of this inside the workbench's JVM is retrieved using IStringBeanProxy.stringValue()
and this is stored in the instance field stringValue;
To ensure that the contents of the Label used by the cell editor
shows the string correctly the method updateContents(Object value) is
overriden to ignore the argument and call super.updateContents() with the
actual String.
To create the curstom text editor several steps were involved:
To test the text property
start the runtime Eclipse workbench, drop an instance of MyCustomPrompter onto a Shell or Composite and select and edit
the text property. If
it fails and has the default String label and cell editor look in the .log file in the .metadata
directory of the target workbench for any syserr output. These
will typically be because some XMI syntax in the .override file was
entered incorrectly. If there is no output then it is possible
that the definition of the beaninfo.registrations extension point is
incorrect, and for this debug the BeanInfoClassAdapter
class to see that the .override file being searched for.
The next step of the tutorial will create a special GEF edit part for
MyCustomPrompter that instead of just drawing an image of the live
custom control, renders some text and icon on top of the graphic.
Classes implement the interface org.eclipse.gef.GraphicalEditPart act as mediators between a model object and the draw2D API that renders the object onto the GEF canvas. The edit part to use for a given IJavaInstance (the model object) by the Visual Editor is obtained from the ClassDescriptorDecorator that annotates its JavaClass. If no explicitly defined ClassDescriptorDecorator can be found, or the one found doesn't have a graphical edit part class defined, then the inheritance chain of the EMF JavaClass (that shadows the Java type hierarchy) is searched until a graphical edit part class name is found. following this rule, in the absence of any override for MyCustomPrompter the Visual Editor will pick up the inherited edit part class CompositeGraphicalEditPart because MyCustomPrompter extends Composite and this is what gives MyCustomPrompter its initial default edit experience.
This section of the tutorial will build a custom graphical edit part named org.eclipse.ve.example.customwidget.CustomWidgetGraphicalEditPart. This will be declared in the MyCustomPrompter.override file as being the graphical edit part class to use, and the class will be specialized to create the draw2D desired effects.
MyCustomPrompter.override should be updated as below. (The grey text fragments of XMI represents elements in the original file written for the text property custom editor and the black the new lines to add)
<?xml version="1.0" encoding="UTF-8"?>
<xmi:XMI xmi:version="2.0"
xmlns:xmi="http://www.omg.org/XMI"
xmlns:xsi="http://www.w3.org/2001/XMLSchema-instance">
xmlns:ecore="http://www.eclipse.org/emf/2002/Ecore"
xmlns:event="event.xmi">
</addedEObjects>
</event:Add>
<addedEObjects xsi:type="ecore:EReference" name="text" unsettable="true">
<eAnnotations xsi:type="org.eclipse.ve.internal.cde.decorators:BasePropertyDecorator"
cellEditorClassname="org.eclipse.ve.example.customwidget/org.eclipse.ve.example.customwidget.CustomLabelEditor"/>
</addedEObjects>
</event:Add>
</xmi:XMI> </xmi:XMI>
To specify that BasePropertyDecorator
as annotating the type
structural feature (as was done for the CustomLabelEditor earlier)
an event:Add was created for the EMF feature eStructuralFeatures. This represents the
features or properties on the JavaClass, and the decorator was then
defined as annotating the feature. To annotate the actual
JavaClass (as opposed to one of its specific features) an event:Add is created directly
on the eAnnotations feature
as a top level element in the XMI. Because the file name is MyCustomPrompter.override the
Visual Editor will process this as an addition to the annotations of
the EMF definition of the MyCustomPrompter
class.
The class being added as an annotation to MyCustomPrompter is an
instance of
org.eclipse.ve.internal.cde.decorators.ClassDescriptorDecorator.
As described earlier the XMI
describes this as EMFPackageName:EMFClassName
which corresponds to the EMF registered package org.eclipse.ve.internal.cde.decorators.DecoratorsPackage.
A common coding error with XMI is to declare the element for an
annotation assuming that it is the packageName:className
without having the namespace definition at
the top of the XMI file.
ClassDescriptorDecorator
stores the name of the graphical edit part to use by GEF with the
syntax of pluginName/qualifiedClassName.
For this tutorial the edit part created is called org.eclipse.ve.example.CustomWidgetGraphicalEditPart
and in the plugin name org.eclipse.ve.example.,customwidget.
The method responsible for creating the draw2D figure shown on the GEF canvas is createFigure() and this is overriden to place a draw2L label on top of the inherited behavior (an image of the live visual). The method is shown below and the full class list is available at CustomWidgetGraphicalEditPart.java.
public class CustomWidgetGraphicalEditPart extends
protected IFigure createFigure() {
// ImageFigure has no layout, so we will have to explicitly set the size().
// To get a prefered size (before we look up the hierarchy), Label will need a Font
customFigure.setSize(customFigure.getPreferredSize());
figure.add(customFigure);
return figure;
}
}
Although MyCustomPrompter
extends Composite and the
Visual Editor uses the class CompositeGraphicalEditPart
for visually edited composites, the CustomWidgetGraphicalEditPart
is defined as extending ControlGraphicalEditPart.
This is because CompositeGraphicalEditPart
contains all of the GEF behavior to allow dropping of child controls
and dealing with layout management, and while MyCustomPrompter physically
extends Composite to
enable it to have child controls our usage of it is as a closed black
box that can't accept more child controls and logically extends Control's behavior.
The inherited implementation from ControlGraphicalEditPart
returns the class ImageFigure.
This has the logic required to render a picture of the live
control. To this figure we add a draw2D Label that has an icon
and the text VE Rules
drawn in red. The Label is
created with the text and image and its
foreground color and details about how to
place the text (below the icon) are specified. The size of the
figure is set to its preferred size, and because this involves
calculating using the fontMetrics to determine the width of the label's
text the font must be explicitly set to the value it will
acquire when it is added to the parent. Having completed the
creation of the Label it is added as a child of the ImageFigure.
To test the CustomWidgetGraphicalEditPart launch the Eclipse
workbench target and verify that the image of a MyCustomPrompter class
now renders itself with an image of the live visual covered with the VE Rules text and icon .
The original default behavior for MyCustomPrompter in the absence of
its specific graphical edit part was to render the live visual with a
border drawn around it. however the figure above shows that there is no
border drawn. The border is not part of the natural behavior of
an SWT composite (although one can be specified with the style bit of
SWT.BORDER) and it drawn by the Visual Editor around a
CompositeGraphicalEditPart so that an empty Composite with no children
isn't otherwise invisible (as if it were the same color as its
background it'd blend in and be hard to see on the design
canvas). The behavior to render a design time border around a GEF
figure is done by ConttrolGraphicalEditPart (which
CustomWidgetGraphicalEditPart extends) by having initializationData
supplied as part of its definition. InitializationData is used by
the Visual Editor as a way of supplying parameters to a class so that
different usages can supply custom implementations. It occurs by
having the class defined in the .override file implement the interface org.eclipse.core.runtime.IExecutableExtension.
This has a single method setInitializationData(IConfigurationElement
config, String propertyName, Object data).
When the Visual Editor parses a class name defined in a .override file
if there is a colon symbol :
after the class name then anything following this is parsed and passed
into the setInitializationDataMethod(....). An example of this is
the class ControlGraphicalEditPart implements the IExecutableExtension
interface and uses the initData to determine whether a border should be
drawn around the figure or not as follows:
public void setInitializationData(IConfigurationElement config, String propertyName, Object data) throws CoreException {
  if (data instanceof String)
    border = Boolean.valueOf((String) data).booleanValue();
}
and in the Composite.override file in org.eclipse.ve.swt/overrides/org/eclipse/swt/widgets
<addedEObjects xsi:type="org.eclipse.ve.internal.cde.decorators:ClassDescriptorDecorator"
</addedEObjects>
The graphViewClassname is defined as
pluginName/qualifiedClassNane:initData and the value of true specifies that an SWT
composite is drawn by the Visual Editor with the border. Because MyCustomPrompter.override does not
specify the initData of true
it is drawn with the live widget as is.
The next step in the tutorial is to look at how to affect the code
generation subsystem of the Visual Editor.
The code generation subsystem is responsible for parsing a .java file when it is opened by the Visual Editor and building up the graph of IJavaInstance objects that represent the model of the visual class. It does this by working with the JDT's Abstract Syntax Tree (AST) that represents a set of fine grained nodes for every compilable fragment of Java source. For every AST expression that is modeled by the Visual Editor (not all source represents code constructs that the Visual Editor is interested in showing to the user or collecting in its model) there is an expression decoder. The decoder has two helper classes; a feature mapper and a decoder helper.
The feature mapper is responsible for tying together a source code expression in the actual Java source to a modeled feature in the Visual Editor's EMF model and vice-versa.
The decoder helper has the knowledge of how to parse AST expressions and build up the Visual Editor model portion related to a specific expression type, as well as how to generate specific expression source code from the model.
The task of the decoder class is largely a delegate to determine which feature mapper and decoder helper to use for a given source code expression
Decoders do not generate AST nodes directly because in many cases the Java
source is created instead by using JavaJet templates. These
templates can be modified by users and recognized by the Visual
Editor and will be covered in more detail in a specific tutorial
covering the code generation subsystem.
This tutorial will create a decoder helper that adds a comment // Prompter Text Property to the line of Java code generated for the setText(String aString) method of the text property.
private void createMyCustomPrompter() {
 myCustomPrompter = new MyCustomPrompter(sShell, SWT.NONE);
 myCustomPrompter.setText("Text value"); // Prompter Text Property
}

The class created to do this is org.eclipse.ve.examples.customwidget.CustomPrompterDecoderHelper.  This is declared in the MyCustomPrompter.override file as annotating the JavaClass definition for MyCustomPrompter so the Visual Editor uses it.
<?xml version="1.0" encoding="UTF-8"?>
<xmi:XMI xmi:version="2.0" xmlns:xmi="http://www.omg.org/XMI" xmlns:xsi="http://www.w3.org/2001/XMLSchema-instance"
xmlns:org.eclipse.ve.internal.cde.decorators="http:///org/eclipse/ve/internal/cde/decorators.ecore"
xmlns:ecore="http://www.eclipse.org/emf/2002/Ecore"
xmlns:event="event.xmi">
<addedEObjects xsi:type="org.eclipse.ve.internal.cde.decorators:ClassDescriptorDecorator"
graphViewClassname="org.eclipse.ve.example.customwidget/org.eclipse.ve.example.customwidget.CustomWidgetGraphicalEditPart">
</addedEObjects>
<event:Add featureName="eStructuralFeatures">
<addedEObjects xsi:type="ecore:EReference" name="text" unsettable="true">
<eAnnotations xsi:type="org.eclipse.ve.internal.cde.decorators:BasePropertyDecorator"
cellEditorClassname="org.eclipse.ve.example.customwidget/org.eclipse.ve.example.customwidget.CustomLabelEditor"/>
</addedEObjects>
</event:Add>
</xmi:XMI>
Earlier when just the single ClassDecriptorDecorator was added as an
annotation to MyCustomPrompter the XMI tag used in the .override file
was <event:Add>.
This is the syntax to add a single object, however because a second
annotation now needs to be added the file is changed to use the <event:AddMany> element for
the two decorators. The decorator added is a CodeGenHelperClass
and this is done through adding
the namespace for codeGenHelper in the XMI package declarations and an
xsi:type of namespace:CodeGenHelperClass
with syntax source="codegen.CodeGenHelperClass".
The expression decoder is stored in the expDecoder feature of the
CodeGenHelperClass and defined with the syntax of
pluginName/qualifiedClassName.
The CustomPrompterDecoder.java. is responsible for determining which decoder helper is associated with which property. The superclass ~org.eclipse.ve.internal.swt.codegen.SWTControlDecoder is used as this contains behavior such as dealing with the SWT code patterns required for constructor style bits, and the method initialDecoderHelper() is specialized to associate a decoder helper with the text property
public class CustomPrompterDecoder extends SWTControlDecoder {
protected void initialDecoderHelper() {
// if it is the text property that this decoder is decoding, use a custom helper
if (fFeatureMapper.getFeature(null).getName().equals("text")) {
fhelper = new CustomPrompterDecoderHelper(fbeanPart, fExpr, fFeatureMapper, this);
} else {
super.initialDecoderHelper();
}
}
}
The CustomPrompterDecoderHelper will extend the Visual Editor class org.eclipse.ve.internal.java.codegen.java.SimpleAttributeDecoderHelper. The method responsible for generating the code is generate(Object[]) and this is specialized as below. The full source file can be viewed in CVS CustomPrompterDecoderHelper.java.
public class CustomPrompterDecoderHelper extends SimpleAttributeDecoderHelper {
public String generate(Object[] noArgs) throws CodeGenException {
String result = super.generate(noArgs);
// Add a comment at the end of the expression
int idx = result.lastIndexOf(';') + 1;
}
}
The generate(Object[]) method returns the String that is used for the code fragment generated and the CustomPrompterDecoderHelper adds a hard coded literal to the end of the inherited behavior (that creates the full expression for the setType(...) method invocation).
Instead of having CustomPrompterDecoderHelper and CustomPrompterDecoder
as two separate classes it would have been possible to have the decoder
helper as an anonymous inner class of the decoder itself. By
separating the decoder and the decoder helper into separate classes
however enables for re-use, as other properties that wished to share
the same rules as the text
property can have their own decoders that use the same decoder helper.
You can test the decoder and decoder helper for the text property by launching the Eclipse target workbench. Use the Properties view to set the text property and ensure that the line is generated with the new comment. If it fails follow the same steps as for the custom property editor which involves looking in the .log file for any XMI syntax errors, using the BeanInfoClassAdapter to ensure the .override is being detected, and then finally debugging the decoder helper itself.
The final step of the tutorial is to promote the buttonSelection event to the list of preferred events used by the Visual Editor when a list of events to be added is displayed to the user.
MyCustomPrompter class
has the methods addButtonSelectionEvent(ButtonSelectionEvent
anEvent) and removeButtonSelectionEvent(ButtonSelectionEvent
anEvent). This allows anyone developing a class that uses
the custom prompter to be able to get called back anytime the user
presses its button. This is the button on the right hand side of
the prompter that is labelled ..., Open
or More based on the type property
setting. If a button listener is added to the custom prompter the
code generated is as below, and can be used for example to launch an
additional dialog or perform user logic.
private void createCustomPrompter()
{
customPrompter
= new MyCustomPrompter(sShell,
SWT.NONE);
customPrompter.addButtonSelectionListener(new ButtonSelectionListener() {
public void
buttonSelected(org.eclipse.swt.events.SelectionEvent e)
{
System.out.println("buttonSelected()"); // TODO Auto-generated Event stub
buttonSelected()
}
});
}
The purpose of this section is to show how to make it such that the buttonSelected event is the
preferred event offered to the user because it is the one that will be
most commonly used.
In the absence of any specific customization rules the Visual Editor will by default use JavaBeans reflection and associate these together with an event named buttonSelection. This will be available for the user to add events to from the Add Event wizard that is launched from the Events > Add Event ... pop-up menu option.
The desired effect though is to override the behavior of the Visual Editor such as the buttonSelected event appears on the first level of the Events cascaded menu, as shown in the figure below. The result of this would be that the usability of the MyCustomPrompter class has been improved because the user is more aware of its preferred API usage.
Preferred events are defined according to the JavaBeans specification with a custom BeanInfo class. Earlier the tutorial created a specialized MyCustomPrompterBeanInfo.java to define the enumerationValues for the type property. This was done by specializing the getPropertyDescriptors() method. As well as defining the list of available properties and how they should be edited, a BeanInfo class defines the list of available events in the method getEventSetDescriptors(). This returns an array of java.beans.EventSetDescriptor objects and for MyCustomPrompterBeanInfo is written as below
public EventSetDescriptor[] getEventSetDescriptors() {
try {
MethodDescriptor addButtonSelectionMD = new MethodDescriptor(
ButtonSelectionListener.class.getMethod("buttonSelected",
new Class[]{SelectionEvent.class})
);
EventSetDescriptor addButtonSelectionED = new EventSetDescriptor(
"buttonSelection",
ButtonSelectionListener.class,
new MethodDescriptor[] {addButtonSelectionMD},
MyCustomPrompter.class.getMethod("addButtonSelectionListener",new Class[]{ButtonSelectionListener.class}),
MyCustomPrompter.class.getMethod("removeButtonSelectionListener",new Class[]{ButtonSelectionListener.class})
);
return new EventSetDescriptor[] {addButtonSelectionED};
} catch (Exception e){
e.printStackTrace();
}
return null;
}
To prompt a method to be preferred requies both the
MethodDescriptor being set to preferred and also the
EventSetDescriptor.
To test the preferred event launch the Eclipse workbench target environment and verify that the Events pop-up menu displays an item for buttonSelected.
This tutorial has gone through the steps required to create the
plugin org.eclipse.ve.example.customwidget.
The completed plugin is available
here or can be obtained directly from CVS.
To install the plugin from CVS into an Eclipse development environment
attach to the host dev.eclipse.org
and repository path /cvsroot/tools
using a user id of anonymous
with no password required. The figure below illustrates the CVS
perspective in Eclipse with the CVS Repositories view showing the
repository correctly attached to. To create the new repository
open the pop-up menu on the CVS Repositories view and select New > Repository
Location.
Attach to the repository name/cvsroot/tools
on the host namedev.eclipse.org.
Specify a user name of anonymous which allows the code to be checked
out.
The CVS Repositories view showing the correct
repository for the tutorial's finished pugin
Having attached to the repository expand the Head tree item and search for the
plugin org.eclipse.ve.examples.
Expand this and select org.eclipse.ve.example.customwidget.
This is the complete plugin and to install it onto your workbench use
the pop-up menu option Check Out
as shown below
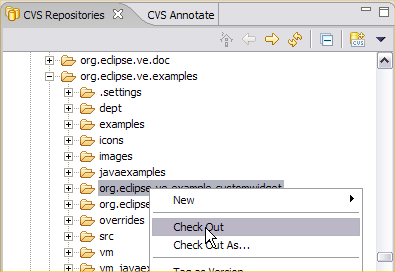
In this tutorial, we looked at a high level where to start and extend the Visual Editor and use specialized property cell editors, BeanInfo, GEF edit parts, palette, and CodeGen decoders. To do this required understanding how to use Java build path containers as the trigger point for Visual Editor custom behavior, and how to inject specialized code through the user of BeanInfo classes (for cross IDE extensions) and .override files (for Visual Editor only specific logic). An XMI file for a new palette category was created, and also the concept of the target VM was discussed.
The software supplied with this article is for illustrative purposes only and should be used accordingly. The software is provided as is and with all faults, and hereby disclaims all other warranties and conditions, either expressed, implied or statutory, including, but not limited to, any (if any) implied warranties, duties or conditions of merchantability, of fitness for a particular purpose, of accuracy or completeness of responses, of results, of workmanlike effort, of lack of viruses, and of lack of negligence, all with regard to the software.
Further tutorials will cover some of the topics introduced in more depth and we welcome all feedback.
ref: bug 88801
IBM is trademark of International Business Machines Corporation in the United States, other countries, or both. Java and all Java-based trademarks and logos are trademarks or registered trademarks of Sun Microsystems, Inc. in the United States, other countries, or both. Microsoft and Windows are trademarks of Microsoft Corporation in the United States, other countries, or both. Other company, product, and service names may be trademarks or service marks of others.