Copyright © 2002 International Business Machines Corp.
 
 Eclipse Corner Article

Using EMF

Summary
This article introduces EMF, the Eclipse Modelling Framework, and will help you get started using EMF in your own Eclipse plug-ins.

By Catherine Griffin, IBM
December 9, 2002 (revised May 2003 for EMF 1.1.0)


What is EMF, and why would I want to use it ?

EMF, the Eclipse Modelling Framework, is used to define and implement structured data models. A data model is simply a set of related classes used to handle the data which you want to deal with in your application.

Some good reasons to use EMF

  1. Code generation. All the code needed for a working data model is generated for you, based on a definition of the model. EMF generates nice readable code, from template files that can be customized. You can customize the generated code, and your changes won't be lost when the classes are regenerated. The input to code generation can be a Rational Rose model file, annotated Java interfaces, or an XML schema definition (under development).
  2. Meta-data. You can programatically query the structure of a model, and get more information than the standard Java BeanInfo or reflection would allow. EMF also supports accessing and updating models reflectively.
  3. Default serialization. EMF can load and save instances of your model as XMI (an XML format). If you need to save your data in a different format, you can do so. XML schema as a file format is under development.
  4. Links between files. You can save and edit data across multiple files.
  5. Editors. EMF will also generate an editor for your model, complete with content outline and property sheet. There is also a reflective editor, which can view and edit any EMF model file, using only the model meta-data. It provides similar function to the default generated editor, but it can't be easily customized.
For more information see the EMF project page.

If you want to try the example from this article, you will need EMF and a suitable version of Eclipse (I am using 2.1). EMF version 1.1.0 Build 20030501_0612VL was used to generate the example code.

Developing an Eclipse plug-in using EMF

The Example

The example used in this article is an editor for family trees.

Step 1: Designing the model

The first step is to design the data model for the application - that is, the structure of the data we want to be able to view and edit, and the relationships between data items. You may find a UML tool useful, or a piece of paper. For this application, the main information needed is who had which children. In UML, the data structure looks like this:

A FamilyTree contains families and individuals. Individuals are either Male or Female - Individual itself is an abstract class. A Family contains children and is linked to a mother and father.

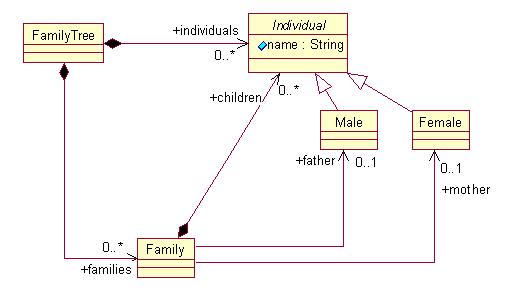
In addition to these types of relations, EMF will handle multi-valued references, two-way relationships (navigable both ways), enumerations and data types (Java objects which aren't EMF based, serialized as strings).

Step 2: Defining the model

The next step is to define the model to EMF so that code can be generated. If you have Rational Rose, EMF can generate the implementation of your model directly from the Rose mdl file. See the EMF tutorial for details.

It is also possible to generate the model code from annotated Java interfaces. and that is what is described below. If you don't want to do any typing, just create a new Java project in Eclipse, import family1.zip, and skip to Step 3. Otherwise proceed as follows:

  1. In Eclipse, create a new Java project and a package for the interfaces. I am calling my project com.ibm.example.familytree and my package com.ibm.example.familytree.
  2. Create new Java interfaces called FamilyTree and Family in this package. In the Javadoc comment for each interface, add a line with the tag @model. This tells EMF that this interface is part of your model.
  3. A Java interface is also needed for Individual, but this needs an extra piece of information in the Javadoc comment because Individual needs to be treated as an abstract class. Add the tag @model abstract="true".
  4. Next create the interfaces Male and Female, each extending Individual.  Again add the @model tag.

Defining Attributes

Individuals have names, so we need to add the attribute 'name' to the Individual interface. Just add a method as follows:
     /**
      * Return the individuals name.
      * @return the name
      * @model
      **/
     String getName();
Again, the @model tag tells EMF that this method needs some code generated. If you add methods to the interface that don't have the @model tag, EMF will not generate implementations of those methods, so you will have to implement them yourself. Sometimes it makes sense to do this - for example, you might want to add some convenience methods to the model interfaces.

Defining simple references

A Family should have references to a mother and a father. Add the following methods to the Family interface:
     /**
      * Return the father
      * @return the father
      * @model
      **/
  Male getFather();
     
     /**
      * Return the mother
      * @return the mother
      * @model
      **/
     Female getMother();
Notice that the method  is very similar to how an attribute is defined.

Defining containment relations

In the UML model above, the links with black diamonds on them are containment relations. For example, an Individual can be contained either by a Family or by a FamilyTree. An object can only have one container. For example, the relations between Family and Individual defined in the previous section are not containment relations - because people can be married more than once (even if generally not at the same time).

When instances of this model are created using the editor generated by EMF, there will be a single top-level FamilyTree object and all the other objects in the model will be contained by it, directly or indirectly. The model cannot be saved correctly if there are objects which have no container.

Add the following methods to FamilyTree to define its containment relations:

     /**
      * Return a list of contained families
   * @model type="Family" containment="true"
      **/
     java.util.List getFamilies();
 
      /**
       * Return a list of contained individuals
       * @model type="Individual" containment="true"
       **/
      java.util.List getIndividuals();
Unlike the simple references defined in the previous section, these methods return Lists - thats because a FamilyTree can contain multiple Families and Individuals. The return type must be java.util.List or org.eclipse.emf.common.util.EList so that EMF recognizes that this is meant to be multi-valued. Notice the @model tag  declares the type of object that can appear in the List. In addition, the flag containment="true" indicates that this is a containment relation.

There is one other containment relation to define, in Family:

     /**
      * Return children
      * @return list of child Individuals
      * @model type="Individual" containment="true"
      **/
     java.util.List getChildren();

Step 3: Generating the model

Now that the model has been defined, we can proceed to generate the model implementation.
  1. In the File menu, select New > Other...
  2. In the New File wizard, select Ecore Model Framework in the left-hand panel and GenModel model in the right-hand panel, then click Next.
  3. On the next page, select your project source folder, enter a filename with file type "genmodel", and click Next.
  4. Select the Load from Java annotations radio button and click Finish. Two new files will be created in your project folder, one is called familytree.ecore (this is an XMI file which contains a definition of the family tree model) and the other is the genmodel file which you entered a name for. The genmodel file contains additional information about how EMF should generate code for the model. The genmodel file is opened for editing.
  5. In the editor, select the root (first) node of the tree and right-click to bring up the popup menu.
  6. Select Generate Model to generate the model implementation code.

Two new packages will be generated in your project, com.ibm.example.familytree.impl and com.ibm.example.familytree.util. If you look now at the original package com.ibm.example.familytree, you will find that two new interfaces called FamilytreeFactory and FamilytreePackage have appeared. These are used to programmatically create model elements and to query meta-data, respectively. At the same time as generating the model implementation, EMF has also made some changes to the other interfaces in this package. If you look at Family.java for example, you will see that the return type java.util.List has been changed to EList and that the interface now extends EObject. These changes are needed so that the generated model code works correctly.

Step 4: Generating an editor

The popup menu in the GenModel editor has four generation options: Since we have already generated the model, to generate the editor we need to first generate the EMF.Edit plug-in, then the EMF.Editor plug-in. This creates two new plug-in projects called com.ibm.example.familytree.edit and com.ibm.example.familytree.editor.

Step 5: Trying out the generated plug-ins

The generated editor can be used as a starting point for developing your application. However, resist the temptation to immediately start working on fancier views. First use the generated editor to check that your data model is able to cope with some sample data. If you find problems, you can then redesign the data model and repeat the process until you are happy with it. Its much easier to change your model now, than it would be after you have put a lot of work into the editor.

To run the example editor, you need to start a runtime workbench, making sure that it will be launched with the three generated plug-ins. If you aren't sure how to do this, see the EMF tutorial.

Once the workbench has started, you need to create a model file:

  1. Create a new simple project
  2. Select from the menu File > New > Other...
  3. Select Example EMF Model Creation Wizards and Familytree Model, and click Next
  4. Select the new project, and enter a filename for the new file. The file should have the extension 'familytree'. Click Next.
  5. From the combo box, select FamilyTree, then click Finish.
The new file will be opened with the editor. This is a multipage editor, each page demonstrating different ways of displaying data from your model. The first page is a tree view, the root of the tree being the file you are editing. Expand the root and you will see a FamilyTree element - thats what the wizard created in the file. Select FamilyTree and right-click to bring up the popup menu. The menu allows you to add child elements - Family, Female or Male.

Add a Female or Male to the FamilyTree. If the Properties view is showing, you should see the properties for the Individual - there is only one: name. Set the name to something meaningful, and the label in the tree view will change.

When you add children to a Family, they appear as child items in the tree. You can use the properties view to set the mother and father for a Family, but setting these doesn't change the tree, because mothers and fathers are linked to families, not contained by them.

This is what the editor looks like when I have put in some test data:

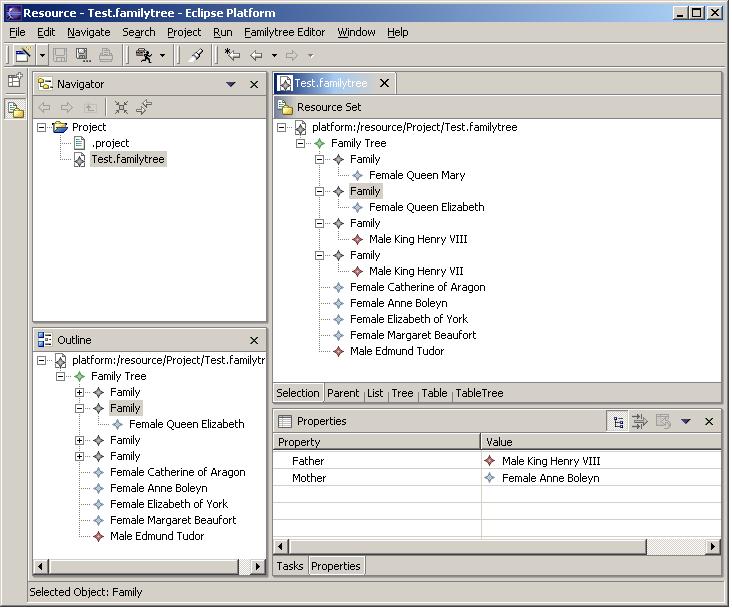
The test family tree shown here is in the file Test.familytree. This is an XMI file. By default, EMF uses XMI (a form of XML) to save model instance data. If you need to save your data in a different format, you can write code to do so.

Anatomy of the EMF Editor

As you can see, the editor generated by EMF does quite a lot. The content outline view (bottom left in the above image) shows the contents of the file you are editing as a tree view. Whatever element is selected in the content outline view is also shown selected on the first page of the editor, which is a similar tree view. Whenever you select an element either in the editor or in the outline, its properties are shown in the properties view. The properties view lets you edit all that elements attributes and any single-valued references to other model elements (by picking from all the available elements of the right type).

You can drag and drop elements to move them, and cut, copy and paste, delete, undo and redo edit actions are supported.

The other pages of the editor are -

Next steps

You might decide at this point that some changes to the model are needed. For example, say I want to add a description attribute to Individual so I can add additional biographical information. I would edit the Individual interface as before and add the method:
     /**
      * Return a description.
      * @return a description
      * @model
      **/
     String getDescription();
Then to update the genmodel file, right-click on it to bring up the popup menu, and select Reload.... You will also need to regenerate all the generated code. If you make changes to the generated code, then remember to take out the @generated flag from the Javadoc so that your changes are not overwritten.

The generated editor is meant to be a starting point for your own development and a demonstration of the reusable user interfaces parts provided in EMF.  Once you are satisfied that your model is how you want it to be, you can start customizing the generated editor, or writing your own.

Source code

To run the customized versions of the family tree plug-ins, unzip family2.zip into your plugins/ subdirectory. All the source code is included. The customized editor has only two pages, the original first page and a modified table tree view. For details of the changes see the sections below.

Labels and Images

To change the labels that are used in the editor, you need to go and find the adapter classes generated in the com.ibm.example.familytree.edit project. In the package com.ibm.example.familytree.provider, there is one adapter class for each model class. The methods getText and getImage determine the label and image that are used in the editor.

If you change the getText method, remember to remove the @generated flag from the method javadoc comment so that your changes will be kept if you regenerate the code.

To change the icons, you can just change the gifs that are in the icons folder in this plug-in project.

In the customized version of the family tree .edit plug-in, the getText methods have been changed in FamilyItemProvider, IndividualItemProvider, FemaleItemProvider and MaleItemProvider. For example, here's the code from IndividualItemProvider:

        public String getText(Object object) {
                Individual individual = (Individual)object;
                if( individual.getName() == null )
                        return "Unnamed individual";
                return individual.getName();
        }

Trees

The simplest tree view is the one used for the generated editors content outline view and the selection tree view. The content provider for this is org.eclipse.emf.edit.ui.provider.AdapterFactoryContentProvider, which uses the generated adapter classes from com.ibm.example.familytree.edit. The children of each element are the elements it contains.

You can create different tree views by writing your own content provider. However, make sure that you won't have the same element appearing twice in the tree as this will cause problems. The tree viewer assumes that each domain element maps to one tree item. If you need to show referenced elements in a tree, you will have to wrap them. Other structured viewers (tables and lists) behave the same way.

In the customized version of the family tree editor, I have changed the input of the content outline view so that the root of the tree is now FamilyTree instead of the resource (file), and changed the root and title of the selection tree view.

I have added the inner class ParentAdapterFactoryContentProvider in place of ReverseAdapterFactoryContentProvider. This returns the parents of a child as the tree 'children', resulting in a tree showing parents, grandparents, great-grandparents etc. Here's how the getChildren method is implemented:

                public Object [] getChildren(Object object) {
                        Object parent = super.getParent(object);
                        if( parent instanceof Family ){
                                List parents = new ArrayList();
                                if( ((Family)parent).getMother() != null )
                                        parents.add( ((Family)parent).getMother() );
                                if( ((Family)parent).getFather() != null )
                                        parents.add( ((Family)parent).getFather() );
                                return parents.toArray();
                        }
                        return new Object[0];
                }

Tables

Table viewers require a content provider and a table label provider. org.eclipse.emf.edit.ui.provider.AdapterFactoryLabelProvider implements the org.eclipse.jface.viewers.ITableLabelProvider interface, but it delegates the real work to the generated adapter classes. Modify these to implement the org.eclipse.emf.edit.provider.ITableItemLabelProvider interface. Then change the constructor of FamilytreeItemProviderAdapterFactory so that it knows it can supply a table item label provider.

You will also need to set up the table with the right columns; in the generated editor this is done in the createPages method.

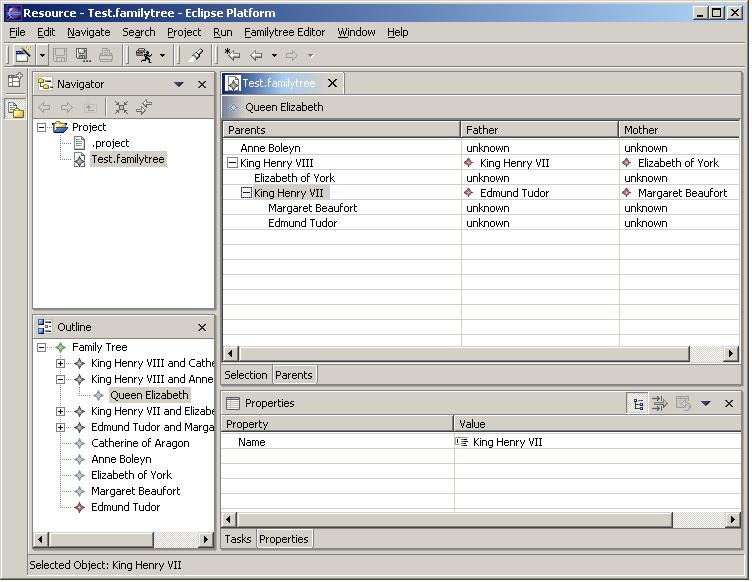
The second page of the editor is now a table tree, using the content provider described above. It shows parents of children. I have defined three columns - Parents, Father and Mother. You can expand items in the first column to see parents of parents.

I modified IndividualItemProvider so that it implements ITableItemLabelProvider. The second column shows the individuals father, the third column their mother. Here's how the method getColumnText is implemented in IndividualItemProvider:

        public String getColumnText(Object o, int index ){
                if( index == 0 ){
                        return getText(o);
                }
                else{
                        Object f = getParent(o);
                        if( f instanceof Family ){
                                if( index == 1 && ((Family)f).getFather() != null ){
                                        // father
                                        return getText(((Family)f).getFather());                
                                }
                                else if( index == 2 && ((Family)f).getMother() != null ){
                                        // mother
                                        return getText(((Family)f).getMother());                
                                }
                        }
                }
                return "unknown";
        }

Heres the customized version of the editor, showing the table tree:

Menus

The generated ActionBarContributor is responsible for the popup menus, toolbar and menu bar items. The popup menu contents depend only on the selected elements, not the active viewer.

The menu items New Child and New Sibling are somewhat confusing in this context, so I have changed the ActionBarContributor to just have the submenu Add New, with menu items Family, Male, Female.

Conclusions

This article has introduced the process of plug-in development using EMF and shown how to start customizing the EMF generated editor code for your own use. By using EMF in your own plug-ins you can benefit from reusing user interface parts that are based on EMF. When you are familiar with the framework, you can quickly build functional new editors and views.

For more information about EMF, see the EMF tutorial (in the Eclipse Help for EMF), documentation, and the EMF newsgroup (news://www.eclipse.org/eclipse.tools.emf).

Java and all Java-based trademarks and logos are trademarks or registered trademarks of Sun Microsystems, Inc. in the United States, other countries, or both.