| Eclipse Corner Article |

Summary
OpenGL is a vendor-neutral, multi-platform standard for creating high-performance 2D and 3D graphics. Hardware and software implementations exist on various operating systems, including Windows, Linux and MacOS. OpenGL may be used to render simple 2D charts or complex 3D games. This article describes an experimental Eclipse plug-in that facilitates the use of OpenGL for drawing onto SWT widgets. A short history and overview of OpenGL is presented, followed by an example application.
By Bo Majewski, Cisco Systems, Inc.
April 15, 2005 (Eclipse 3.2 Update added June 15, 2006)
As of Eclipse 3.2, OpenGL support has migrated into the org.eclipse.swt project and is officially supported there. This is the new preferred way of drawing with OpenGL in SWT, as opposed to the Experimental OpenGL plug-in which was used previous to eclipse 3.2 and appears throughout this article. While this article is still relevant to using OpenGL in SWT, its example code does not map to the Eclipse 3.2 OpenGL API. For more information about OpenGL support in Eclipse 3.2 see http://www.eclipse.org/swt/opengl/.
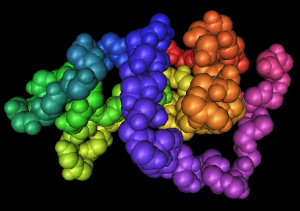
As the common saying goes, a picture is worth a thousand words. Or a thousand database records. In a world flush with terabytes of data, gaining an understanding of information often requires an effective way to visualize it. A field of molecular biology, specifically proteomics, is a good example. The raw data, in the form of an amino acid sequence, is insufficient to understand the function of a given protein. Only knowing a full 3D structure of it can one gain a deeper comprehension of the protein's purpose and the way that it fulfills its tasks (see Figure 1).
|
KVFERCELARTLKRLGMDGYRGISLANWMCLAKWESGYNTRATNY NAGDRSTDYGIFQINSRYWCNDGKNPGAVNACHLSCSALLQDNIA DAVACAKRVVRDPQGIRAWVAWRNRCQNRDVRQYVQGCGV ATOM 1 N LYS A 1 19.534 32.582 38.371 1.00 25.04 N ATOM 2 CA LYS A 1 18.911 32.387 37.062 1.00 25.51 C ATOM 3 C LYS A 1 17.908 33.472 36.753 1.00 27.65 C ATOM 4 O LYS A 1 17.251 33.988 37.643 1.00 29.70 O ATOM 5 CB LYS A 1 18.184 31.056 37.123 1.00 27.48 C ATOM 6 CG LYS A 1 17.069 30.921 36.093 1.00 24.63 C ATOM 7 CD LYS A 1 16.059 29.845 36.488 1.00 20.32 C ATOM 8 CE LYS A 1 14.972 29.702 35.432 1.00 17.75 C ATOM 9 NZ LYS A 1 14.270 28.408 35.603 1.00 22.15 N ATOM 10 N VAL A 2 17.863 33.900 35.497 1.00 28.50 N ATOM 11 CA VAL A 2 16.885 34.898 35.083 1.00 30.21 C ATOM 12 C VAL A 2 15.664 34.300 34.397 1.00 28.35 C … |
|
Eclipse ships with the Standard Widget Toolkit (SWT) which provides access to native widget functionality through a platform-independent API. While the toolkit provides a rich selection of widgets, graphics support was somewhat limited. The SWT Graphics [1] package provided basic functionality needed to do 2D drawings, from rendering 2D primitives such as lines, arcs, rectangles and ovals, through clipping, text drawing and image display.
The Draw2D plug-in that builds on top of SWT
provides lightweight rendering and layout capabilities.
The lightweight term means that you need only one native widget (i.e. heavy widget),
such as a Canvas to draw multiple figures. Layout functionality
allows you to automatically position multiple IFigures. If your goal was
to develop a charting package for Eclipse, Draw2D would provide a good
start.
Until recently, in order to utilize advanced 2D graphics, one possible approach
was to use Java2D. By relying on a BufferedImage a developer could
use Java2D APIs to draw in memory, transfer the image to an SWT image, and
then render it on any SWT component (see [2]
for details). However, the drawback of this technique was added storage
and processing time requirements. These limitations were overcome
in milestone 5 of the 3.1 release through a new SWT API that utilizes native
Cairo or GDI+ graphics
libraries. Developers now can use
transparency, rotation, shearing, brushes, pens and many more techniques
for enhancing graphical output, directly in SWT. Unfortunately, even with these additions,
the realm of high-performance 3D graphics is still out of reach.
To address this need, a
plug-in was developed that
enabled OpenGL rendering onto an SWT Drawable. While the
plug-in is still experimental, it can be used to create high-impact,
high-performance graphics in Eclipse plug-ins and SWT applications. The goal of this article is to give
the reader a gentle introduction to the world of OpenGL and its use in SWT.
Immediately I am going to provide caveat lector. The subjects of 3D
rendering and OpenGL are so vast that they are well beyond the scope
of this short writeup. Readers interested in either of the topics
are encouraged to explore the available pool of extensive literature, some of which
has been listed in the Bibliography section.
Hands-on experience may be gained by following various online tutorials,
with NeHe Productions providing a
particularly good selection of 48 OpenGL lessons.
Open Graphics Library, or OpenGL for short, traces its roots to SGI's IRIS GL. Its first public release was made available on July 1, 1992. It went through six revisions, culminating in version 2.0 published on September 7, 2004. The main goal of OpenGL is to provide an efficient and easy-to-use API for creating 2D and 3D computer graphics. Interestingly, and in part due to the fact that it was designed when hardware capable of rendering 3D scenes efficiently was expensive and often only available on a central server, OpenGL can work transparently across a network. OpenGL was designed to be cross-platform, and as a consequence is devoid of methods, also known as commands, for performing windowing tasks or obtaining user input. Instead, the bulk of the calls specify vertices or properties of geometric primitives, such as points, lines, triangles, quads and polygons. Properties may define colors, textures, and material properties such as how they interact with light. Through these and other calls that deal with light sources, scene depth and angles, OpenGL allows one to build sophisticated 3D scenes. Some of the features that go beyond regular graphics are listed below.
OpenGL concentrates on core 2D and 3D functionality, and as such does not provide high-level commands that describe complex 3D models and their dependencies. As a result, a few extensions have been added for working with higher-level structures. In particular, the OpenGL Utility Library (GLU [9]) provides a number of APIs that allow one to create more complex objects with ease. Disks, cylinders, spheres, and nonuniform rational B-splines (NURBS for short) are a few such examples.
Each GL command consists of the library prefix,
followed by the command name, followed by an optional argument
count, and ends with an optional argument type. This is illustrated in Figure 2. For example,
the glVertex3f has the library prefix gl,
the command Vertex, and it takes 3 arguments
of the type float. The parameter count varies between
2 and 4, and parameters may be of type double (d), float (f),
integer (i), short (s), byte (b), unsigned integer (ui),
unsigned short (us), unsigned byte (ub), or a vector of any
of these types (*v).

One may roughly divide OpenGL methods into two types: those that
specify parameters of geometric primitives and those that alter
the state of the drawing engine. Because of this, OpenGL is often
described as a state machine. Parameters such as color,
projection transformation, line and polygon stipple patterns
are said to be part of the state of the OpenGL machine.
State can be changed by calling methods such as
glColor*() or glLight*(). In order
for state variables to impact rendering, you need to
enable or disable them with the glEnable()
and glDisable() methods, respectively. While the
full description of the OpenGL state machine
[6] is well beyond the scope of this
article, the basic concept is simple. You can put the rendering engine
in a state by, for instance, defining the current color as blue, and from then on
all objects are drawn with this attribute until that particular state
variable is changed.
Drawing of objects follows the begin/end paradigm.
You indicate to the rendering engine, by passing the appropriate value to
the glBegin(int) method, what you are going to draw. Next,
you specify one or more vertices of the object's surface. Finally, you end drawing
by calling the glEnd() method.
There are ten geometric objects that can be drawn this way: points,
line segment strips, line segment loops, individual line segments,
polygons, triangle strips, triangle fans, individual triangles,
quad strips, and individual quads (quads are four-vertex surfaces such as
rectangles, squares and rhomboids).
For example, if you specify that you are drawing line strips, the first
vertex specifies the starting point of line segments, and every subsequent
vertex defines the end of the previous segment and the start of the next.
If you specify i > 1 vertices, i-1 connected segments are
drawn. For efficiency reasons, querying the state of the OpenGL machine between
the begin and end calls is not guaranteed to return correct values. A single
scene may consist of one or more begin/end blocks.
SWT exposes the functionality of OpenGL version 1.1. It consists
of three core classes and one data class. The core classes are
GLContext, GL and GLU.
The GLContext provides a bridge between SWT and OpenGL.
A context must be created with a Drawable, usually an
SWT Canvas, on which OpenGL renders its scenes. It is
important that the context be disposed when no longer needed. Also,
it is erroneous to attempt to render a scene once the drawable has
been disposed. Every time the drawable is resized, the
context must be notified about it through a call to its resize
method. The call allows the context to adjust its view port and perspective
parameters. The Laying
Groundwork section describes a class that
takes care of most of these tasks.
A scene may be drawn by making a series of calls to methods defined
in the GL and GLU classes once the
context is made current.
The GL class exposes over 330 commands. There are
essentially one-to-one mappings between methods
defined in the GL and GLU classes
and their native counterparts. Figure 3 provides
sample code that draws a triangle. For every gl*
function in C, there is a corresponding GL.gl* Java method, and
for every enumerated value GL_* in C,
there is an equivalent GL.GL_* Java constant.
Adopting the same APIs in the SWT OpenGL plug-in makes it easy for those
familiar with the C language APIs to code in Java.
void drawScene() {
    glClear(GL_COLOR_BUFFER_BIT
        | GL_DEPTH_BUFFER_BIT);
    glLoadIdentity();
    glTranslatef(0.0f, 0.0f, -5.0f);

    glBegin(GL_TRIANGLES);
        glVertex3f(-1.0f, -1.0f, 0.0f);
        glVertex3f(1.0f, -1.0f, 0.0f);
        glVertex3f(0.0f, 1.0f, 0.0f);
    glEnd();

    glutSwapBuffers();
}
|
public void drawScene() {
    GL.glClear(GL.GL_COLOR_BUFFER_BIT
        | GL.GL_DEPTH_BUFFER_BIT);
    GL.glLoadIdentity();
    GL.glTranslatef(0.0f, 0.0f, -5.0f);

    GL.glBegin(GL.GL_TRIANGLES);
        GL.glVertex3f(-1.0f, -1.0f, 0.0f);
        GL.glVertex3f(1.0f, -1.0f, 0.0f);
        GL.glVertex3f(0.0f, 1.0f, 0.0f);
    GL.glEnd();

    glContext.swapBuffers();
}
|
The OpenGL plug-in relies on the JNI interface to access the native OpenGL
libraries. The native interface consists of roughly two parts. First,
as OpenGL was designed to be free of hardware and operating system dependencies,
the GL and GLU calls can be translated to
identical calls under all operating systems.
Thus, on all three platforms you can see the following code
for the glBegin method:
JNIEXPORT void JNICALL GL_NATIVE(glBegin)
	(JNIEnv *env, jclass that, jint arg0)
{
	GL_NATIVE_ENTER(env, that, glBegin_FUNC);
	glBegin(arg0);
	GL_NATIVE_EXIT(env, that, glBegin_FUNC);
}
The difference between the three available implementations is how the SWT drawable is hooked up with the native GL context. This code is internal to the SWT OpenGL plug-in and is platform-dependent. For example, both the GTK and Motif implementations use GLX, "the glue connecting OpenGL and the X Windowing System", while the Windows native interface is provided through a similar Windows library called WGL. At the time of this writing there was no plug-in for Apple's OpenGL for Mac OS.
There exist alternative solutions for performing 3D drawing in Java. For example, Sun maintains Java 3D, which unlike OpenGL, provides a set of object-oriented interfaces that support a high-level programming model for building, rendering, and controlling the behavior of 3D objects. Closer to the spirit of the SWT OpenGL plug-in is the JOGL project, which provides access to OpenGL commands for drawing on AWT and Swing components. While both solutions are more mature than the SWT OpenGL plug-in project, they both target Swing and AWT, and therefore do not tie in to the Eclipse environment and SWT as directly as the SWT OpenGL plug-in does.
In the following sections I describe a simple application that shows a
3D chart of four quantities. The application uses
GLScene, which is a utility class for displaying OpenGL scenes.
In order to facilitate looking at a scene from various angles
and zoom levels, a scene grip is added; the
grip uses either the mouse or the keyboard to do zooming and
panning. Both the GLScene class and the grip are of a generic nature and may
be reused in other applications that use OpenGL. These components
are described first.
The GLScene class is similar to SWT's
Canvas. However, rather than using
a GC to draw on it, its content is
rendered by OpenGL commands. This is achieved by associating
a GLContext with an SWT Canvas
and making it the current context whenever a scene is
rendered by the commands defined in the drawScene
method.
 1 public class GLScene {
 2     private GLContext context;
 3     private Canvas canvas;
 4
 5     public GLScene(Composite parent) {
 6         this.canvas = new Canvas(parent, SWT.NONE);
 7         this.canvas.addControlListener(new ControlAdapter() {
 8             public void controlResized(ControlEvent e) {
 9                 resizeScene();
10             }
11         });
12         this.canvas.addDisposeListener(new DisposeListener() {
13             public void widgetDisposed(DisposeEvent e) {
14                 dispose();
15             }
16         });
17         this.init();
18         Rectangle clientArea = parent.getClientArea();
19         this.canvas.setSize(clientArea.width, clientArea.height);
20     }
In the constructor, a new SWT Canvas is created. This is
the canvas that is associated with a GLContext
instance. Immediately, two listeners are registered on it. The first
listener makes sure that whenever the canvas is resized the GLContext
is notified and appropriately resized. The second listener takes care of
disposing the context once the canvas is disposed. In order to make sure
that the rendering area is of non-zero size, the client rectangle of
the parent is fetched and used to set the initial size of the canvas.
This size may later be changed either by a layout manager or user
actions.
22     protected void resizeScene() {
23         Rectangle rect = this.canvas.getClientArea();
24         this.context.resize(0, 0, rect.width, rect.height);
25     }
26
27     protected void dispose() {
28         if (this.context != null) {
29             this.context.dispose();
30             this.context = null;
31         }
32     }
GLScene uses the entire area of the canvas for
drawing. Whenever the canvas is resized, we fetch the client area and
pass the new width and height to the context. Based on the new width
and height, the context adjusts the view appropriately.
Disposing the canvas (line 27) requires that we dispose the context.
This is particularly important in operating systems where a limited
number of device contexts are available. To prevent multiple calls to
the dispose method of the context, once it is disposed it
is set to null.
34     protected void init() {
35         this.initGLContext();
36         this.initGL();
37     }
38
39     protected void initGLContext() {
40         this.context = new GLContext(this.canvas);
41         this.context.setCurrent();
42     }
43
44     protected void initGL() {
45         GL.glClearColor(0.0f, 0.0f, 0.0f, 0.0f);
46         GL.glClearDepth(1.0f);
47         GL.glDepthFunc(GL.GL_LEQUAL);
48         GL.glEnable(GL.GL_DEPTH_TEST);
49         GL.glShadeModel(GL.GL_SMOOTH);
50         GL.glHint(GL.GL_PERSPECTIVE_CORRECTION_HINT, GL.GL_NICEST);
51     }
The GLScene initialization is split into two parts:
initializing the context and initializing the state machine of
OpenGL. For the context, we simply create a new GLContext and make it
current. OpenGL rendering always draws on the current
context, and thus if you have more than one GLScene
active, it is important to make its context current before any
drawing takes place. The initGL method is a bit more
interesting. It begins by specifying the color used to clean color buffers
(black). Next, the
depth buffer is set up; line 46 establishes the
depth value used when the depth buffer is cleared (this value must be between 0.0 and 1.0), and line 47 specifies how
depth value comparisons are done. This comparison function is used to
reject or accept incoming pixels, and
GL.GL_LEQUAL in particular accepts only those pixels that are
closer to or at an equal distance from the viewer. Line 48 enables
depth testing, since as was mentioned before, not only must the OpenGL state machine
be set in a particular state, but the state must also be enabled in order to
impact rendering. The
next line sets the shade model to GL.GL_SMOOTH, which
interpolates colors (smooths them out) if two vertices
of a surface have different colors. Finally, line 50 asks
the rendering engine to put a significant effort into the computing of color and texture coordinate interpolation.
On older and slower hardware you may wish to use GL.GL_FASTEST
or GL.GL_DONT_CARE instead.
53     public void render() {
54         if (!this.context.isCurrent()) {
55             this.context.setCurrent();
56         }
57
58         this.drawScene();
59         this.context.swapBuffers();
60     }
61
62     protected void drawScene() {
63         GL.glClear(GL.GL_COLOR_BUFFER_BIT | GL.GL_DEPTH_BUFFER_BIT);
64         GL.glLoadIdentity();
65     }
The final two methods of the GLScene class deal with
repainting and scene drawing. The first method is exposed to other
classes and should be used whenever a repaint of the scene is
needed. As an example, one could repeatedly call it to display
animation. The second method is meant to be overridden by
extending classes. Its default implementation simply clears the color and depth buffers and
restores the coordinate system by loading the identify matrix.
One of the nice things about 3D is that it allows you to view scenes
in perspective, with obstructed objects hidden. However,
sometimes you might want to view a scene from a different angle, so
that what was hidden becomes visible and what was in the foreground
moves to the background. OpenGL provides two methods that can be
used to achieve just that. The glRotate method allows
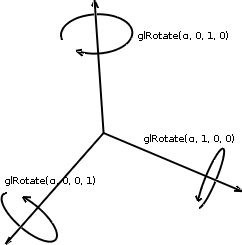
you to rotate your scene by any angle in the x, y and z planes.
For example, GL.glRotatef(180f, 0f, 1f, 0f) rotates
the scene by 180 degrees and thus makes its furthest point become the
closest to the viewer. GL.glRotatef(180f, 1f, 0f, 0f)
flips the scene upside down (see Figure 4).
Scene translation can be achieved by calling the GL.glTranslate
method, which takes three parameters, x, y and z,
to indicate how many units to move the scene in each direction. For
example, GL.glTranslatef(5f, -1f, -2f) moves the
scene 5 units to the right, 1 unit down, and 2 units away from the viewer.
In order to provide the ability to move and rotate a scene, we
need to perform the appropriate transformation before the scene is
being rendered. The solution developed in this article relies on an
external class, a SceneGrip, that does necessary rotations
and translations. How much the scene is transformed is dictated by
internal variables. These, in turn, are adjusted on key and mouse events.
 31 public class SceneGrip extends MouseAdapter
 32                        implements MouseMoveListener, Listener, KeyListener {
 33     private float xrot;
 34     private float yrot;
 35     private float zoff;
 36     private float xoff;
 37     private float yoff;
...
 45     public SceneGrip() {
 46         this.init();
 47     }
 48
 49     protected void init() {
 50         this.xrot = this.yrot = 0.0f;
 51         this.xoff = this.yoff = 0.0f;
 52         this.zoff = -8.0f;
 53     }
The class defines two variables that store the current angle of the rotation along the x and y axis. In addition, three variables remember by how much to move a scene in each of the three directions. The initial values of all of the variables, except for the z offset, are set to 0.0f. The offset along the z axis is set to -8.0f so that the scene has some separation from the viewer. Setting z offset to 0.0f would be equivalent to jamming the scene up against the viewer's nose.
 99     public void keyPressed(KeyEvent e) {
100         switch (e.keyCode) {
101         case SWT.ARROW_UP:
102             if ((e.stateMask & SWT.CTRL) != 0) {
103                 this.xrot -= 0.5f;
104             } else {
105                 this.yoff += 0.05f;
106             }
107             break;
108         case SWT.ARROW_DOWN:
109             if ((e.stateMask & SWT.CTRL) != 0) {
110                 this.xrot += 0.5f;
111             } else {
112                 this.yoff -= 0.05f;
113             }
114             break;
115         case SWT.ARROW_LEFT:
116             if ((e.stateMask & SWT.CTRL) != 0) {
117                 this.yrot -= 0.5f;
118             } else {
119                 this.xoff -= 0.05f;
120             }
121             break;
122         case SWT.ARROW_RIGHT:
123             if ((e.stateMask & SWT.CTRL) != 0) {
124                 this.yrot += 0.5f;
125             } else {
126                 this.xoff += 0.05f;
127             }
128             break;
129         case SWT.PAGE_UP:
130             this.zoff += 0.05f;
131             break;
132         case SWT.PAGE_DOWN:
133             this.zoff -= 0.05f;
134             break;
135         case SWT.HOME:
136             this.init();
137             break;
138         }
139     }
Upon receiving a key event, we adjust the offset and rotation variables. The convention used here is that if the Ctrl key is pressed, pressing arrow keys rotates the scene. Otherwise, pressing arrow keys moves the scene. For example, when the arrow up key is pressed we either increase the y offset, moving the scene up, or decrease the x angle, twisting the scene so that the part closest to the viewer is lifted up, and the part furthest away from the user is rotated down. The left arrow performs a similar function for the x offset or y axis rotation. Page up and page down keys are used to zoom in and out. Finally, hitting the Home key restores the scene to its original settings. (The step size values chosen here work well for small scenes. For larger scenes, the step size should be calculated based on how far the viewer is from the center of the scene. However, for simplicity this has been omitted in this example.)
144     public void adjust() {
145         GL.glTranslatef(this.xoff, this.yoff, this.zoff);
146         GL.glRotatef(this.xrot, 1.0f, 0.0f, 0.0f);
147         GL.glRotatef(this.yrot, 0.0f, 1.0f, 0.0f);
148     }
The adjust method performs necessary translations and
rotations of the scene. Just like other OpenGL operations, they
are applied to the current context. As the reader may notice, the
translations can be performed in one call. However, to enable independent
rotation in the x and y axis, two glRotatef calls passing the
appropriate x and y angles are made. To make use of the
scene grip, the GLScene class needs to be modified. When
creating a new instance, a scene grip must be created and register as
a listener of mouse, mouse move, and key events of the SWT canvas. In drawScene,
a call must be made to the adjust method before any GL
calls are made (see next section).
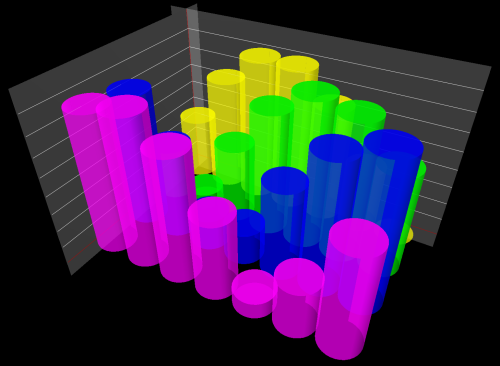
With all the above preparations, we are ready to dive into the main application. The chart shows four sets of data. Each set consists of the same, fixed number of points, each point being a positive value between 0.0 and 10.0. These requirements are intentionally simple, so that the brunt of the work can go into developing OpenGL code rather than dealing with issues of scaling, missing points, disparate axis ranges, and other challenges that a true charting application needs to address.
The demo runs as a very simple Eclipse view (a stand-alone SWT
application is
also included in the provided source code). The only
interesting addition is the Refresher, which
periodically forces repainting of the OpenGL scene.
This way, as the viewpoint is moved or rotated, the up-to-date
rendering is shown in the component. The refresher, which is launched
just after the SWT control for the view
is created, repeatedly calls the
redraw method of the scene. The calls are spaced
every 100ms, giving it a theoretical rate of 10 frames per second.
13 public class Refresher implements Runnable {
14     public static final int DELAY = 100;
15
16     private GLScene scene;
17
18     public Refresher(GLScene scene) {
19         this.scene = scene;
20     }
21
22     public void run() {
23         if (this.scene != null && !this.scene.isDisposed()) {
24             this.scene.render();
25             this.scene.getDisplay().timerExec(DELAY, this);
26         }
27     }
28 }
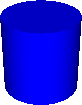
The values of points of each data set are represented by cylinders. Rendering a cylinder can be achieved by executing three GLU calls: two to render the disks needed at both ends of the cylinder, and one to render the cylinder walls. For example, to draw a cylinder 2 units long, you could use the code shown in Figure 5.
1 int qobj = GLU.gluNewQuadric(); 2 GL.glRotatef(-90.0f, 1.0f, 0.0f, 0.0f); 3 GLU.gluDisk(qobj, 0.0, 1.0, 32, 1); 4 GLU.gluCylinder(qobj, 1.0f, 1.0, 2.0, 32, 1); 5 GL.glTranslatef(0.0f, 0.0f, 2.0f); 6 GLU.gluDisk(qobj, 0.0, 1.0, 32, 1); 7 GL.glTranslatef(0.0f, 0.0f, -2.0f); 8 GL.glRotatef(90.0f, 1.0f, 0.0f, 0.0f); 9 GLU.gluDeleteQuadric(qobj); |
|
The first line allocates a new quadric needed by the disk and cylinder calls. The scene is then rotated by -90 degrees, so that the cylinder is drawn upright. Next, the bottom disk is rendered, followed by the cylinder walls (the value of 32 indicates how many slices are to be used to approximate the circular perimeter of both, and gives a fair approximation of roundness). Before we can draw the top disk, we need to move 2 units along the z-axis, which is done by performing a scene translation. The final disk is then drawn and the coordinate system is restored by moving back by 2 units and twisting it in the opposite direction. Finally, the quadric that was allocated in line 1 is deleted.
While this approach works, it is also time-consuming. When drawing one cylinder the inefficiency is not a problem, but rendering hundreds of them could severely impact the program's performance. OpenGL provides a solution for such situations, allowing us to perform a cooking show trick - rather than "baking" the scene in front of a live audience, we can ask OpenGL to use the one we prepared earlier. This trick can be done by using display lists.
A display list is a collection of compiled OpenGL commands. A list
is defined by the set of commands placed between the
glNewList(int list, int mode) and glEndList()
method calls. The first parameter must be a positive integer that
uniquely identifies the display list being created. You can ask
GL to create one or more list identifiers for you, using the
glGenLists(int n)
method. The second glNewList parameter specifies whether the list is compiled
or compiled and immediately executed. Most of the time you probably just
want to compile the list. Later, you can display the list by
calling the glCallList(int list) method with the
identifier of the list to be displayed. For example, the triangle
code shown in Figure 3 could be turned into a list using the
following code:
triangle = GL.glGenLists(1);
GL.glNewList(triangle, GL.GL_COMPILE);
    GL.glBegin(GL.GL_TRIANGLES);
        GL.glVertex3f(-1.0f, -1.0f, 0.0f);
        GL.glVertex3f(1.0f, -1.0f, 0.0f);
        GL.glVertex3f(0.0f, 1.0f, 0.0f);
    GL.glEnd();
GL.glEndList();
To display it in, for instance, the drawScene method, you would simply
call glCallList(triangle). Finally, you should also delete
any lists no longer needed by calling the glDeleteLists(int list, int range)
method. If you allocated just one list, the range is set
to 1.
In the charting application we are using two kinds of display lists,
one to represent a particular value in a chart, and the other to
draw chart axes. To simplify chart rendering, I defined a common
base class, the CompiledShape. In the constructor, it
grabs the next available list index. In addition, it defines three
methods: one for accessing the list index (line 8), one for rendering the
pre-compiled list (line 12), and one for deleting it (line 16).
 1 public abstract class CompiledShape {
 2     private int listIndex;
 3
 4     public CompiledShape() {
 5         this.listIndex = GL.glGenLists(1);
 6     }
 7
 8     public int getListIndex() {
 9         return this.listIndex;
10     }
11
12     public void draw() {
13         GL.glCallList(this.getListIndex());
14     }
15
16     public void dispose() {
17         GL.glDeleteLists(this.getListIndex(), 1);
18     }
19 }
The values of the chart are represented by instances of
the CompiledShape class. Note that CompiledShape
does not create a display list, but leaves this task to the constructors
of extending classes. For the BarValue we reuse the
same quadric for each generated list. For a value passed to the
constructor, we build a cylinder in a similar manner as previously
described. The only two significant differences here are that the cylinder is
compiled into a display list (lines 6-14), and the specified value
is used to render the cylinder height (lines 8 and 10).
 1 private static class BarValue extends CompiledShape {
 2     public static final float RADIUS = 1.0f;
 3     public static int QUADRIC;
 4
 5     public BarValue(float value) {
 6         GL.glNewList(this.getListIndex(), GL.GL_COMPILE);
 7         GL.glRotatef(-90.0f, 1.0f, 0.0f, 0.0f);
 8         GLU.gluCylinder(BarValue.QUADRIC, RADIUS, RADIUS, value, 32, 1);
 9         GLU.gluDisk(BarValue.QUADRIC, 0.0, RADIUS, 32, 32);
10         GL.glTranslatef(0.0f, 0.0f, value);
11         GLU.gluDisk(BarValue.QUADRIC, 0.0, RADIUS, 32, 32);
12         GL.glTranslatef(0.0f, 0.0f, -value);
13         GL.glRotatef(90.0f, 1.0f, 0.0f, 0.0f);
14         GL.glEndList();
15     }
16 }
The widget on which the chart is drawn is a modification of the previously
introduced GLScene class. It overrides a number of methods
to add functionality needed by the application. Its initGL
method starts by setting up and enabling color blending. This creates
translucent rather than opaque cylinders, allowing us to view chart
values that would normally be hidden. To add the 3D realism, a light
source is set up. It emits a dim white light and a bright diffuse
(directional) light. The light is positioned above and to the left
of the scene. Finally, compiled shapes are created. First the axes
are set up, then bar values are generated. A simple shifted
sinusoidal curve is used for each row.
protected void initGL() {
    super.initGL();

    BarValue.QUADRIC = GLU.gluNewQuadric();
    GL.glBlendFunc(GL.GL_SRC_ALPHA, GL.GL_ONE_MINUS_SRC_ALPHA);
    GL.glEnable(GL.GL_BLEND);
    GL.glEnable(GL.GL_LINE_SMOOTH);
    GLU.gluQuadricNormals(BarValue.QUADRIC, GLU.GLU_SMOOTH);

    GL.glLightfv(GL.GL_LIGHT1,
                 GL.GL_DIFFUSE,
                 new float[] {1.0f, 1.0f, 1.0f, 1.0f});
    GL.glLightfv(GL.GL_LIGHT1,
                 GL.GL_AMBIENT,
                 new float[] {0.5f, 0.5f, 0.5f, 1.0f});
    GL.glLightfv(GL.GL_LIGHT1,
                 GL.GL_POSITION,
                 new float[] {-50.f, 50.0f, 100.0f, 1.0f});
    GL.glEnable(GL.GL_LIGHT1);
    GL.glEnable(GL.GL_LIGHTING);
    GL.glEnable(GL.GL_COLOR_MATERIAL);
    GL.glColorMaterial(GL.GL_FRONT, GL.GL_AMBIENT_AND_DIFFUSE);

    this.axis = new Axis(15.0f, 9.0f, 11.0f);
    this.chart = new BarValue[CHART_COUNT][ROW_LENGTH];
    double slice = Math.PI/ROW_LENGTH;

    for (int i = 0; i < this.chart.length; ++ i) {
        BarValue[] value = this.chart[i];
        double shift = i*Math.PI/4.0;

        for (int j = 1; j <= value.length; ++ j) {
            value[j-1] = new BarValue((float) (8.0*Math.abs(Math.sin(slice*j - shift))));
        }
    }
}
To render the chart we override the drawScene method.
This method first asks the scene grip to adjust the view point. Next,
the axes figure is drawn, followed by the bars. After each bar is drawn,
the coordinate system is moved to the right so that bars are
arranged in a row. After a complete row of bars is rendered, the
coordinate system is translated to the left and forward.
When using light sources it is customary to set up
material properties. These define how each component of light
is reflected by a given material, and whether the material is
shiny or dull. To simplify this procedure, the initGL
method sets up color tracking. This way, material properties are
automatically inferred from the current color. In order to make
cylinders translucent rather than opaque, we use the color command
that defines four rather than three parameters. The fourth parameter is the
alpha composite, which dictates the level of transparency. Objects that have
alpha set to 1.0f are opaque, while objects with an alpha of 0.0f are completely
transparent, and hence effectively invisible.
The program
uses alpha equal to 0.7f to allow some but not all
light to pass through walls of cylinders.
protected void drawScene() {
    super.drawScene();
    this.grip.adjust();

    GL.glLineWidth(1.0f);
    this.axis.draw();
    GL.glTranslatef(BarValue.RADIUS, 0.0f, BarValue.RADIUS);

    for (int i = 0; i < this.chart.length; ++ i) {
        BarValue[] value = this.chart[i];
        GL.glColor4fv(COLOR[i % COLOR.length]);

        for (int j = 0; j < value.length; ++ j) {
            value[j].draw();
            GL.glTranslatef(2.0f*BarValue.RADIUS, 0.0f, 0.0f);
        }

        GL.glTranslatef(-2.0f*BarValue.RADIUS*value.length,
                        0.0f,
                        2.0f*BarValue.RADIUS + 0.5f);
    }
}
The dispose method is used to free resources used by the
program. First, the quadric used by GLU to render cylinders and disks
is destroyed. Next, all display lists used by bars are freed, as well
as the list used to display the axes. Finally, the parent's dispose
method is called to dispose the context.
public void dispose() {
    GLU.gluDeleteQuadric(BarValue.QUADRIC);

    for (int i = 0; i < this.chart.length; ++ i) {
        BarValue[] value = this.chart[i];

        for (int j = 0; j < value.length; ++ j) {
            value[j].dispose();
            value[j] = null;
        }
    }

    this.axis.dispose();
    super.dispose();
}
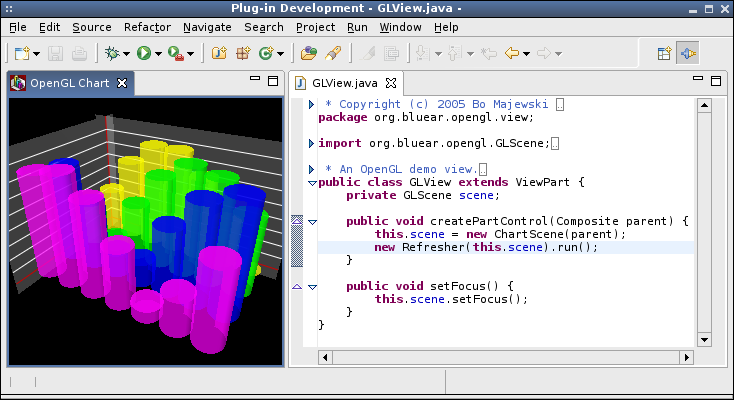
The end result is shown in Figure 6. The view point can be moved around and rotated using either the mouse left or right buttons or the keyboard. Depending on the angle from which the chart is inspected, one can observe different interaction of the light source and objects in the scene. The color blending creates the translucent appearance of cylinders.
![]() To run this article's demo plug-in in your workspace make sure you
have the correct
OpenGL
plug-in installed. Download
demo_plugin.zip which contains an
Eclipse plug-in that defines a view that shows the OpenGL chart.
Unzip it to your Eclipse root directory; it should create the
To run this article's demo plug-in in your workspace make sure you
have the correct
OpenGL
plug-in installed. Download
demo_plugin.zip which contains an
Eclipse plug-in that defines a view that shows the OpenGL chart.
Unzip it to your Eclipse root directory; it should create the
org.bluear.opengl_0.1.0 directory in Eclipse's plugins
folder. Start Eclipse with the -clean switch to ensure
that your newly-installed plug-in is detected. From the
Show View dialog, accessible under the Windows menu,
select the OpenGL Chart view listed in
the OpenGL Examples category.
In order to obtain access to the source code, import the plug-in
as the source project. The code also contains a stand alone version in the
form of an SWT program, with the entry point defined in the Launcher
class. To run it you need to set the java.library.path
variable with the path to both the SWT and OpenGL binary libraries.
GLScene.
This article introduces and presents some of the functionality available
today in the OpenGL plug-in for SWT. While the subject of 3D and OpenGL
is too vast to be fully explored, I tried to give the reader a taste
of what can be achieved. Some of the components and techniques, such
as GLScene and SceneGrip, may be reused
in other 3D applications.
The plug-in is still considered experimental. For example, if you pass a
null array to some GL methods, rather than getting a possible to catch
NullPointerException, you end up with a JVM crash. These
and other issues must be addressed before the final release of the
plug-in.
OpenGL is not the only game in town; one could expect that a Windows-only DirectX plug-in with similar capabilities could be developed. On the other hand, OpenGL has the enormous benefit of being a platform-neutral solution. The majority of the code for this article has been developed under Linux and then tested, without any additional modifications, under Windows. This fits well with the SWT philosophy of using native platform capabilities but exposing them through platform-agnostic APIs. One can only hope that the plug-in will continue to mature and be deployed in other operating systems to which Eclipse has been ported.
I would like to thank Grant Gayed and Ed Burnette for their comments that helped improve the structure and accuracy of this article. My thanks also go to Jill Sueoka for tirelessly reviewing numerous versions that I managed to produce.
| [1] | Joe Winchester, Introduction to SWT Graphics, Eclipse Corner Article, July 2003 |
| [2] | Yannick Saillet, Java 2D imaging for the Standard Widget Toolkit, IBM developerWorks, Jun 2004 |
| [3] | OpenGL Architecture Review Board, Dave Shreiner, Mason Woo, Jackie Neider, Tom Davis, OpenGL Programming Guide, Addison-Wesley, November 14, 2003, ISBN 0321173481. |
| [4] | OpenGL Architecture Review Board, Dave Shreiner, OpenGL Reference Manual, Addison-Wesley, March 16, 2004, ISBN 032117383X. |
| [5] | James D. Foley, Andries van Dam, Steven K. Feiner, John F. Hughes, Computer Graphics: Principles and Practice in C, Addison-Wesley, August 4, 1995, ISBN 0201848406. |
| [6] | The OpenGL Machine, Silicon Graphics, Inc., 1996. |
| [7] | Mark Segal, Kurt Akeley, The OpenGL Graphics System: A Specification (Version 1.1), Silicon Graphics, Inc., 1992-1997. |
| [8] | Richard S Wright, Benjamin Lipchak, OpenGL SuperBible, Sams, 3rd edition, June 30, 2004, ISBN: 0672326019 |
| [9] | Norman Chin, Chris Frazier, Paul Ho, Zacheng Liu, Kevin P. Smith, OpenGL Graphics System Utility Library, Editor Jon Leech, version 1.3, November 1998 |
Java and all Java-based trademarks and logos are trademarks or registered trademarks of Sun Microsystems, Inc. in the United States, other countries, or both.